

构建语义地图时,用的是 octomap_server和 semantic_slam: octomap_generator,不过还是整理下之前的学习笔记。
一、Octomap 安装并使用Octomap_Server
1.1 Apt 安装 Octomap 库
如果你不需要修改源码,可以直接安装编译好的 octomap 库,记得把 ROS 版本「kinetic」替换成你用的:
sudo apt-get install ros-kinetic-octomap*上面这一行命令等价于安装以下的 octomap 组件:
sudo apt-get install ros-kinetic-octomap ros-kinetic-octomap-mapping ros-kinetic-octomap-msgs ros-kinetic-oc注意:上面没有安装 ros-kinetic-octomap-server,原因是我要使用这个包来建图,并且需要修改它,所以在下一步我直接通过编译源码来安装它!
1.2 编译安装 OctomapServer 建图包
因为我要启用八叉树体素栅格的 RGB 颜色支持,需要修改源码,所以必须使用源码编译安装,过程如下:
创建编译用的工作空间
cd 你的一个目录/

# 创建工作空间
mkdir octomap_ws
cd octomap_ws/

# ROS 的工作空间必须包含 src 目录
mkdir src/

# 创建
catkin_make

# 记得 source 环境变量
source devel/setup.zsh
下载编译源码
cd src/
git clone https://github.com/OctoMap/octomap_mapping.git
返回你的工作空间主目录,安装下依赖,然后开始编译:
cd ../

rosdep install octomap_mapping

catkin_make
编译过程基本没有报错,如果你遇到问题,直接复制错误信息浏览器搜索解决,然后启动测试的 launch:
roslaunch octomap_server octomap_mapping.launch没问题的话应该可以用 rostopic list 看到一个 octomap_full 的话题:
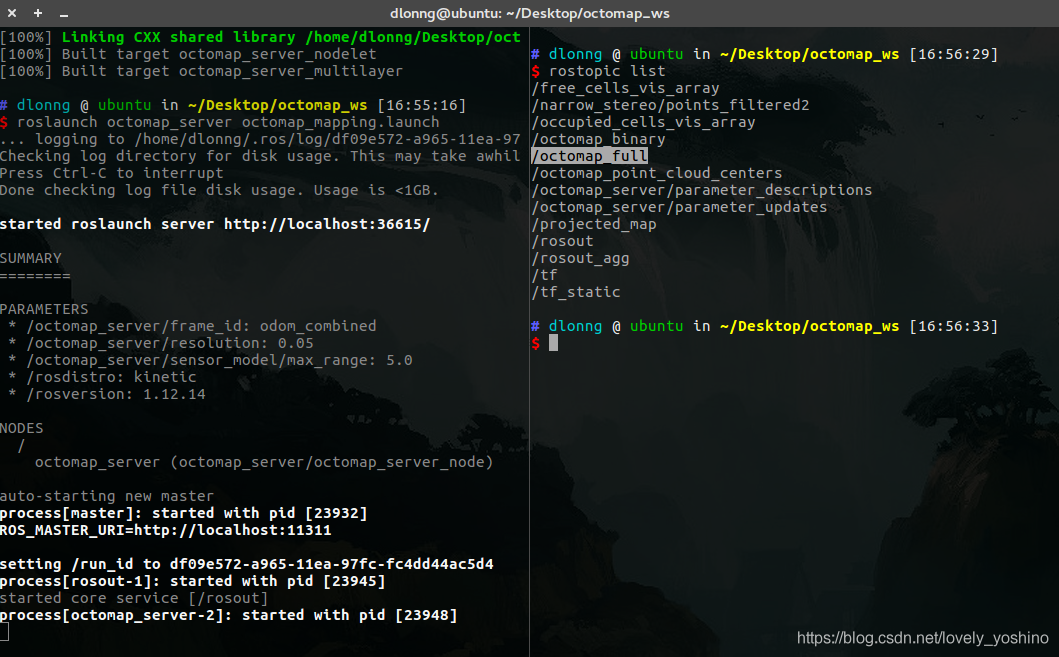
有这个话题说明这个建图包可以正常工作啦:)
1.3 Rviz 可视化 Octomap
ROS 中提供了一个 Rviz 可视化 Octomap 的插件,如果没有安装使用下面的命令即可:
sudo apt-get install ros-kinetic-octomap-rviz-plugins安装后启动 Rviz,直接添加一个八叉树占用网格的类型,第一个是带颜色的类型,第二个不带颜色:
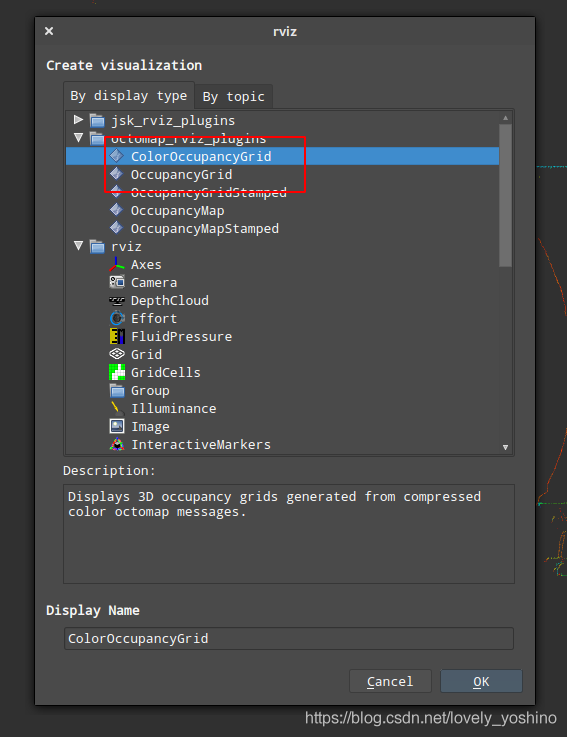
建图节点启动后,选择话题名称为 octomap_full,即可显示出八叉树体素栅格,这是我的实验结果,我用的是第一个带颜色的类型:
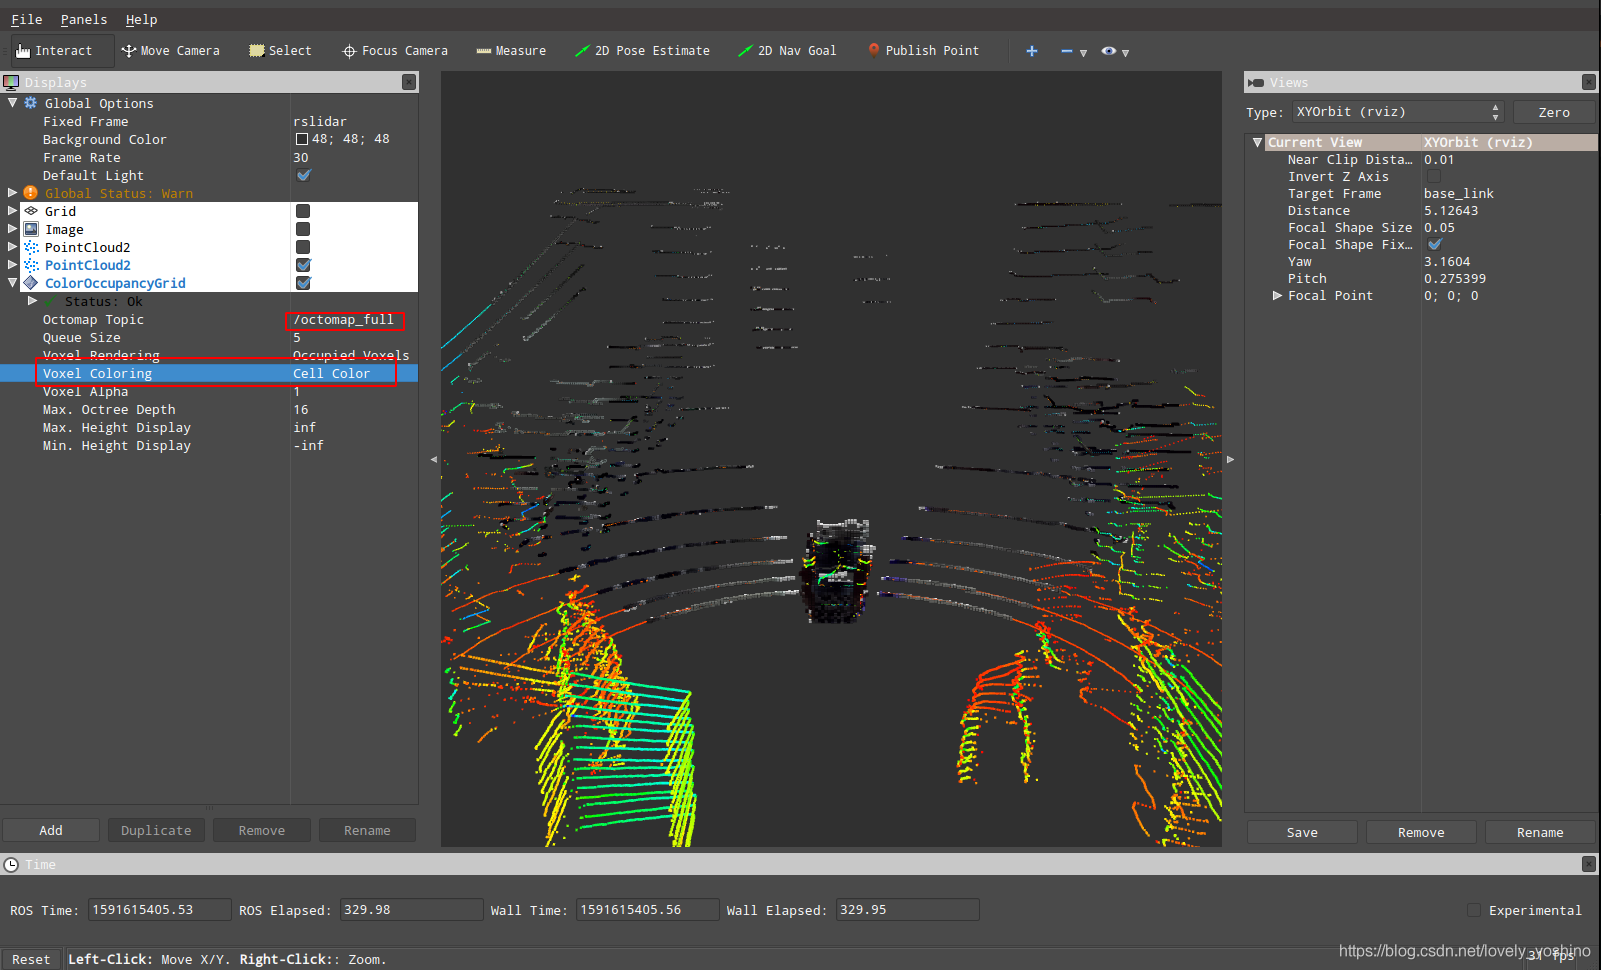
我把点云和体素栅格一起显示了,所以会重叠。这里要注意的是,如果你的点云显示不出来,要检查下「Global Options」的「Fixed Frame」有没有设置正确,我是设置的是 Robosense 雷达的 frame_id:「rslidar」。
1.4 启用 ColorOctomap
默认编译的 octomap 不能显示颜色,要开启颜色的支持,需要 2 个步骤,第一步编辑 OctomapServer.h 文件:
vim octomap_mapping/octomap_server/include/octomap_server/OctomapServer.h打开下面 COLOR_OCTOMAP_SERVER 宏的注释即可:
// switch color here - easier maintenance, only maintain OctomapServer.
// Two targets are defined in the cmake, octomap_server_color and octomap_server. One has this defined, and the other doesn't
// 打开这个注释
#define COLOR_OCTOMAP_SERVER
然后重新编译一遍源码:
cd octomap_ws/

catkin_make
第二步是在使用时,在 launch 文件中禁用 height_map,启用 colored_map,这个配置是我阅读源码查找的,因为官网文档很久没有更新了,一些参数配置方法需要通过阅读源码才能知道:
<param name = "height_map" value = "false" />
<param name = "colored_map" value = "true" />
比如以下是我实验用的 launch 文件:
<launch>
  <node pkg="octomap_server" type="octomap_server_node" name="octomap_server">

    <!-- resolution in meters per pixel -->
    <param name="resolution" value="0.10" />

    <!-- name of the fixed frame, needs to be "/map" for SLAM -->
    <!--
         增量式构建地图时,需要提供输入的点云帧和静态全局帧之间的 TF 变换
    -->
    <param name="frame_id" type="string" value="world" />

    <param name = "height_map" value = "false" />
    <param name = "colored_map" value = "true" />

    <!-- topic from where pointcloud2 messages are subscribed -->
    <!-- 要订阅的点云主题名称 /fusion_cloud -->
    <remap from="/cloud_in" to="/fusion_cloud" />
  </node>
</launch>
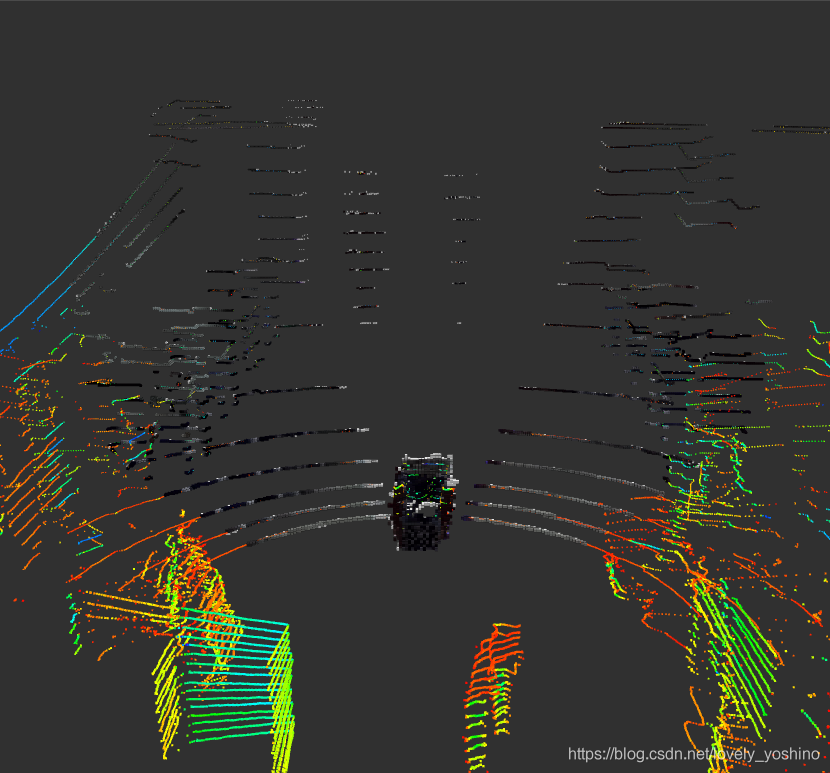
我设置了八叉树帧的 frame 为 rslidar,并将融合的点云话题 /fusion_cloud 作为节点的输入,我没有提供 TF,因为目前只是做了一个单帧的体素栅格构建,效果如下:
二、增量构建八叉树地图步骤
为了能够让 octomap_server 建图包实现增量式的地图构建,需要以下 2 个步骤:

2.1 配置 launch 启动参数
这 3 个参数是建图必备:
- 地图分辨率
resolution:用来初始化地图对象 - 全局坐标系
frame_id:构建的全局地图的坐标系 - 输入点云话题
cloud_in:作为建图的数据输入,建图包是把一帧一帧的点云叠加到全局坐标系实现建图
<launch>
  <node pkg="octomap_server" type="octomap_server_node" name="octomap_server">
    <!-- resolution in meters per pixel -->
    <param name="resolution" value="0.10" />

    <!-- 增量式构建地图时,需要提供输入的点云帧和静态全局帧之间的 TF 变换 -->
    <param name="frame_id" type="string" value="map" />

    <!-- 要订阅的点云主题名称 /fusion_cloud -->
    <remap from="/cloud_in" to="/fusion_cloud" />
  </node>
</launch>
以下是所有可以配置的参数:
frame_id (string, default: /map)
Static global frame in which the map will be published. A transform from sensor data to this frame needs to be available when dynamically building maps.
resolution (float, default: 0.05)
Resolution in meter for the map when starting with an empty map. Otherwise the loaded file’s resolution is used
height_map (bool, default: true)
Whether visualization should encode height with different colors
color/[r/g/b/a] (float)
Color for visualizing occupied cells when ~heigh_map=False, in range [0:1]
sensor_model/max_range (float, default: -1 (unlimited))
动态构建地图时用于插入点云数据的最大范围(以米为单位),将范围限制在有用的范围内(例如5m)可以防止虚假的错误点。
sensor_model/[hit|miss] (float, default: 0.7 / 0.4)
动态构建地图时传感器模型的命中率和未命中率
sensor_model/[min|max] (float, default: 0.12 / 0.97)
动态构建地图时的最小和最大 clamp 概率
latch (bool, default: True for a static map, false if no initial map is given)
不管主题是锁定发布还是每次更改仅发布一次,为了在构建地图(频繁更新)时获得最佳性能,请将其设置为 false,如果设置为 true,在每个地图上更改都会创建所有主题和可视化。
base_frame_id(string, default: base_footprint)
The robot’s base frame in which ground plane detection is performed (if enabled)
filter_ground(bool, default: false)
动态构建地图时是否应从扫描数据中检测并忽略地平面,这会将清除地面所有内容,但不会将地面作为障碍物插入到地图中。如果启用此功能,则可以使用 ground_filter 对其进行进一步配置
ground_filter/distance (float, default: 0.04)
将点(在 z 方向上)分割为接地平面的距离阈值,小于该阈值被认为是平面
ground_filter/angle (float, default: 0.15)
被检测平面相对于水平面的角度阈值,将其检测为地面
ground_filter/plane_distance (float, default: 0.07)
对于要检测为平面的平面,从 z = 0 到距离阈值(来自PCL的平面方程的第4个系数)
pointcloud_[min|max]_z (float, default: -/+ infinity)
要在回调中插入的点的最小和最大高度,在运行任何插入或接地平面滤波之前,将丢弃此间隔之外的任何点。您可以以此为基础根据高度进行粗略过滤,但是如果启用了 ground_filter,则此间隔需要包括接地平面。
occupancy_[min|max]_z (float, default: -/+ infinity)
最终 map 中要考虑的最小和最大占用单元格高度,发送可视化效果和碰撞 map 时,这会忽略区间之外的所有已占用体素,但不会影响实际的 octomap 表示。
filter_speckles(bool)
是否滤除斑
2.2 要求 TF 变换
有了全局坐标系和每一帧的点云,但是建图包怎么知道把每一帧点云插入到哪个位置呢?
因为随着机器人的不断移动,会不断产生新的点云帧,每个点云帧在全局坐标系中插入的时候都有一个确定的位置,否则构建的地图就不对了,因此需要给建图包提供一个当前帧点云到全局坐标系的位姿,这样建图包才能根据这个位姿把当前获得的点云插入到正确的位置上。
在 ROS 中可以很方便的使用 TF 来表示这个变换,我们只需要在启动建图包的时候,在系统的 TF 树中提供「cloud frame -> world frame」的变换就可以了:
cloud frame -> world frame (static world frame, changeable with parameter frame_id)注意:
cloud frame:就是输入点云话题中 head.frame_id,比如 Robosense 雷达的 frame_id = rslidar
world frame:这是全局坐标系的 frame_id,在启动 launch 中需要手动给定,比如我给的是 map
如果你给 world frame id 指定的是输入点云的 frame_id,比如 fusion_cloud.head.frame_id == wolrd_frame_id == rslidar,则只会显示当前帧的八叉树,而不会增量构建地图,这点要注意了,可以自己测试看看。
那么为了增量式建图,还需要在系统的 TF 树中提供「rslidar -> world」的变换,这个变换可以通过其他的 SLAM 等获得,比如我测试时候的一个 TF 树如下: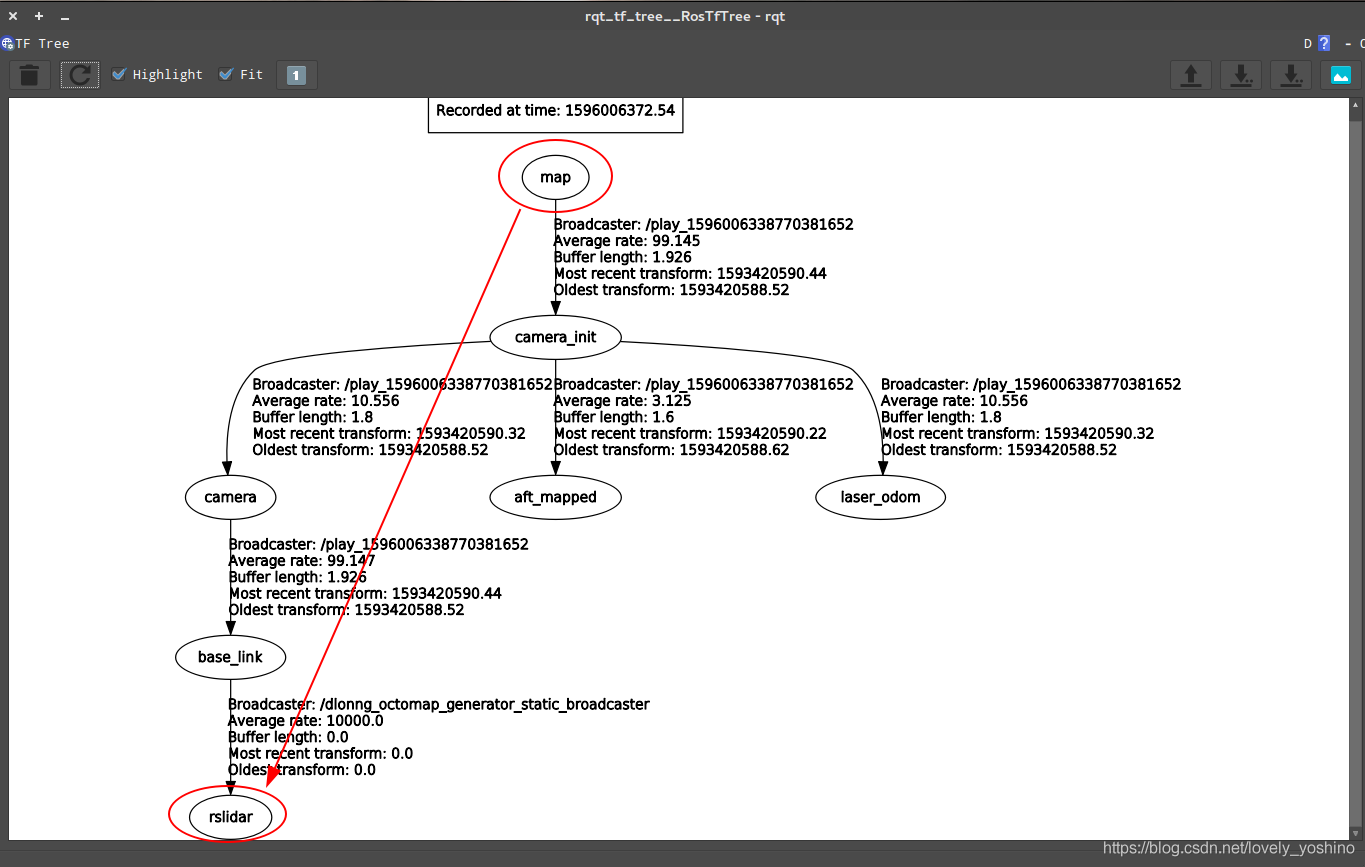
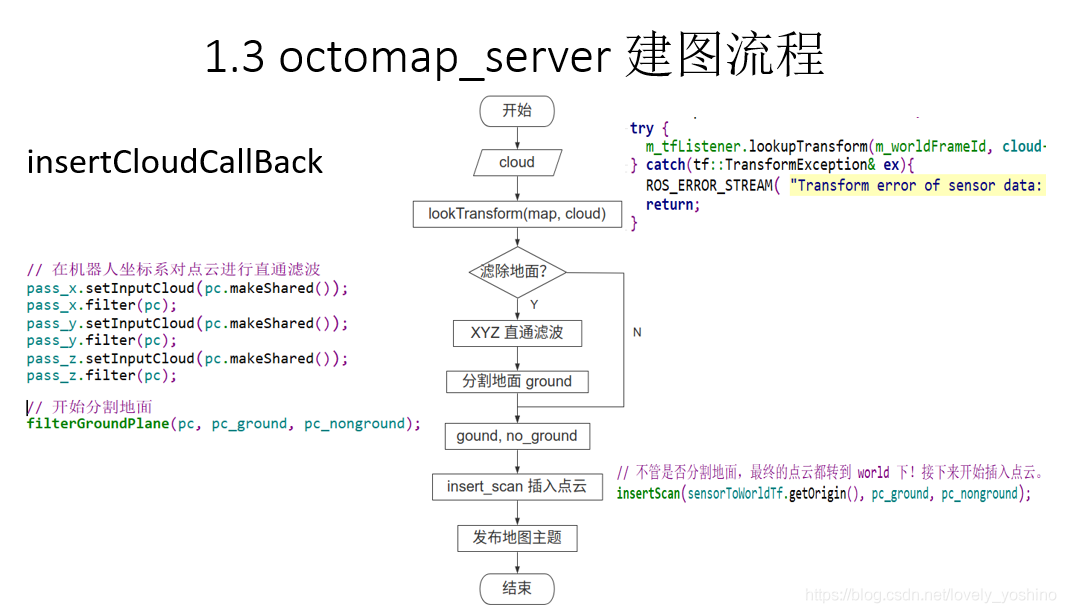
我找了下源代码 OctomapServer.cpp 中寻找 TF 的部分:
tf::StampedTransform sensorToWorldTf;
  try {
    m_tfListener.lookupTransform(m_worldFrameId, cloud->header.frame_id, cloud->header.stamp, sensorToWorldTf);
  } catch(tf::TransformException& ex){
    ROS_ERROR_STREAM( "Transform error of sensor data: " << ex.what() << ", quitting callback");
    return;
  }
总体来说这个建图包使用起来还是挺简单的,最重要的就是要写清楚输入点云话题和 TF 变换。
小 Tips:没有 TF 怎么办?
我刚开始建图的时候,我同学录制的 TF 树中并没有「world -> rslidar」的变换,只有「world -> base_link」,所以为了能够测试增量式建图,因为我的点云帧的 frame_id 是 rslidar,因此我就手动发布了一个静态的「base_link -> rslidar」的变换:
rosrun tf2_ros static_transform_publisher 0 0 0 0 0 0 base_link rslidar这样系统中就有「rslidar -> world」的变换了,但是我发的位姿都是 0,所以对建图测试没有影响,为了方便启动,放在 launch 中:
<node pkg = "tf2_ros" type = "static_transform_publisher" name = "dlonng_static_test_broadcaster" args = "0 0 0 0 0 0 base_link rslidar" />如果你也遇到这个问题,可以试试发个静态 TF 做做测试,关于静态 TF 详细技术可以参考之前的文章:ROS 机器人技术 - 静态 TF 坐标帧
三、ColorOctomap 启用方法
为了显示 RGB 颜色,我分析了下源码,第一步修改头文件,打开注释切换地图类型:OctomapServer.h
// switch color here - easier maintenance, only maintain OctomapServer.
// Two targets are defined in the cmake, octomap_server_color and octomap_server. One has this defined, and the other doesn't
// 打开这个注释
#define COLOR_OCTOMAP_SERVER

#ifdef COLOR_OCTOMAP_SERVER
  typedef pcl::PointXYZRGB PCLPoint;
  typedef pcl::PointCloud<pcl::PointXYZRGB> PCLPointCloud;
  typedef octomap::ColorOcTree OcTreeT;
#else
  typedef pcl::PointXYZ PCLPoint;
  typedef pcl::PointCloud<pcl::PointXYZ> PCLPointCloud;
  typedef octomap::OcTree OcTreeT;
#endif
CMakeList.txt 文件中有 COLOR_OCTOMAP_SERVER 的编译选项:
target_compile_definitions(${PROJECT_NAME}_color PUBLIC COLOR_OCTOMAP_SERVER)OctomapServer.cpp 中有 colored_map 的参数:
m_useHeightMap = true;
m_useColoredMap = false;

m_nh_private.param("height_map", m_useHeightMap, m_useHeightMap);
m_nh_private.param("colored_map", m_useColoredMap, m_useColoredMap);
地图默认是按照高度设置颜色,如果要设置为带颜色的地图,就要禁用 HeightMap,并启用 ColoredMap:
if (m_useHeightMap && m_useColoredMap) {
    ROS_WARN_STREAM("You enabled both height map and RGB color registration. This is contradictory. Defaulting to height map.");
    m_useColoredMap = false;
  }
第二步、需要在 octomap_server 的 launch 文件中禁用 height_map,并启用 colored_map :
<param name="height_map" value="false" />
<param name="colored_map" value="true" />
2 个核心的八叉树生成函数 insertCloudCallback 和 insertScan 中有对颜色的操作:
#ifdef COLOR_OCTOMAP_SERVER
  unsigned char* colors = new unsigned char[3];
#endif

// NB: Only read and interpret color if it's an occupied node
#ifdef COLOR_OCTOMAP_SERVER
        m_octree->averageNodeColor(it->x, it->y, it->z, /*r=*/it->r, /*g=*/it->g, /*b=*/it->b);
#endif
四、保存和显示地图
启动 octomap_server 节点后,可以使用它提供的地图保存服务,保存压缩的二进制存储格式地图:
octomap_saver mapfile.bt保存一个完整的概率八叉树地图:
octomap_saver -f mapfile.ot安装八叉树可视化程序 octovis 来查看地图:
sudo apt-get install octovis安装后重启终端,使用以下命令显示一个八叉树地图:
octovis xxx.ot[bt]五、源码阅读笔记
同时笔者整理了以下这个建图包的关键流程,只有 2 个关键的函数也不是很复杂。
第一步是订阅点云的回调:
第二步是插入单帧点云构建八叉树,这里就不详细介绍过程了,因为涉及到八叉树库 octomap 的更新原理:

以下是我建图过程的 launch:
<launch>
  <node pkg="octomap_server" type="octomap_server_node" name="octomap_server">
    <!-- resolution in meters per pixel -->
    <param name = "resolution" value = "0.15" />

    <!-- name of the fixed frame, needs to be "/map" for SLAM -->
    <!-- 静态全局地图的 frame_id,但在增量式构建地图时,需要提供输入的点云帧和静态全局帧之间的 TF 变换 -->
    <param name = "frame_id" type = "string" value = "camera_init" />

    <!-- set min to speed up! -->
    <param name = "sensor_model/max_range" value = "15.0" />

    <!-- 机器人坐标系 base_link,滤除地面需要该 frame -->
    <!-- <param name = "base_frame_id" type = "string" value = "base_link" /> -->

    <!-- filter ground plane, distance value should be big! 项目并不需要滤除地面 -->
	<!-- <param name = "filter_ground" type = "bool" value = "true" /> -->
    <!-- <param name = "ground_filter/distance" type = "double" value = "1.0" /> -->
    <!-- 分割地面的 Z 轴阈值 value 值 -->
	<!-- <param name = "ground_filter/plane_distance" type = "double" value = "0.3" /> -->

    <!-- 直通滤波的 Z 轴范围,保留 [-1.0, 10.0] 范围内的点 -->
    <!-- <param name = "pointcloud_max_z" type = "double" value = "100.0" /> -->
    <!-- <param name = "pointcloud_min_z" type = "double" value = "-1.0" /> -->

    <!-- <param name = "filter_speckles" type = "bool" value = "true" /> -->

    <param name = "height_map" value = "false" />
    <param name = "colored_map" value = "true" />

    <!-- 增加了半径滤波器 -->
    <param name = "outrem_radius" type = "double" value = "1.0" />
    <param name = "outrem_neighbors" type = "int" value = "10" />

    <!-- when building map, set to false to speed up!!! -->
    <param name = "latch" value = "false" />

    <!-- topic from where pointcloud2 messages are subscribed -->
    <!-- 要订阅的点云主题名称 /pointcloud/output -->
    <!-- 这句话的意思是把当前节点订阅的主题名称从 cloud_in 变为 /pointcloud/output -->
    <remap from = "/cloud_in" to = "/fusion_cloud" />

  </node>
</launch>
六、路径规划
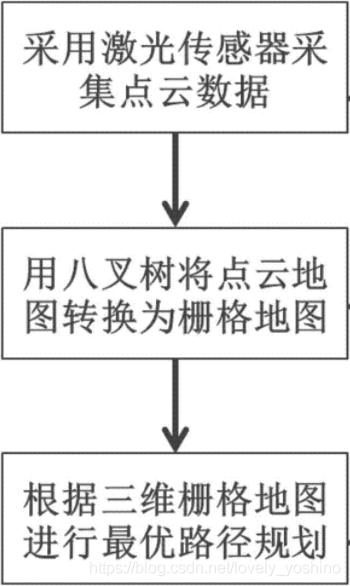
这里给一个链接:https://github.com/Quitino/IndoorMapping,该作者实现了基于ORB-SLAM生成三维密集点云,并使用OctoMap构建室内导航地图。也意味着我们可以在此基础上加入轨迹规划算法实现基于OBR-SLAM的室内规划导航。具体代码可以参照:https://blog.csdn.net/lovely_yoshino/article/details/105272602中的3D-RRT路径规划方法实现。
七:介绍三维A*在栅格地图中的使用
AngeloG 博文中写了三维 A的相关matlab仿真。为了便于在ROS中对A算法进行开发,这里也提供一下之前我学习的A*算法
#include "Astar_searcher.h"

using namespace std;
using namespace Eigen;

void AstarPathFinder::initGridMap(double _resolution, Vector3d global_xyz_l, Vector3d global_xyz_u, int max_x_id,
                                  int max_y_id, int max_z_id)
{
  gl_xl = global_xyz_l(0);
  gl_yl = global_xyz_l(1);
  gl_zl = global_xyz_l(2);

  gl_xu = global_xyz_u(0);
  gl_yu = global_xyz_u(1);
  gl_zu = global_xyz_u(2);

  GLX_SIZE = max_x_id;
  GLY_SIZE = max_y_id;
  GLZ_SIZE = max_z_id;
  GLYZ_SIZE = GLY_SIZE * GLZ_SIZE;
  GLXYZ_SIZE = GLX_SIZE * GLYZ_SIZE;

  resolution = _resolution;
  inv_resolution = 1.0 / _resolution;

  data = new uint8_t[GLXYZ_SIZE];
  memset(data, 0, GLXYZ_SIZE * sizeof(uint8_t));

  GridNodeMap = new GridNodePtr **[GLX_SIZE];
  for (int i = 0; i < GLX_SIZE; i++)
  {
    GridNodeMap[i] = new GridNodePtr *[GLY_SIZE];
    for (int j = 0; j < GLY_SIZE; j++)
    {
      GridNodeMap[i][j] = new GridNodePtr[GLZ_SIZE];
      for (int k = 0; k < GLZ_SIZE; k++)
      {
        Vector3i tmpIdx(i, j, k);
        Vector3d pos = gridIndex2coord(tmpIdx);
        GridNodeMap[i][j][k] = new GridNode(tmpIdx, pos);
      }
    }
  }
}

void AstarPathFinder::resetGrid(GridNodePtr ptr)
{
  ptr->id = 0;
  ptr->cameFrom = NULL;
  ptr->gScore = inf;
  ptr->fScore = inf;
}

void AstarPathFinder::resetUsedGrids()
{
  for (int i = 0; i < GLX_SIZE; i++)
    for (int j = 0; j < GLY_SIZE; j++)
      for (int k = 0; k < GLZ_SIZE; k++)
        resetGrid(GridNodeMap[i][j][k]);
}

void AstarPathFinder::setObs(const double coord_x, const double coord_y, const double coord_z)
{
  if (coord_x < gl_xl || coord_y < gl_yl || coord_z < gl_zl || coord_x >= gl_xu || coord_y >= gl_yu || coord_z >= gl_zu)
    return;

  int idx_x = static_cast<int>((coord_x - gl_xl) * inv_resolution);
  int idx_y = static_cast<int>((coord_y - gl_yl) * inv_resolution);
  int idx_z = static_cast<int>((coord_z - gl_zl) * inv_resolution);

  data[idx_x * GLYZ_SIZE + idx_y * GLZ_SIZE + idx_z] = 1;
}

vector<Vector3d> AstarPathFinder::getVisitedNodes()
{
  vector<Vector3d> visited_nodes;
  for (int i = 0; i < GLX_SIZE; i++)
    for (int j = 0; j < GLY_SIZE; j++)
      for (int k = 0; k < GLZ_SIZE; k++)
      {
        // if(GridNodeMap[i][j][k]->id != 0) // visualize all nodes in open and
        // close list
        if (GridNodeMap[i][j][k]->id == -1)  // visualize nodes in close list only
          visited_nodes.push_back(GridNodeMap[i][j][k]->coord);
      }

  ROS_WARN("visited_nodes size : %d", visited_nodes.size());
  return visited_nodes;
}

Vector3d AstarPathFinder::gridIndex2coord(const Vector3i &index)
{
  Vector3d pt;

  pt(0) = ((double)index(0) + 0.5) * resolution + gl_xl;
  pt(1) = ((double)index(1) + 0.5) * resolution + gl_yl;
  pt(2) = ((double)index(2) + 0.5) * resolution + gl_zl;

  return pt;
}

Vector3i AstarPathFinder::coord2gridIndex(const Vector3d &pt)
{
  Vector3i idx;
  idx << min(max(int((pt(0) - gl_xl) * inv_resolution), 0), GLX_SIZE - 1),
      min(max(int((pt(1) - gl_yl) * inv_resolution), 0), GLY_SIZE - 1),
      min(max(int((pt(2) - gl_zl) * inv_resolution), 0), GLZ_SIZE - 1);

  return idx;
}

Eigen::Vector3d AstarPathFinder::coordRounding(const Eigen::Vector3d &coord)
{
  return gridIndex2coord(coord2gridIndex(coord));
}

inline bool AstarPathFinder::isOccupied(const Eigen::Vector3i &index) const
{
  return isOccupied(index(0), index(1), index(2));
}

inline bool AstarPathFinder::isFree(const Eigen::Vector3i &index) const
{
  return isFree(index(0), index(1), index(2));
}

inline bool AstarPathFinder::isOccupied(const int &idx_x, const int &idx_y, const int &idx_z) const
{
  return (idx_x >= 0 && idx_x < GLX_SIZE && idx_y >= 0 && idx_y < GLY_SIZE && idx_z >= 0 && idx_z < GLZ_SIZE &&
          (data[idx_x * GLYZ_SIZE + idx_y * GLZ_SIZE + idx_z] == 1));
}

inline bool AstarPathFinder::isFree(const int &idx_x, const int &idx_y, const int &idx_z) const
{
  return (idx_x >= 0 && idx_x < GLX_SIZE && idx_y >= 0 && idx_y < GLY_SIZE && idx_z >= 0 && idx_z < GLZ_SIZE &&
          (data[idx_x * GLYZ_SIZE + idx_y * GLZ_SIZE + idx_z] < 1));
}

inline void AstarPathFinder::AstarGetSucc(GridNodePtr currentPtr, vector<GridNodePtr> &neighborPtrSets,
                                          vector<double> &edgeCostSets)
{
  neighborPtrSets.clear();
  edgeCostSets.clear();
  /*
  STEP 4: finish AstarPathFinder::AstarGetSucc yourself
  please write your code below
  */
  // get all neighbours of current node, calculate all the costs, and then save to the point.
  // should be a 3D search, maxumin 26 nodes, but need to remove the obstacles and boundary
  Vector3i neighborIdx;
  for (int dx = -1; dx < 2; dx++)
  {
    for (int dy = -1; dy < 2; dy++)
    {
      for (int dz = -1; dz < 2; dz++)
      {
        if (dx == 0 && dy == 0 && dz == 0)
          continue;

        neighborIdx(0) = (currentPtr->index)(0) + dx;
        neighborIdx(1) = (currentPtr->index)(1) + dy;
        neighborIdx(2) = (currentPtr->index)(2) + dz;

        if (neighborIdx(0) < 0 || neighborIdx(0) >= GLX_SIZE || neighborIdx(1) < 0 || neighborIdx(1) >= GLY_SIZE ||
            neighborIdx(2) < 0 || neighborIdx(2) >= GLZ_SIZE)
          continue;

        neighborPtrSets.push_back(GridNodeMap[neighborIdx(0)][neighborIdx(1)][neighborIdx(2)]);
        edgeCostSets.push_back(sqrt(dx * dx + dy * dy + dz * dz));
      }
    }
  }
}

double AstarPathFinder::getHeu(GridNodePtr node1, GridNodePtr node2)
{
  /*STEP 1
  choose possible heuristic function you want
  Manhattan, Euclidean, Diagonal, or 0 (Dijkstra)
  Remember tie_breaker learned in lecture, add it here ?
  */
  // ROS_INFO("[node] calcute Heu");
  // return getDiagHeu(node1, node2);
  double tie_breaker = 1 + 1 / 1000;
  return tie_breaker * getDiagHeu(node1, node2);
}

double AstarPathFinder::getEuclHeu(GridNodePtr node1, GridNodePtr node2)
{
  // calculate distance at each dimention
  double dx = node1->index(0) - node2->index(0);
  double dy = node1->index(1) - node2->index(1);
  double dz = node1->index(2) - node2->index(2);

  double result1 = sqrt(dx * dx + dy * dy + dz * dz);
  // double result2 = (node2->index - node1->index).norm();

  // cout.setf(ios::fixed);
  // cout << "norm1 = " << setprecision(4) << result1 << endl;
  // cout << "diff = " << (node2->index - node1->index) << endl;
  // cout << "norm2 = " << setprecision(4) << result2 << endl;

  return result1;
}
double AstarPathFinder::getDiagHeu(GridNodePtr node1, GridNodePtr node2)
{
  double dx = abs(node1->index(0) - node2->index(0));
  double dy = abs(node1->index(1) - node2->index(1));
  double dz = abs(node1->index(2) - node2->index(2));

  double h = 0.0;
  int diag = min(min(dx, dy), dz);
  dx -= diag;
  dy -= diag;
  dz -= diag;

  if (dx == 0)
    h = 1.0 * sqrt(3.0) * diag + sqrt(2.0) * min(dy, dz) + 1.0 * abs(dy - dz);
  if (dy == 0)
    h = 1.0 * sqrt(3.0) * diag + sqrt(2.0) * min(dx, dz) + 1.0 * abs(dx - dz);
  if (dz == 0)
    h = 1.0 * sqrt(3.0) * diag + sqrt(2.0) * min(dx, dy) + 1.0 * abs(dx - dy);

  return h;
}

double AstarPathFinder::getManhHeu(GridNodePtr node1, GridNodePtr node2)
{
  double dx = abs(node1->index(0) - node2->index(0));
  double dy = abs(node1->index(1) - node2->index(1));
  double dz = abs(node1->index(2) - node2->index(2));

  return dx + dy + dz;
}

void AstarPathFinder::AstarGraphSearch(Vector3d start_pt, Vector3d end_pt)
{
  ros::Time time_1 = ros::Time::now();

  // index of start_point and end_point
  Vector3i start_idx = coord2gridIndex(start_pt);  // what is coord2gridIndex mean?
  Vector3i end_idx = coord2gridIndex(end_pt);
  goalIdx = end_idx;

  // position of start_point and end_point
  start_pt = gridIndex2coord(start_idx);
  end_pt = gridIndex2coord(end_idx);

  // Initialize the pointers of struct GridNode which represent start node and
  // goal node
  GridNodePtr startPtr = new GridNode(start_idx, start_pt);
  GridNodePtr endPtr = new GridNode(end_idx, end_pt);

  // openSet is the open_list implemented through multimap in STL library
  openSet.clear();
  // currentPtr represents the node with lowest f(n) in the open_list
  GridNodePtr currentPtr = NULL;
  GridNodePtr neighborPtr = NULL;

  // put start node in open set
  startPtr->gScore = 0;
  startPtr->fScore = getHeu(startPtr, endPtr);  // f = h + g = h + 0
  startPtr->id = 1;
  startPtr->coord = start_pt;
  openSet.insert(make_pair(startPtr->fScore, startPtr));
  // startPtr->cameFrom = startPtr;

  /**
  STEP 2: some else preparatory works which should be done before while loop
  please write your code below, neighbour of start point
  **/
  double tentative_gScore;

  vector<GridNodePtr> neighborPtrSets;
  vector<double> edgeCostSets;

  // this is the main loop
  while (!openSet.empty())
  {
    /*
    step 3: Remove the node with lowest cost function from open set to closed
    set, please write your code below
    IMPORTANT NOTE!!!
    This part you should use the C++ STL: multimap,
    more details can be find in Homework description
    */
    // get the min f node from open set to current
    currentPtr = openSet.begin()->second;

    // if the current node is the goal
    if (currentPtr->index == goalIdx)
    {
      ros::Time time_2 = ros::Time::now();
      terminatePtr = currentPtr;
      ROS_WARN("[A*]{sucess}  Time in A*  is %f ms, path cost is %f m", (time_2 - time_1).toSec() * 1000.0,
               currentPtr->gScore * resolution);
      // cout << "final point" << endl << terminatePtr->coord << endl;
      // cout << "came frome" << endl << terminatePtr->cameFrom->coord << endl;
      return;
    }

    // put to close, and erase it
    openSet.erase(openSet.begin());
    currentPtr->id = -1;

    // STEP 4: finish AstarPathFinder::AstarGetSucc, get the succetion
    AstarGetSucc(currentPtr, neighborPtrSets, edgeCostSets);

    /***
    STEP 5:  For all unexpanded neigbors "m" of node "n", please finish this for
    loop please write your code below
    **/
    for (int i = 0; i < (int)neighborPtrSets.size(); i++)
    {
      /*
      Judge if the neigbors have been expanded,please write your code below
      IMPORTANT NOTE!!!
      neighborPtrSets[i]->id = -1 : in closed set
      neighborPtrSets[i]->id = 1 : in open set
      */
      neighborPtr = neighborPtrSets[i];
      if (isOccupied(neighborPtr->index) || neighborPtr->id == -1)
        continue;

      double edge_cost = edgeCostSets[i];
      tentative_gScore = currentPtr->gScore + edge_cost;

      if (neighborPtr->id != 1)
      {  // discover a new node, which is not in the open set
        /*
        STEP 6:  As for a new node, do what you need do ,and then put neighbor
        in open set and record it,please write your code below
        */
        // insert to open set
        openSet.insert(make_pair(startPtr->fScore, neighborPtrSets[i]));
        neighborPtr->id = 1;
        neighborPtr->cameFrom = currentPtr;
        neighborPtr->gScore = tentative_gScore;
        neighborPtr->fScore = neighborPtr->gScore + getHeu(neighborPtr, endPtr);
        neighborPtr->nodeMapIt =
            openSet.insert(make_pair(neighborPtr->fScore, neighborPtr));  // put neighbor in open set and record it.
        continue;
      }
      else if (neighborPtr->gScore >= tentative_gScore)  // compare original f and new f from current
      // this node is in open set and need to judge if it needs to update,
      // he "0" should be deleted when you are coding
      {
        /*
        STEP 7:  As for a node in open set, update it , maintain the openset,
        and then put neighbor in open set and record it please write your code below
        */
        neighborPtr->cameFrom = currentPtr;
        neighborPtr->gScore = tentative_gScore;
        neighborPtr->fScore = tentative_gScore + getHeu(neighborPtr, endPtr);
        openSet.erase(neighborPtr->nodeMapIt);
        neighborPtr->nodeMapIt = openSet.insert(make_pair(neighborPtr->fScore, neighborPtr));
        // if change its parents, update the expanding direction
        for (int i = 0; i < 3; i++)
        {
          neighborPtr->dir(i) = neighborPtr->index(i) - currentPtr->index(i);
          if (neighborPtr->dir(i) != 0)
            neighborPtr->dir(i) /= abs(neighborPtr->dir(i));
        }
      }
    }
  }
  // if search fails
  ros::Time time_2 = ros::Time::now();
  if ((time_2 - time_1).toSec() > 0.1)
    ROS_WARN("Time consume in Astar path finding is %f", (time_2 - time_1).toSec());
}

vector<Vector3d> AstarPathFinder::getPath()
{
  vector<Vector3d> path;
  vector<GridNodePtr> gridPath;
  /*
  STEP 8:  trace back from the curretnt nodePtr to get all nodes along the path
  please write your code below
  */

  gridPath.push_back(terminatePtr);

  while (terminatePtr->cameFrom != NULL)
  {
    terminatePtr = terminatePtr->cameFrom;
    gridPath.push_back(terminatePtr);
  }

  for (auto ptr : gridPath)
    path.push_back(ptr->coord);

  reverse(path.begin(), path.end());

  return path;
}
cite: 本文参照了登龙的相关文章


评论(4)
您还未登录,请登录后发表或查看评论