

2017 年 6 月, Google 公司开放了 TensorFlow Object Detection API 。 这 个项目使用 TensorFlow 实现了大多数深度学习目标检测框架,真中就包括Faster R-CNN。
本系列文章将
(1)先介绍如何安装 TensorFlow Object Detection API;Tensorflow Object Detection API安装
(2)再介绍如何使用已经训练好的模型进行物体检测 ;文章链接
(3)最后介绍如何训练自己的 模型;
安装环境如果是win10 CPU的话请参考(win10 CPU Tensorflow Object Detection API安装与测试)
之前已经完成了安装,直接用已有模型做检测篇的讲解;本文讲训练自己的模型做目标检测;
step1: 准备训练用的数据集
所谓人工智能,七分靠人工,事先你得准备好训练用的数据集,自己打标注。为了讲解这么个过程,采用公开的数据集VOC做讲解。VOC2012是VOC2007的升级版,共计11530张图像(voc数据集详细介绍)。
涵盖 20 类(
person(人)
bird(鸟), cat(猫), cow(牛), dog(狗), horse(马), sheep(羊)
aeroplane(飞机), bicycle(自行车), boat(船), bus(公交车), car(轿车), motorbike(摩托车), train(火车)
bottle(瓶子), chair(椅子), dining table(餐桌), potted plant(盆栽), sofa(沙发), tv/monitor(电视机/显示器)
).
所有的标注图片都有Detection需要的label, 但只有部分数据有Segmentation Label。
VOC2007中包含9963张标注过的图片, 由train/val/test三部分组成, 共标注出24,640个物体。
VOC2007的test数据label已经公布, 之后的没有公布(只有图片,没有label)。
对于检测任务,VOC2012的trainval/test包含08-11年的所有对应图片。 trainval有11540张图片共27450个物体。
对于分割任务, VOC2012的trainval包含07-11年的所有对应图片, test只包含08-11。trainval有 2913张图片共6929个物体。
The train/val data has 11,530 images containing 27,450 ROI annotated objects and 6,929 segmentations. (voc2012地址,voc2012数据集下载链接)
在object_detection文件夹下新建一个名为voc的文件夹,将下载的voc2012解压后放在voc下,目录结构如下:
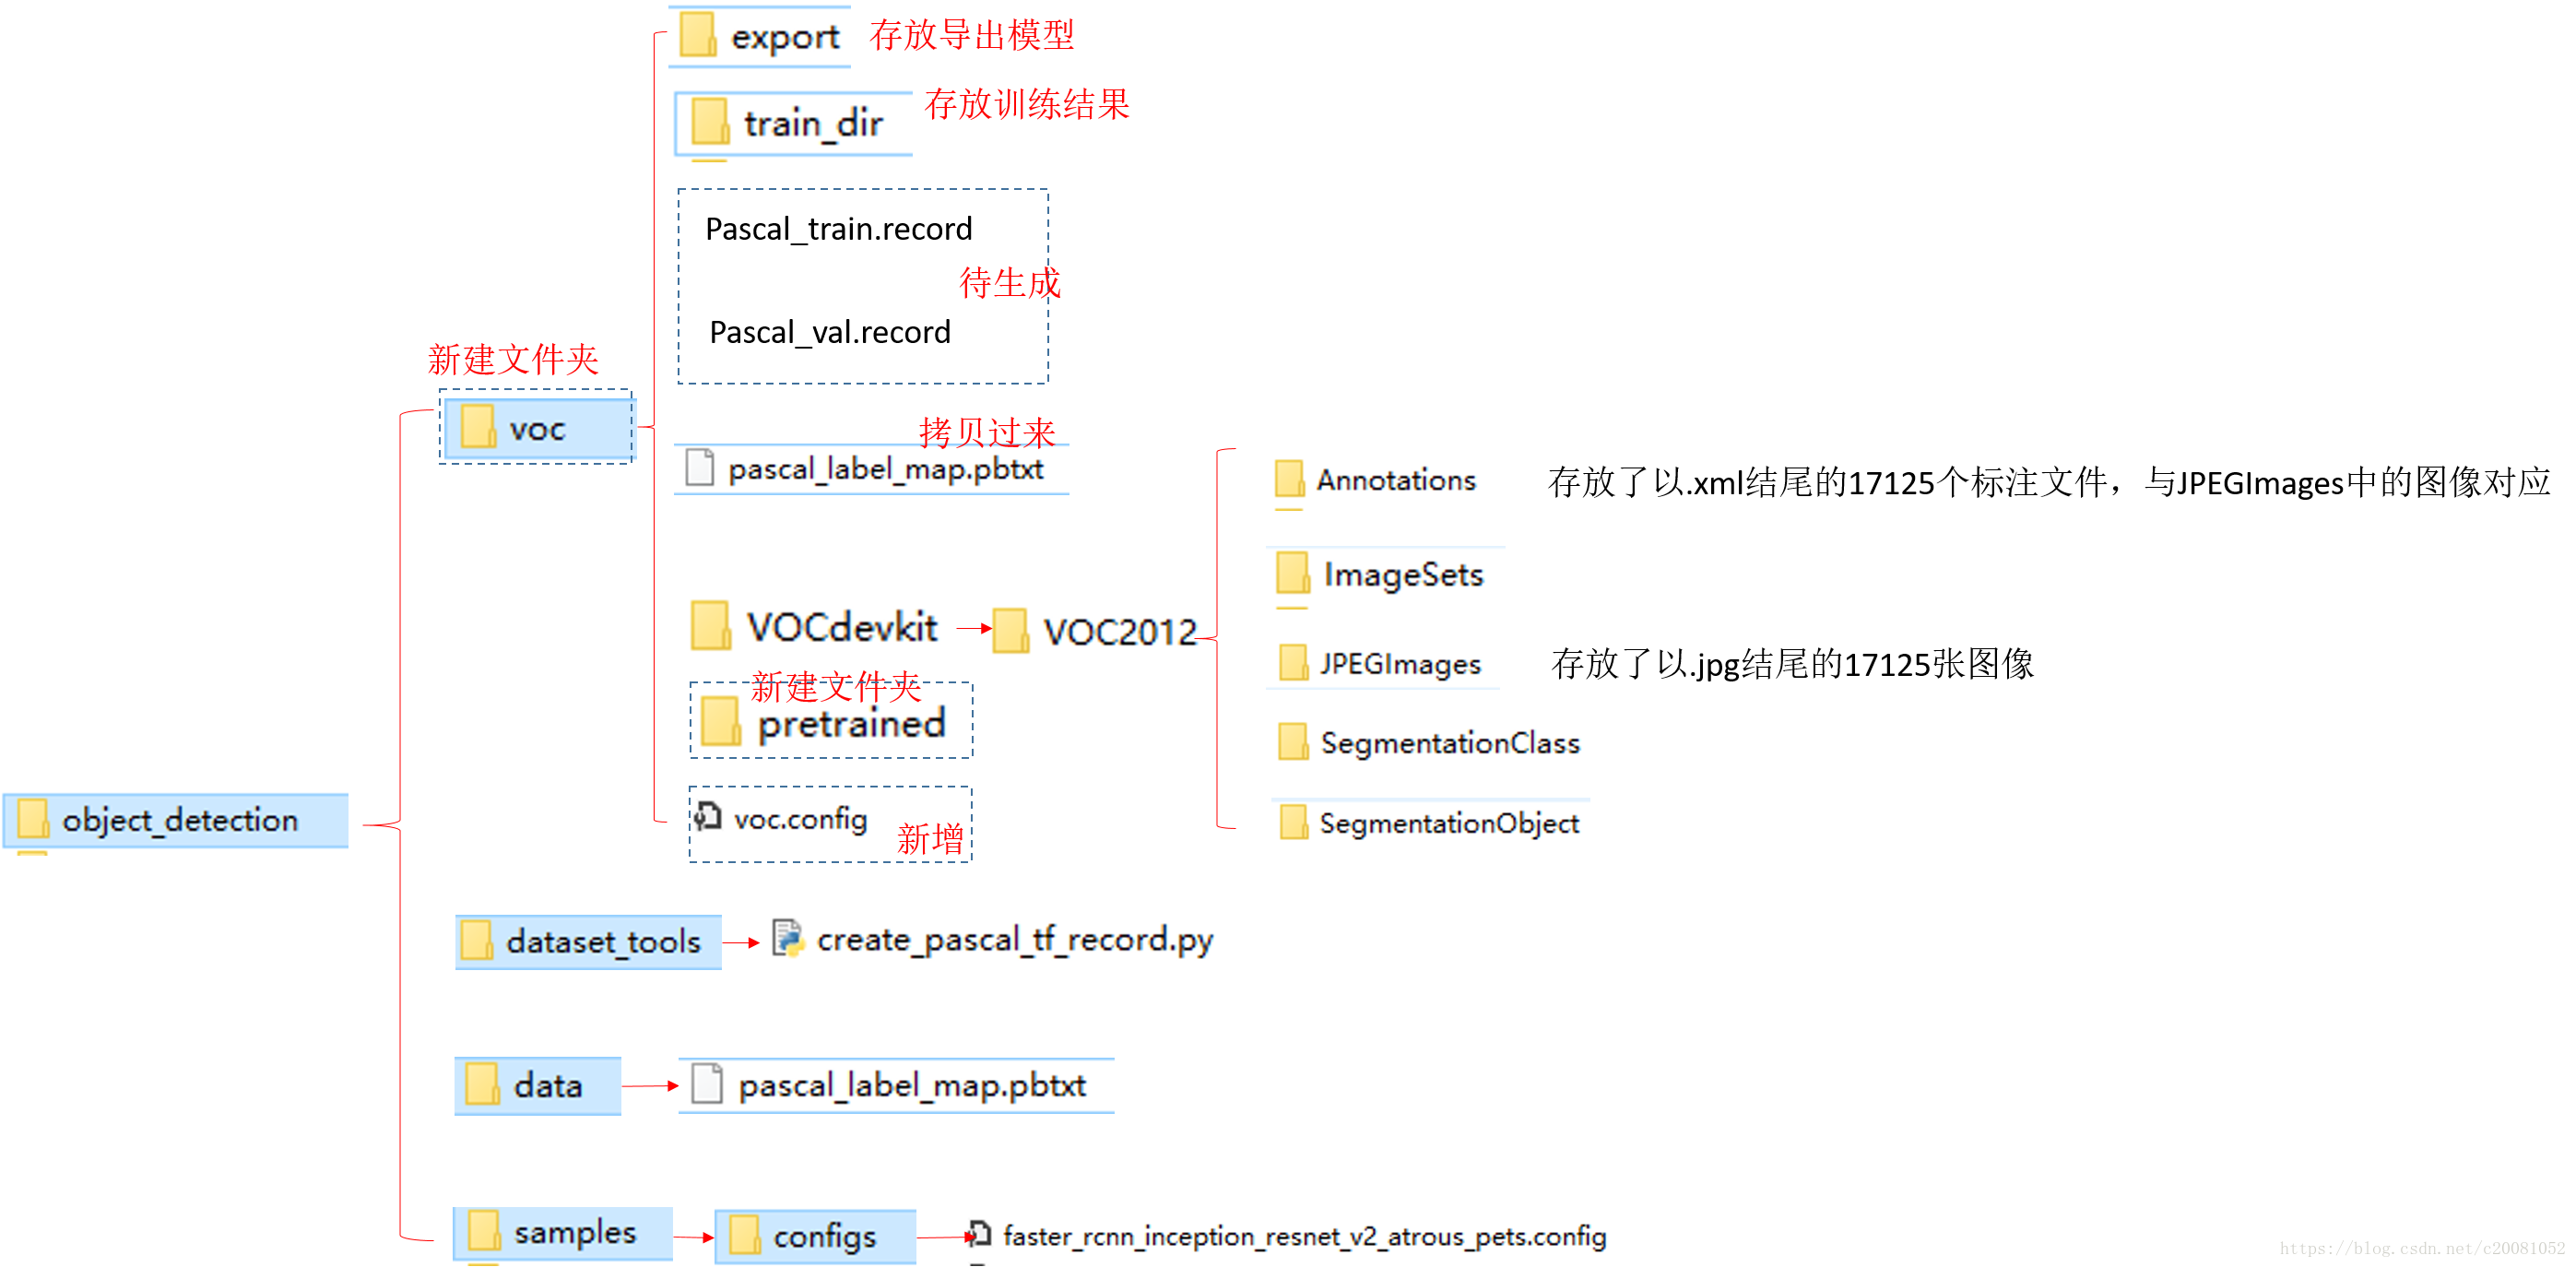
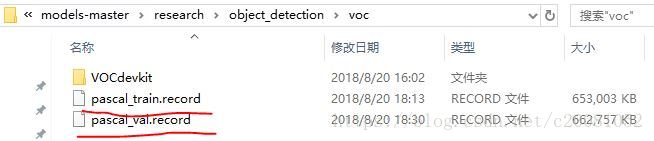
之前已经介绍过,tensorflow中数据存储格式是以.record形式存储的,首先第一步就是将voc中的原jpg格式图像转为.record格式。这里就调用了opject_detection / dataset_tools / create_pascal_tf_record.py ;指令如下(前提是你将工作路径切换到object_detection文件夹下,当然你可以更改生成文件的路径,我用的是anaconda,然后打开prompt,切换目录到了object_detection文件夹下):python create_pascal_tf_record.py --data_dir voc/VOCdevkit/ --year=VOC2012 --set=train --output_path=voc/pascal_train.record python create_pascal_tf_record.py --data_dir voc/VOCdevkit/ --year=VOC2012 --set=val --output_path=voc/pascal_val.record
建议从dataset_tools下拷贝一份create_pascal_tf_record.py到object_detection文件夹下,并在该python文件中增加如下内容:
##add begin
import sys
sys.path.append('E:/DL/tensorflow-models-master/models-master/research')
##add end
其中添加的路径(sys.path.append)为object_detection文件夹所在的路径(即将你的object_detection文件夹所在路径添加到系统路径)。这样再使用上面的的指令,会在voc文件夹下生成训练和验证用的数据集;
Step2: 添加标签映射信息
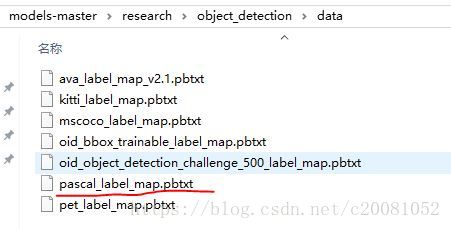
这步就是将voc数据集的数字标签和对应代表的类别映射信息准备好。以便后续解析。在tensorflow中,早就对voc数据集做好映射信息了,放在object_detection/data/文件夹下。voc共20类。
其内容为:
item {
  id: 1
  name: 'aeroplane'
}

item {
  id: 2
  name: 'bicycle'
}

item {
  id: 3
  name: 'bird'
}

item {
  id: 4
  name: 'boat'
}

item {
  id: 5
  name: 'bottle'
}

item {
  id: 6
  name: 'bus'
}

item {
  id: 7
  name: 'car'
}

item {
  id: 8
  name: 'cat'
}

item {
  id: 9
  name: 'chair'
}

item {
  id: 10
  name: 'cow'
}

item {
  id: 11
  name: 'diningtable'
}

item {
  id: 12
  name: 'dog'
}

item {
  id: 13
  name: 'horse'
}

item {
  id: 14
  name: 'motorbike'
}

item {
  id: 15
  name: 'person'
}

item {
  id: 16
  name: 'pottedplant'
}

item {
  id: 17
  name: 'sheep'
}

item {
  id: 18
  name: 'sofa'
}

item {
  id: 19
  name: 'train'
}

item {
  id: 20
  name: 'tvmonitor'
}
我们将 pascal_label_map.pbtxt 拷贝一份到 voc文件夹下;
step3:预训练模型下载
接下来就是选择合适的模型对下载的数据集进行训练了,本文选用的是coco预训练的Faster R-CNN+Inception_ResNet_v2模型(该预训练模型下载地址为:预训练模型)by the way,你也可以选择其他模型作为预训练模型用,下载地址为:tensorflow model zoo
将下载的Faster R-CNN+Inception_ResNet_v2模型放在object_detection / voc / pretrained/文件夹下;你下载后得到的会是 “faster_rcnn_inception_resnet_v2_atrous_coco_11_06_2017”这么个文件,将其解压会得到下面五个文件:

各个文件model zoo给与的解释如下:
a graph proto (graph.pbtxt)
a checkpoint (model.ckpt.data-00000-of-00001, model.ckpt.index, model.ckpt.meta)
a frozen graph proto with weights baked into the graph as constants (frozen_inference_graph.pb) to be used for out of the box inference (try this out in the Jupyter notebook!)
a config file (pipeline.config) which was used to generate the graph. These directly correspond to a config file in the samples/configs) directory but often with a modified score threshold. In the case of the heavier Faster R-CNN models, we also provide a version of the model that uses a highly reduced number of proposals for speed.
下载以上文件的作用就是在官网预训练模型的基础上做finetune,不是完全重新训练。
step4:创建配置文件
在object_detection/samples/configs/下,找到faster_rcnn_inception_resnet_v2_atrous_pets.config这一配置文件,并拷贝一份重命名为voc.config并做一些更改后放在voc文件夹下(如本文文件结构图所示),更改后的voc.config内容如下(完整内容):
# Faster R-CNN with Inception Resnet v2, Atrous version;
# Configured for Oxford-IIIT Pets Dataset.
# Users should configure the fine_tune_checkpoint field in the train config as
# well as the label_map_path and input_path fields in the train_input_reader and
# eval_input_reader. Search for "PATH_TO_BE_CONFIGURED" to find the fields that
# should be configured.

model {
  faster_rcnn {
    num_classes: 20                        #change from 37 to 20 by csq
    image_resizer {
      keep_aspect_ratio_resizer {
        min_dimension: 600
        max_dimension: 1024
      }
    }
    feature_extractor {
      type: 'faster_rcnn_inception_resnet_v2'
      first_stage_features_stride: 8
    }
    first_stage_anchor_generator {
      grid_anchor_generator {
        scales: [0.25, 0.5, 1.0, 2.0]
        aspect_ratios: [0.5, 1.0, 2.0]
        height_stride: 8
        width_stride: 8
      }
    }
    first_stage_atrous_rate: 2
    first_stage_box_predictor_conv_hyperparams {
      op: CONV
      regularizer {
        l2_regularizer {
          weight: 0.0
        }
      }
      initializer {
        truncated_normal_initializer {
          stddev: 0.01
        }
      }
    }
    first_stage_nms_score_threshold: 0.0
    first_stage_nms_iou_threshold: 0.7
    first_stage_max_proposals: 300
    first_stage_localization_loss_weight: 2.0
    first_stage_objectness_loss_weight: 1.0
    initial_crop_size: 17
    maxpool_kernel_size: 1
    maxpool_stride: 1
    second_stage_box_predictor {
      mask_rcnn_box_predictor {
        use_dropout: false
        dropout_keep_probability: 1.0
        fc_hyperparams {
          op: FC
          regularizer {
            l2_regularizer {
              weight: 0.0
            }
          }
          initializer {
            variance_scaling_initializer {
              factor: 1.0
              uniform: true
              mode: FAN_AVG
            }
          }
        }
      }
    }
    second_stage_post_processing {
      batch_non_max_suppression {
        score_threshold: 0.0
        iou_threshold: 0.6
        max_detections_per_class: 100
        max_total_detections: 100
      }
      score_converter: SOFTMAX
    }
    second_stage_localization_loss_weight: 2.0
    second_stage_classification_loss_weight: 1.0
  }
}

train_config: {
  batch_size: 1
  optimizer {
    momentum_optimizer: {
      learning_rate: {
        manual_step_learning_rate {
          initial_learning_rate: 0.0003
          schedule {
            step: 0
            learning_rate: .0003
          }
          schedule {
            step: 900000
            learning_rate: .00003
          }
          schedule {
            step: 1200000
            learning_rate: .000003
          }
        }
      }
      momentum_optimizer_value: 0.9
    }
    use_moving_average: false
  }
  gradient_clipping_by_norm: 10.0
  fine_tune_checkpoint: "voc/pretrained/model.ckpt"   #change your own path for pre-trained model by csq
  from_detection_checkpoint: true
  # Note: The below line limits the training process to 200K steps, which we
  # empirically found to be sufficient enough to train the pets dataset. This
  # effectively bypasses the learning rate schedule (the learning rate will
  # never decay). Remove the below line to train indefinitely.
  num_steps: 200000
  data_augmentation_options {
    random_horizontal_flip {
    }
  }
}

train_input_reader: {
  tf_record_input_reader {
    input_path: "voc/pascal_train.record"   #change your own path for train data by csq
  }
  label_map_path: "voc/pascal_label_map.pbtxt" #change your own path for label map by csq
}

eval_config: {
  num_examples: 5823                            #change from 1101 to 5823 by csq
  # Note: The below line limits the evaluation process to 10 evaluations.
  # Remove the below line to evaluate indefinitely.
  max_evals: 10
}

eval_input_reader: {
  tf_record_input_reader {
    input_path: "voc/pascal_val.record"        #change your own path for val data by csq
  }
  label_map_path: "voc/pascal_label_map.pbtxt"  #change your own path for label map by csq
  shuffle: false
  num_readers: 1
}
更改之处总共有7项:1.训练类别数更改,voc有20类;2.验证阶段图片数量为5823(视具体情况);3.训练,验证,标签路径更改;
step5:开始训练
准备好如上内容后,可以开始训练了,目录切换到object_detection文件夹下,查看该目录下是否有train.py,如果没有(根据tensorflow版本的不同),可查看legacy文件夹,并将其中的train.py拷贝一份到object_detection目录下。运行如下指令开始训练:
python train.py --traiη_dir voc/train_dir/ --pipeline_config_path voc/voc.config
训练得到的日志和模型会存放在train_dir中。可用tensorboard监控:tensorboard --logdir voc/train_dir/
***如果训练过程中提示内存和显存不足,可将配置文件中的最小尺寸和最大尺寸由现在的600,1024等比例改的小些(如300,512)
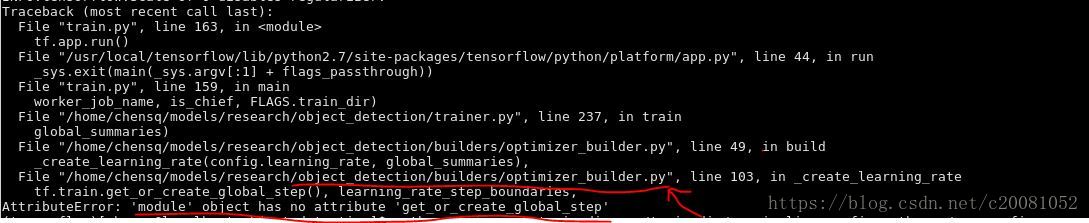
***如果运行训练指令后提示“AttributeError:'module' object has no attribute 'get_or_create_global_step'”的话,这是由于tensorflow版本冲突问题造成的;早些的tensorflow版本中是tf.train.get_or_create_global_step();后面的版本则更改为tf.contrib.framework.get_or_create_global_step()即可;由于我调用了低版本的tensorflow,因此对提示的错误位置做了更改;如下图,提示optimizer_builder.py中模块没有get_or_create_global_step(),故将该文件中做了上述的更改。
***如果遇到提示解析出错,可能是你的config文件没有写对。
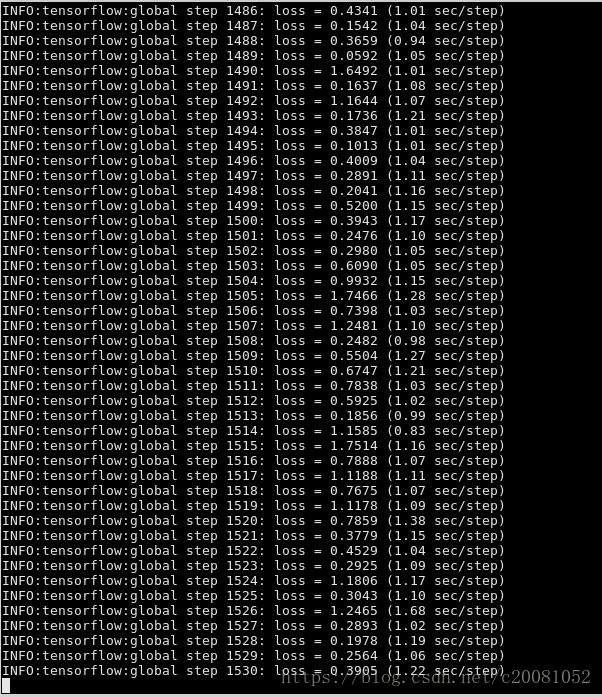
下图是正常训练的中间过程:
如果训练的步长设置太长,可适当调小,也可以中途中止训练,用tensorboard查看训练状态,然后决定是否中止或继续训练。我训练了55000步,在voc/train_dir中生成如下内容:

其中红线部分是每隔一定时间,会保存模型,且只保存最近的5个模型权重。checkpoint文件中记录了最新的5个权重信息,events开头文件可在tensorboard中查看训练记录,pipeline.config和step4中的配置文件一样。graph.pbtxt图表信息。
step6:导出训练模型
这一步的主要目的是将train_dir目录中的checkpoint文件导出并用于单张图片的目标检测。在object_detection文件夹下有个export_inference_graph.py脚本可导出训练好的模型。将目录切换到object_detection文件夹下,运行如下指令:python export_inference_graph.py \--input_type image_tensor \--pipeline_config_path voc/voc.config \--trained_checkpoint_prefix voc/train_dir/model.ckpt-54747 \--output_directory voc/export/
其中的54747是你最后模型保存时对应的训练步数,可在checkpoint文件中查看。
最后会在voc/export/文件夹中产生导出的pb文件。
***如果在运行指令后,弹出“ImportError:cannot import name rewriter_config_pb2” ,问题点可能是你的tensorflow版本太低,需要升级,运行pip install --upgrade tensorflow==1.8 (指定个版本或可以不指定);或者 将API中的exporter.py中的rewrite_options = rewriter_config_pb2.RewriterConfig(
layout_optimizer=rewriter_config_pb2.RewriterConfig.ON)这里的layout_optimizer替换为optimize_tensor_layout(参考:tensorflow/core/protobuf/rewriter_config_pb2.py has updated,but Object Detection API's file not)
***如果遇到" TypeError: non_max_suppression() got an unexpected keyword argument 'score_threshold' ",请升级你的tensorflow版本,貌似1.9或以上才支持。


评论(0)
您还未登录,请登录后发表或查看评论