

0. 简介
管道模式,不属于23种设计模式之一(是责任链模式的一种变体),但是在我们实际业务架构中还是有很多场景适用的。尤其是在多传感器的数据流处理中会非常方便。尤其是在大型场景中使用Pipeline将复杂的进程分解成多个子任务。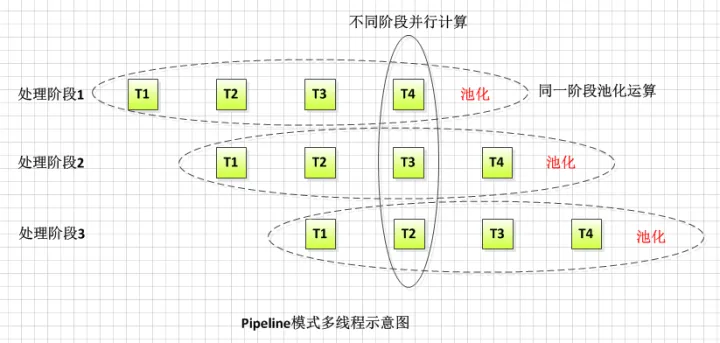
1. 管道模式示意图
Pipeline模式为管道模式,也称为流水线模式。顾名思义,管道模式就像一条管道把多个对象连接起来,整体看起来就像若干个阀门嵌套在管道中,而处理逻辑就放在阀门上,需要处理的对象进入管道后,分别经过各个阀门,每个阀门都会对进入的对象进行一些逻辑处理,经过一层层的处理后从管道尾出来,此时的对象就是已完成处理的目标对象。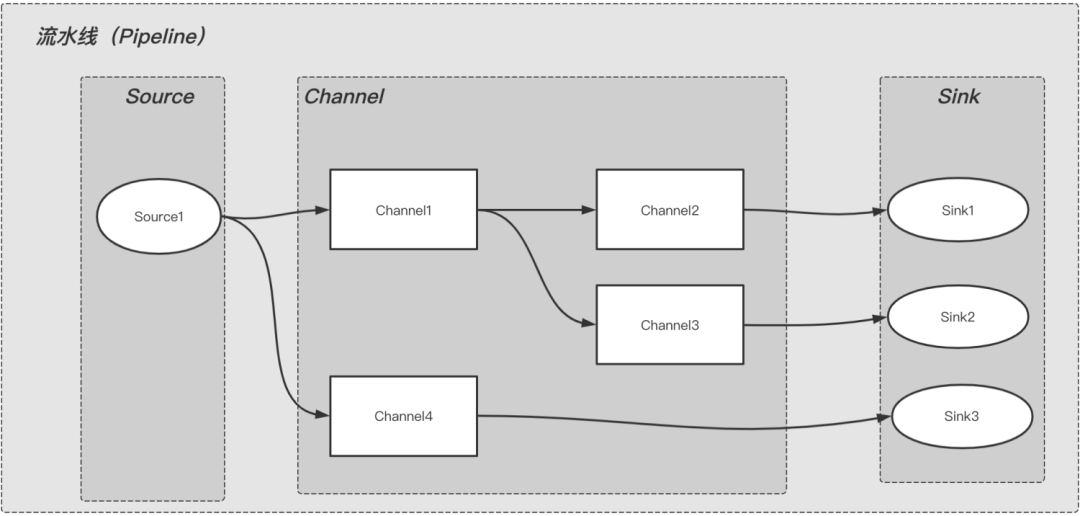
从图中可以看出,整个流水线内数据流转是从上游到下游,上游的输出是下游的输入,按阶段依次执行。
-
Source: 表示数据来源,比如:KafkaSource。
-
Channel:表示对数据进行处理的组件,比如:JsonChannel,对数据进行json转换和处理。
-
Sink:表示数据落地或下沉的地方,比如:KafkaSink,表示数据发送到指定的kafka;DbSInk表示数据落地到DB。
可以看出,Pipeline是由Source(必须有),Channel(不一定需要),Sink(必须有)三种类型的组件自由组合而成的。
2. 示例程序
这里我们借鉴网上的程序,并进行简化
/** 申明整个生命周期 **/
class LifeCycle {
 public:
     // 纯虚函数
    virtual void init(std::string config) = 0;

    virtual void startUp() = 0;

    virtual void shutDown() = 0;
};

/** 模板类,一般对模板参数类型typename和class认为是一样的,并构建多两个纯虚函数
https://blog.csdn.net/function_dou/article/details/84644963 **/
template<typename T>
class Component : public LifeCycle {
 public:
    virtual std::string getName() = 0;

    virtual void execute(T t) = 0;
};

/** 需要把之前的模板一同继承 **/
template<typename T, typename R>
class AbstractComponent : public Component<T> {
 private:
    std::unordered_set<shared_ptr<Component<R>>> down_stream;
 protected:
    const std::unordered_set<shared_ptr<Component<R>>> &getDownStream() {
        return down_stream;
    }

 protected:
    virtual R doExecute(T t) = 0;

 public:
    void addDownStream(shared_ptr<Component<R>> component) {
        down_stream.insert(component);//将函数指针存入数组中
    }

    void init(std::string config) override {
    }

    void startUp() override {
        for (auto &&obj : this->getDownStream()) {
            obj->startUp();
        }
        cout << "------------------ " + this->getName() + " is starting ----------------------" << endl;
    }

    void shutDown() override {
        auto downStreams = this->getDownStream();
        for (auto &&obj : downStreams) {
            obj->shutDown();
        }
        cout << "------------------ " + this->getName() + " is starting ----------------------" << endl;
    }

    void execute(T t) override {
        R r = doExecute(t);
        cout << this->getName() + "\treceive\t" << typeid(t).name() << "\t" << t << "\treturn\t" << typeid(r).name()
             << "\t" << r << endl;
        if constexpr (is_same_v<R, void>) {
            return;
        }
        for (auto &&obj : getDownStream()) {//读取数据
            obj->execute(r);//一层层查找
        }
    }
};

/**从这向下才是pipeline的操作,上面的是数据的生命周期**/

template<typename T, typename R>
using Source = AbstractComponent<T, R>;//using来重命名,使用typedef定义的别名和使用using定义的别名在语义上是等效的。 唯一的区别是typedef在模板中有一定的局限性,而using没有。https://blog.csdn.net/qq_35789421/article/details/117591212

template<typename T, typename R>
using Channel = AbstractComponent<T, R>;

template<typename T, typename R>
using Sink = AbstractComponent<T, R>;

class printSink;// 申明class,以防找不到class申明,如果写在两个文件中,会采用前置声明的方式声明class,这里并没有什么用。https://www.shuzhiduo.com/A/obzb7pZVJE/

class intStringChannel;

class printSink : public Sink<string, int> {
 public:
    string getName() override {
        return "printSink";
    }

 protected:
    int doExecute(string t) override {
        return INT_MIN;
    }
};

class intStringChannel : public Channel<int, string> {
 public:
    string getName() override {
        return "intStringChannel";
    }

    void startUp() override {

    }

 protected:
    string doExecute(int t) override {
        return to_string(t + 100);
    }
};

class IntSource : public Source<int, int> {
 private:
    int val = 0;
 public:
    void init(std::string config) override {
        cout << "--------- " + getName() + " init --------- ";
        val = 1;
    }

    string getName() override {
        return "Int Source";
    }

    void startUp() override {
        this->execute(val);//处理数据
    }

 protected:
    int doExecute(int) override {
        return val + 1;
    }
};

template<typename R, typename T>
class pipeline : public LifeCycle {
 private:
    shared_ptr<Source<R, T>> source;

 public:
    void setSource(shared_ptr<Source<R, T>> component) {
        source = component;//传入类
    }

    void init(std::string config) override {
    }

    void startUp() override {
        assert(source.get() != nullptr);
        source->startUp();//完成类函数的处理
    }

    void shutDown() override {
        source->shutDown();
    }
};

int main() {
    pipeline<int, int> p;
    // source
    auto is = make_shared<IntSource>();

    // channel
    auto isc = make_shared<intStringChannel>();

    // sink
    auto ps = make_shared<printSink>();

    is->addDownStream(isc);
    isc->addDownStream(ps);

    // 设置 source
    p.setSource(is);

    // 启动
    p.startUp();
}

3. bind 回调函数
对于Pipeline函数来说,bind函数应该是紧密绑定的。而趁着我们看Pipeline模式,这里也顺便将bind函数熟悉一下,其不需要像下面一样建立函数指针。而是可以通过bind来完成动态或静态的函数绑定。这在Android,java中也经常使用。
void SeqList<ElemType>::Traverse(void (*visit)(const ElemType &)) const//引用函数,函数指向指针
这里作者看了网上很多的代码,并自己总结出一个比较通用的std::function与std::bind函数结合的方法,并加以注释,方便读者们阅读。
#include <iostream>

using namespace std;

 class A
 {
 public:
     A(){}
     void callback (const std::function<void()>& f) :callback_(f){}

     void notify(void){
         callback_();
     }
 private:
     std::function<void()> callback_;
 };

 class Foo
 {
 public:
     void sayHello(const char* name) const {
        std::cout << _name << " say: hello " << name << std::endl;
    }
    void operator()(void){//第一个括号代表我要重载运算符()
        cout <<"in " <<  __FUNCTION__<< endl;
    }
    const char* bindgo(const char* param) { return param; }
 };

 int main(){
     Foo foo;
     A aa;
     aa.callback(std::bind(&Foo::sayHello, foo, std::placeholders::_1/*參数1*/));//动态绑定,并使用占位符
     aa.callback(std::bind(&Foo::sayHello, std::placeholders::_1/*參数1*/));//静态绑定
     aa.callback(std::bind(&Foo::sayHello, "Lucy"/*固定參数1*/));//静态绑定
     aa.callback(std::bind(&Foo::sayHello, std::bind(Foo::bindgo,"Lucy")/*固定參数1*/));//静态绑定
     aa.notify();

     return 0;
 }
4. lambda 回调函数
以下示例为使用现在c++14以上实现,包括lambda表达式的使用。
#include <functional>
#include <iostream>

class MyTest{
public:
    MyTest() = default;
    void doCalc(){
        //干其他事,完了
        // 执行回调
        if(myCallBack!= nullptr){
            myCallBack(1,2);
        }
    }

    using callback_t = std::function<void(const int &a, const int &b)>;

    // 注册回调
    void setCallBackHandler(const callback_t &cb){
        myCallBack = cb;
    }

private:
    // 定义回调
    callback_t myCallBack;
};

// 回调函数
void handleCallBack(const int &a,const int &b){
    std::cout << "this is from callback handleCallBack"<<std::endl;
}

int main(){

    MyTest t;

    // 回调函数
    auto f= [](const int &a,const int &b){
        std::cout << "this is from callback f"<<std::endl;
    };
    // 注册回调
    // 写法一
    t.setCallBackHandler(f);

    // 写法二
    t.setCallBackHandler([&f](auto &&a, auto &&b) {
        f(std::forward<decltype(a)>(a), std::forward<decltype(b)>(b));
    });

    // 写法三
    t.setCallBackHandler([](auto &&a, auto &&b) {
        handleCallBack(std::forward<decltype(a)>(a), std::forward<decltype(b)>(b));
    });

    t.doCalc();
}
4. 参考链接
https://blog.csdn.net/qq_34179431/article/details/116655251
https://zhuanlan.zhihu.com/p/355034910
https://blog.csdn.net/weixin_42482896/article/details/119582676


评论(0)
您还未登录,请登录后发表或查看评论