
描述
CSF布料滤波算法,用于遥感雷达数据提取地面,是张吴明教授等发表在remote sensing期刊上的文章
论文全称:An Easy-to-Use Airborne LiDAR Data Filtering Method Based on Cloth Simulation
源码链接:https://github.com/jianboqi/CSF.git
方法挺简单易懂的,网上有很多对此的论文分析。因此本文将不对论文的具体细节过于赘述,倾向于使用与分析
算法思想
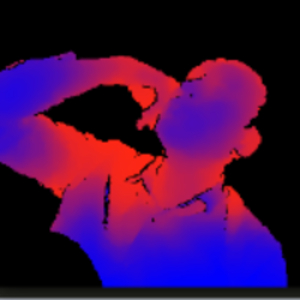
如图所示
一句话:把点云翻过来,罩上一块不同材质的布料,就可以得到地面了。
参考实际物理的布,布料上的点之间存在不同的作用力,如下图
算法步骤
这是论文中的图片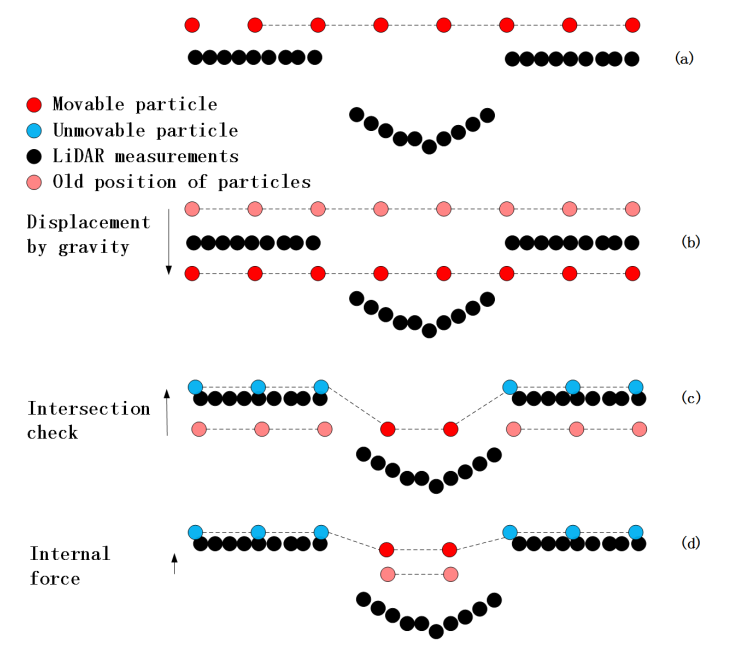
理解这张图,基本上就理解了算法的整体思路:一块布落在翻转后的点云上,布点要不停的下落。某些点(正蓝色点)会被实际的数据点(黑色点)所挡住而无法继续下落。而布料的硬度参数会决定,还能继续下落的布料点(正红色点),仍能够继续下落的深度。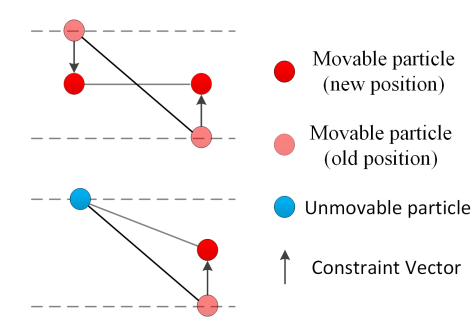

能够下落的点,会被已经不能下落点的力,而重新上弹。上弹恢复的高度取决于不同的面料参数。
依赖库与使用
需要根据源码的Readme.md,进行安装。
python装的是python包,这样才可以使用import CSF
C++是编译安装,对于C++,你也可以不按照下面的做法去安装,只把src路径下的代码加载到你的工程就行。
我强烈建议,C++不执行下面的安装步骤,而是将源码直接保存在工程中就好
- python安装
python setup.py build
python setup.py install
- C++安装
mkdir build #or other name
cd build
cmake ..(需要demo的使用这句话替代 cmake -DBUILD_DEMO=ON ..)
make
sudo make install

mkdir build #or other name
cd build
cmake -DBUILD_DEMO=ON ..
make
sudo make install
python版本
1. 保存点云数据
2. 使用CSF提取地面点
python运行CSF
读取保存着原始雷达数据点xyz的txt文件
再将地面点保存在一个新的txt文件中
import CSF

csf = CSF.CSF()
csf.readPointsFromFile('sample.txt')

csf.params.bSloopSmooth = False
csf.params.cloth_resolution = 0.5

ground = CSF.VecInt()  # a list to indicate the index of ground points after calculation
non_ground = CSF.VecInt()  # a list to indicate the index of non-ground points after calculation
csf.do_filtering(ground, non_ground)  # do actual filtering.
csf.savePoints(ground, "ground.txt")
3. python显示结果
读取原始点云数据和地面点数据,进行显示
import numpy as np
import matplotlib.pyplot as plt
from mpl_toolkits.mplot3d import Axes3D

file_name = 'sample.txt'
data = np.loadtxt(file_name)  # 获取数据, 格式为np.array
# print(data)  # 打印数据
x = data[:, 0]  # 格式为np.array
y = data[:, 1]
z = data[:, 2]

file_name_ground = 'ground.txt'
data_ground = np.loadtxt(file_name_ground)  # 获取数据, 格式为np.array
x_ground = data_ground[:, 0]  # 格式为np.array
y_ground = data_ground[:, 1]
z_ground = data_ground[:, 2]


ax = plt.subplot(projection='3d')  # 创建一个三维的绘图工程
ax.set_title('CSF')  # 设置本图名称


ax.scatter(x, y, z, s=1, c='r')  # 绘制数据点 c: 'r'红色,'y'黄色,等颜色, s: 点大小
ax.scatter(x_ground, y_ground, z_ground, s=1, c='g')
ax.set_xlabel('X')  # 设置x坐标轴
ax.set_ylabel('Y')  # 设置y坐标轴
ax.set_zlabel('Z')  # 设置z坐标轴

plt.show()
4.(补充)C++版显示结果
#include <iostream>
#include <stdlib.h>
#include <pcl/point_types.h>
#include <pcl/io/ply_io.h>
#include <pcl/visualization/pcl_visualizer.h>

pcl::PointCloud<pcl::PointXYZ>::Ptr xyz_to_pointcloud(std::vector<float> x, std::vector<float> y, std::vector<float> z) {
    pcl::PointCloud<pcl::PointXYZ>::Ptr cloud(new pcl::PointCloud<pcl::PointXYZ>);
    cloud->points.resize(x.size());
    for (int i = 0 ; i < x.size(); i++) {
        cloud->points[i].x = x[i];
        cloud->points[i].y = y[i];
        cloud->points[i].z = z[i];
    }
    return cloud;
}

std::vector<std::vector<float>> readRobotPose(std::string path) {
    std::vector<std::vector<float>> filedata;       //vector容器中存放float类型数组
    std::ifstream robotPosefile;
    std::string str;

    robotPosefile.open(path.data());
    while (getline(robotPosefile, str)) {
        std::vector<float> data_line;
        std::istringstream str_stream(str);
        std::string content;
        int i = 0;
        while (str_stream >> content) { //out为非空格的str数据
            float a = std::stof(content); //string 转 float
            data_line.push_back(a);
            i++;
        }
        filedata.push_back(data_line); //传入的是数组首地址
    }
    return filedata;
}

int main(int argc, char** argv) {
    std::vector<std::vector<float>> points;
    points = readRobotPose("../sample.txt");
    std::cout<<"sum points num: "<<points.size()<<std::endl;
    std::vector<float> x;
    std::vector<float> y;
    std::vector<float> z;
    for (int i = 0 ; i < points.size(); i++) {
        x.push_back(points[i][0]);
        y.push_back(points[i][1]);
        z.push_back(points[i][2]);
    }

    std::vector<std::vector<float>> points_ground;
    points_ground = readRobotPose("../ground.txt");
    std::cout<<"ground points num: "<<points_ground.size()<<std::endl;
    std::vector<float> x_ground;
    std::vector<float> y_ground;
    std::vector<float> z_ground;
    for (int i = 0 ; i < points_ground.size(); i++) {
        x_ground.push_back(points_ground[i][0]);
        y_ground.push_back(points_ground[i][1]);
        z_ground.push_back(points_ground[i][2]);
    }


    pcl::PointCloud<pcl::PointXYZ>::Ptr cloud;
    cloud = xyz_to_pointcloud(x, y, z);
    pcl::PointCloud<pcl::PointXYZ>::Ptr cloud_ground;
    cloud_ground = xyz_to_pointcloud(x_ground, y_ground, z_ground);


    pcl::visualization::PCLVisualizer viewer("CSF");
    int v = 0; // design a viewpoint

    viewer.createViewPort (0.0, 0.0, 1.0, 1.0, v);
    viewer.addCoordinateSystem(0.5);

    // order is {R, G, B}
    pcl::visualization::PointCloudColorHandlerCustom<pcl::PointXYZ> cloud_colored(cloud, 255, 0, 0);
    viewer.addPointCloud (cloud, cloud_colored, "cloud", v);
    pcl::visualization::PointCloudColorHandlerCustom<pcl::PointXYZ> cloud_ground_colored(cloud_ground, 0, 255, 0);
    viewer.addPointCloud (cloud_ground, cloud_ground_colored, "ground", v);

    viewer.addText ("CSF", 0, 0, 10, 255, 255, 255, "CSF result", v); // position, color, string, viewpoint
    viewer.setBackgroundColor (0, 0, 0, v); // color, viewpoint

    while (!viewer.wasStopped()) {
        viewer.spinOnce();
    }

    return 0;
}
C++版本
1. 搭建工程
搭建一个属于你自己的C++工程,并将源码中的src路径下的文件,全部放到你的工程之中。
2. 与代码融合
main.cpp添加一个clothSimulationFilter函数
void clothSimulationFilter(const std::vector<csf::Point>& pc,
                           std::vector<int> &groundIndexes,
                           std::vector<int> & offGroundIndexes)
{
    //step 1 read point cloud
    CSF csf;
    csf.setPointCloud(pc);// or csf.readPointsFromFile(pointClouds_filepath);
    //pc can be vector< csf::Point > or PointCloud defined in point_cloud.h

    //step 2 parameter settings
    //Among these paramters:
    //time_step  interations class_threshold can remain as defualt in most cases.
    csf.params.bSloopSmooth = false;
    csf.params.cloth_resolution = 0.5;
    csf.params.rigidness = 3;

    csf.params.time_step = 0.65;
    csf.params.class_threshold = 0.5;
    csf.params.interations = 500;

    //step 3 do filtering
    //result stores the index of ground points or non-ground points in the original point cloud

    csf.do_filtering(groundIndexes, offGroundIndexes);
    //csf.do_filtering(groundIndexes, offGroundIndexes,true);
    //if the third parameter is set as true, then a file named "cloth_nodes.txt" will be created,
    //it respresents the cloth nodes.By default, it is set as false

}
main.cpp主函数main()添加
pcl::visualization::CloudViewer cloud_viewer("CSF Result");

std::vector<int> nonan;
pcl::PointCloud<pcl::PointXYZ>::Ptr cloud_csf(new pcl::PointCloud<pcl::PointXYZ>);
pcl::removeNaNFromPointCloud(*cloud_total, *cloud_csf, nonan);

std::vector<csf::Point> pc;
const auto& pointclouds = cloud_csf->points;
pc.resize(cloud_csf->size());
transform(pointclouds.begin(), pointclouds.end(), pc.begin(), [&](const auto& p)->csf::Point {
    csf::Point pp;
    pp.x = p.x;
    pp.y = p.y;
    pp.z = p.z;
    return pp;
});

std::vector<int> groundIndexes, offGroundIndexes;
clothSimulationFilter(pc, groundIndexes, offGroundIndexes);

pcl::PointCloud<pcl::PointXYZRGB>::Ptr cloud_color(new pcl::PointCloud<pcl::PointXYZRGB>);
pcl::copyPointCloud(*cloud_csf, *cloud_color);

for (size_t i = 0; i < cloud_csf->points.size(); ++i) {
    cloud_color->points[i].r = 255;
    cloud_color->points[i].g = 0;
    cloud_color->points[i].b = 0;
}
      std::cout<<groundIndexes.size()<<std::endl;
for (size_t i = 0; i < groundIndexes.size(); ++i) {
    cloud_color->points[groundIndexes[i]].r = 0;
    cloud_color->points[groundIndexes[i]].g = 255;
    cloud_color->points[groundIndexes[i]].b = 0;
}
cloud_viewer.showCloud(cloud_color);
main中的代码需要根据自己项目的需要,加载原始点云。这里不赘述。
3. 运行
运行工程,就可以看到CSF算法提取地面的效果了
总结
CSF虽然原理易懂,但是受限于面料的分辨率和参数,包括算法的计算方式(采用迭代进行求解),导致了CSF算法提取地面速度较慢

评论(0)
您还未登录,请登录后发表或查看评论