
官方文档的示例可以在这里找到 Programming with rcl and rclc
这篇博客主要讲述 micro-ROS C API,也就是 rclc 的一些基础用法。它的主要理念与 ROS2 相同(publishers, subscriptions, services, timers, …),它们甚至依赖于相同的实现,因为 micro-ROS C API 基于 ROS 2客户端支持库(rcl),并在软件包 rclc 中添加了一些便利的功能。也就是说,rclc 没有在 rcl 之上添加新的类型层(rclcpp 和 rclpy),而只提供简化 rcl 类型编程的功能。仅针对 rcl 中缺失的概念引入新类型,例如 executor 的概念。
Node
ROS 2节点是 ROS 2生态系统的主要参与者。节点将使用 publishers, subscriptions, services 等相互沟通。它们之间的通信可以用下面的动图表示,该动图也是 ROS2 官方文档中对 node 的描述。

对于节点的操作主要有节点的初始化、节点的清除,以及节点的生命周期。
Initialization
创建默认配置的节点
// Initialize micro-ROS allocator
rcl_allocator_t allocator = rcl_get_default_allocator();

// Initialize support object
rclc_support_t support;
rcl_ret_t rc = rclc_support_init(&support, argc, argv, &allocator);

// Create node object
rcl_node_t node;
const char * node_name = "test_node";

// Node namespace (Can remain empty "")
const char * namespace = "test_namespace";

// Init default node
rc = rclc_node_init_default(&node, node_name, namespace, &support);
if (rc != RCL_RET_OK) {
  ... // Handle error
  return -1;
}
allocator 负责分配内存,也叫分配器,support 则是作为配置管理器来使用。
allocator 对象中包装了 micro-ROS 中使用的动态内存分配和重新分配方法
// Get micro-ROS default allocator
rcl_allocator_t allocator = rcl_get_default_allocator();
default allocator 内部结构
- allocate = wraps malloc()
- deallocate = wraps free()
- reallocate = wraps realloc()
- zero_allocate = wraps calloc()
- state = `NULL`
在嵌入式系统中工作,用户可能需要使用自己的内存分配方法修改此默认函数。用户可以使用自己的方法修改默认分配器,如果有需要,可以参考官方的说明 Custom allocator
support 的结构体定义如下
typedef struct
{
    rcl_context_t context;
    rcl_allocator_t * allocator;
    rcl_clock_t clock;
} rclc_support_t;
可以看出来,support 包含了 allocator 的指针、用于创建一些顶层实体(如 node)的 context ,以及对时间相关资源的封装 clock
创建自定义配置的节点
如果是 Foxy 版本镜像,可以使用 rcl_node_options_t 函数配置节点
// Initialize allocator and support objects
...

// Create node object
rcl_node_t node;
const char * node_name = "test_node";

// Node namespace (Can remain empty "")
const char * namespace = "test_namespace";

// Get default node options and modify them
rcl_node_options_t node_ops = rcl_node_get_default_options();

// Set node ROS domain ID to 10
node_ops.domain_id = (size_t)(10);

// Init node with custom options
rc = rclc_node_init_with_options(&node, node_name, namespace, &support, &node_ops);

if (rc != RCL_RET_OK) {
  ... // Handle error
  return -1;
}
如果你使用的是 Galactic 或者更高的版本,在这种情况下,节点选项使用自定义 API 在 rclc_support_t 对象上配置
// Initialize micro-ROS allocator
rcl_allocator_t allocator = rcl_get_default_allocator();

// Initialize and modify options (Set DOMAIN ID to 10)
rcl_init_options_t init_options = rcl_get_zero_initialized_init_options();
rcl_init_options_init(&init_options, allocator);
rcl_init_options_set_domain_id(&init_options, 10);

// Initialize rclc support object with custom options
rclc_support_t support;
rclc_support_init_with_options(&support, 0, NULL, &init_options, &allocator);

// Create node object
rcl_node_t node;
const char * node_name = "test_node";

// Node namespace (Can remain empty "")
const char * namespace = "test_namespace";

// Init node with configured support object
rclc_node_init_default(&node, node_name, namespace, &support);

if (rc != RCL_RET_OK) {
  ... // Handle error
  return -1;
}
上面是不同版本中设置 ROS 的 Domain ID 的示例,使用不同的 Domain ID ,可以使 micro-ROS 加入不同的 DDS 域,之后会在 ROS2 机器人通讯原理详细讲解。
Cleaning Up
要销毁初始化节点,必须在节点本身之前销毁节点拥有的所有实体(Publishers, subscribers, services, ……)
// Destroy created entities (Example)
rcl_publisher_fini(&publisher, &node);
...

// Destroy the node
rcl_node_fini(&node);
这将从 ROS2 图中删除节点,包括 agent 上生成的任何实体和客户端上使用的内存。
Lifecycle
rclc 生命周期包在 C 中提供了方便的函数,将 rcl 节点与 ROS 2 节点生命周期状态机捆绑在一起,类似于 C++的 rclcpp 生命周期节点。Node 的生命周期的状态机图如下,更多可以参考 Node Lifecycle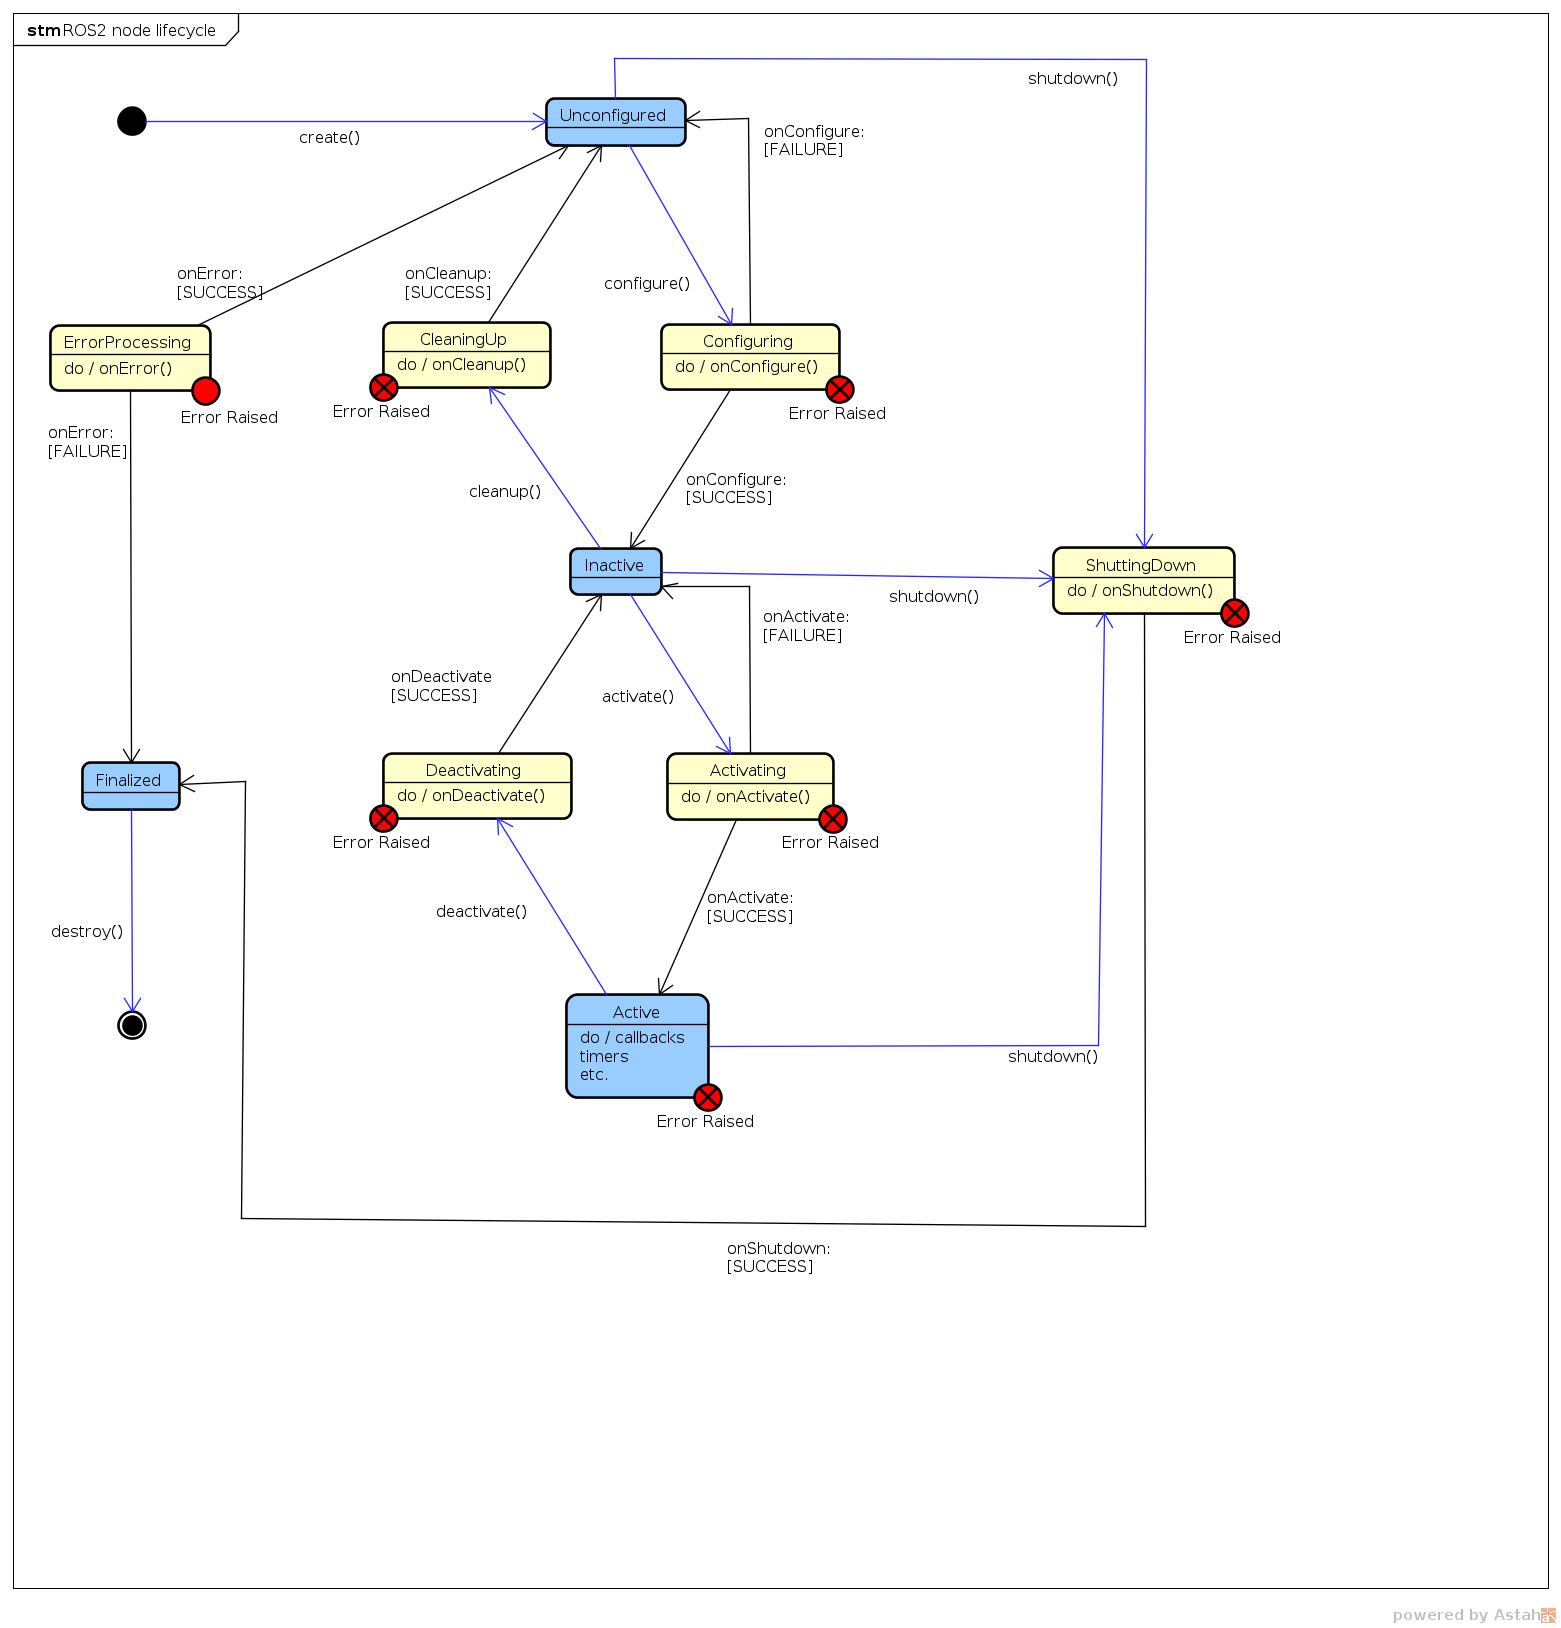
绑定 lifecycle 节点
创建 lifecycle 节点作为 rcl 节点和 rcl 生命周期状态机的一个绑定。假设有一个已经初始化的 node 和 executor
// Create rcl state machine
rcl_lifecycle_state_machine_t state_machine =
rcl_lifecycle_get_zero_initialized_state_machine();

// Create the lifecycle node
rclc_lifecycle_node_t lifecycle_node;
rcl_ret_t rc = rclc_make_node_a_lifecycle_node(
  &lifecycle_node,
  &node,
  &state_machine,
  &allocator);
注册 lifecycle 服务
// Register lifecycle services on the allocator
rclc_lifecycle_add_get_state_server(&lifecycle_node, &executor);
rclc_lifecycle_add_get_available_states_server(&lifecycle_node, &executor);
rclc_lifecycle_add_change_state_server(&lifecycle_node, &executor);
注册服务时,同时需要为服务添加处理函数
注册 lifecycle 回调函数
可以添加回调函数在状态发生改变时进行调用,示例如下:
首先定义一个回调函数,以 configure 状态为例
rcl_ret_t my_on_configure() {
  printf("  >>> my_lifecycle_node: on_configure() callback called.\n");
  return RCL_RET_OK;
}
之后将它添加到 lifecycle 节点
// Register lifecycle service callbacks
rclc_lifecycle_register_on_configure(&lifecycle_node, &my_on_configure);
rclc_lifecycle_register_on_activate(&lifecycle_node, &my_on_activate);
rclc_lifecycle_register_on_deactivate(&lifecycle_node, &my_on_deactivate);
rclc_lifecycle_register_on_cleanup(&lifecycle_node, &my_on_cleanup);
改变 lifecycle 状态
如果要改变 lifecycle 节点的状态,则使用下面的操作
bool publish_transition = true;
rc += rclc_lifecycle_change_state(
  &lifecycle_node,
  lifecycle_msgs__msg__Transition__TRANSITION_CONFIGURE,
  publish_transition);

rc += rclc_lifecycle_change_state(
  &lifecycle_node,
  lifecycle_msgs__msg__Transition__TRANSITION_ACTIVATE,
  publish_transition);
清除 lifecycle
下面函数可以直接清除 lifecycle 节点上注册的所有服务和回调函数。
rc += rcl_lifecycle_node_fini(&lifecycle_node, &allocator);
生命周期服务还不能通过 ros2 lifecycle调用
比如 ros2 lifecycle set /node ...,只能够使用 ros2 service CLI 进行调用
eg:ros2 service call /node/change_state lifecycle_msgs/ChangeState "{transition: {id: 1, label: configure}}"

评论(1)
您还未登录,请登录后发表或查看评论