

引言
我们在上一节中也看到了,为了执行一个动作,我们需要打开好几个终端,这样很麻烦。如果我们学会了使用launch文件,那么时请将简单很多。
事实上,我们也必须得学会launch文件。
一、luanch文件
1.1 了解launch文件
首先来看一个简单的launch文件:
<launch>
   <nodepkg="turtlesim"name="sim1" type="turtlesim_node"/>
   <nodepkg="turtlesim"name="sim2" type="turtlesim_node"/>
</launch>
这是一个简单而完整的launch文件,采用XML的形式进行描述,
包含一个根元素<launch>和两个节点元素<node>。
1.<launch>
XML文件必须要包含一个根元素,launch文件中的根元素采用<launch>标签定义,文件中的其他内容都必须包含在这个标签之中:
<launch>
    ......
<node>
如果你是新手,下面这段话一定要仔细看
启动文件的核心是启动ROS节点,采用<node>标签定义,语法如下:
从上边的定义规则可以看出,在启动文件中启动一个节点需要三个属性:pkg、type和name。其中pkg定义节点所在的功能包名称,type定义节点的可执行文件名称,这两个属性等同于在终端中使用rosrun命令执行节点时的输入参数。name属性用来定义节点运行的名称,将覆盖节点中init()赋予节点的名称。这是三个最常用的属性,在某些情况下,我们还有可能用到以下属性:
· output = “screen”:将节点的标准输出打印到终端屏幕,默认输出为日志文档;
· respawn = “true”:复位属性,该节点停止时,会自动重启,默认为false;
· required = “true”:必要节点,当该节点终止时,launch文件中的其他节点也被终止;
· ns = “namespace”:命名空间,为节点内的相对名称添加命名空间前缀;
· args = “arguments”:节点需要的输入参数
实际应用中的launch文件往往会更加复杂,使用的标签也会更多,例如一个启动机器人的launch文件如下:
<launch>

   <node pkg="mrobot_bringup" type="mrobot_bringup" name="mrobot_bringup" output="screen" />

   <arg name="urdf_file" default="$(find xacro)/xacro --inorder '$(find mrobot_description)/urdf/mrobot_with_rplidar.urdf.xacro'" />
   <param name="robot_description" command="$(arg urdf_file)" />

   <node name="joint_state_publisher" pkg="joint_state_publisher" type="joint_state_publisher" />

   <node pkg="robot_state_publisher" type="robot_state_publisher" name="state_publisher">
       <param name="publish_frequency" type="double" value="5.0" />
   </node>
   <node name="base2laser" pkg="tf" type="static_transform_publisher" args="0 0 0 0 0 0 1 /base_link /laser 50"/>

   <node pkg="robot_pose_ekf" type="robot_pose_ekf" name="robot_pose_ekf">
       <remap from="robot_pose_ekf/odom_combined" to="odom_combined"/>
       <param name="freq" value="10.0"/>
       <param name="sensor_timeout" value="1.0"/>
       <param name="publish_tf" value="true"/>
       <param name="odom_used" value="true"/>
       <param name="imu_used" value="false"/>
       <param name="vo_used" value="false"/>
       <param name="output_frame" value="odom"/>
   </node>

   <include file="$(find mrobot_bringup)/launch/rplidar.launch" />
目前,我们只关注其中的标签元素,除了上边介绍的<launch>和<node>,这里还出现了<arg>、<param>、<remap>,这些都是常用的标签元素
1.2 launch文件的参数
为了方便设置和修改,launch文件支持参数设置的功能,类似于编程语言中的变量声明。关于参数设置的标签元素有两个:<param>、<arg>,一个代表parameter,另一个代表argument。这两个标签元素翻译成中文都是“参数”的意思,但是这两个“参数”的意义是完全不同的。
1 <param>
parameter是ROS系统运行中的参数,存储在参数服务器中。在launch文件中通过<param>元素加载parameter;launch文件执行后,parameter就加载到ROS的参数服务器上了。每个活跃的节点都可以通过 ros::param::get()接口来获取parameter的值,用户也可以在终端中通过rosparam命令获得parameter的值。
<param>的使用方法如下:
运行launch文件后,output_frame这个parameter的值就设置为odom,并且加载到ROS参数服务器上了。但是在很多复杂的系统中,参数的数量很多,如果这样一个一个的设置会非常麻烦,ROS也为我们提供了另外一种类似的参数加载方式——<rosparam>:
<rosparam>可以帮助我们将一个yaml格式文件中的参数全部加载到ROS参数服务器中,需要设置command属性为“load”,还可以选择设置命名空间“ns”。
<arg>
argument是另外一个概念,类似于launch文件内部的局部变量,仅限于launch文件使用,便于launch文件的重构,和ROS节点内部的实现没有关系。
设置argument使用<arg>标签元素,语法如下:
launch文件中需要使用到argument时,可以使用如下方式调用:
<paramname="foo" value="$(argarg-name)" />
二、luanch文件怎么写
首先,ROS中的launch文件是自己创建的(我在ROS包源文件中并没有发现)
接下来是launch文件的编写,需要注意
1:开头是<launch>,结尾是</launch>,两者不同
2:写法,每一条开头都是node,然后是pkg=“ ” type=“ ” name=" " 中间用空格隔开,结尾以 / 结束,例如
<node pkg="turtlesim" type="turtlesim_node" name="turtlesim" />
这算是最简单的用法,高级的暂时先不讲,一步步来。
三、怎样运行一个launch文件
首先,在自己的一个功能包下创建一个launch文件夹,里面创建一个launch文件,直接创建launch文件我猜也行
例如创建一个test1.launch文件,里面的内容是
<launch>
	<node pkg="turtlesim" type="turtlesim_node" name="turtlesim" />
	<node pkg="turtlesim" type="turtle_teleop_key" name="turtle_teleop_key" output="screen" /> 		<param name="twist_name" value="/turtle1/cmd_vel" />
</launch>
运行的命令是 roslaunch 功能包名 launch文件名
例如,在创建好文件之后,直接打开终端,运行
roslaunch catkin_ws tese1.launch
这样的话,就可以运行那个键盘控制小乌龟运动的程序啦~
四、写一个我们的运行机械臂move.py的launch文件
4.1 补全move文件
原始move文件代码如下:
#!/usr/bin/env python
#coding:utf-8
import hid
import time
import rospy
import os
from std_msgs.msg import String
import re
h=None

# for d in hid.enumerate(1155,22352):
#     keys = d.keys()
#     keys.sort()
#     for key in keys:
#         print "%s : %s" % (key, d[key])
#     print ""
def openDevice():
    global h
    try:
        print "努力打开驱动中。。。。。。"
        h = hid.device(1155,22352)
        #h = hid.device(0x1941, 0x0021) # Fine Offset USB Weather Station
        print "Manufacturer: %s" % h.get_manufacturer_string()
        print "chanpingmingcheng: %s" % h.get_product_string()
        print "Serial No: %s" % h.get_serial_number_string()

        # try non-blocking mode by uncommenting the next line
        #h.set_nonblocking(1)0x55,0x55,0x05,0x06,0x00,0x01,0x00

        # try writing some data to the device
        print "运行机械手零号位置。。。。"
        h.write([0x55,0x55,0x05,0x06,0x01,0x01,0x00])
        # print "Closing device"
        # h.close()
    except IOError, ex:
        print ex
def callback(data):
    global h
    b=data.data
    b=re.sub('\\\\x','',b)
    b=b.decode("hex")
    a=map(ord,b)
    #debug only
    print"ceshi----callback。。。。"
    print a
    #print "recive orders"+str(a)
    if h != None:
        h.write(a)

def init():
    global pub_cloud, kinect_tf
    openDevice()
    rospy.init_node("robot_arm", anonymous=True)
    rospy.Subscriber("robot_arm/cmdstring",String, callback)
    rospy.spin() #保持节点运行,直到节点关闭。不影响订阅的回调函数,因为回调函数有自己的线程

if __name__ == "__main__":
    init()
    rate = rospy.Rate(1)
    while not rospy.is_shutdown():
        rate.sleep()
    if h!=None:
        h.close()
运行move文件,机械手会运行0号动作。之后,我们通过终端输入命令,执行其他动作。
动作命令如下:
新开一个命令行终端,因为是演示,所以直接使用rostopic 的pub功能,
将上面的字符串命令打包成topic发给robot_arm节点
动作1: rostopic pub robot_arm/cmdstring std_msgs/String '\x55\x55\x05\x06\x00\x01\x00'
动作2: rostopic pub robot_arm/cmdstring std_msgs/String '\x55\x55\x05\x06\x01\x01\x00'
动作3: rostopic pub robot_arm/cmdstring std_msgs/String '\x55\x55\x05\x06\x02\x01\x00'
如果这样运行,我们需要打开好几个终端,这样很麻烦。如果我们写一个launch文件,则只需要一个终端命令就可以了。
4.1 史上最简单的一个launch文件
这个luanch文件,我们只启动一个节点,就是move.py文件里面的robot_arm,话题名为robot_arm/cmdstring。
luanch文件如下:
<launch>
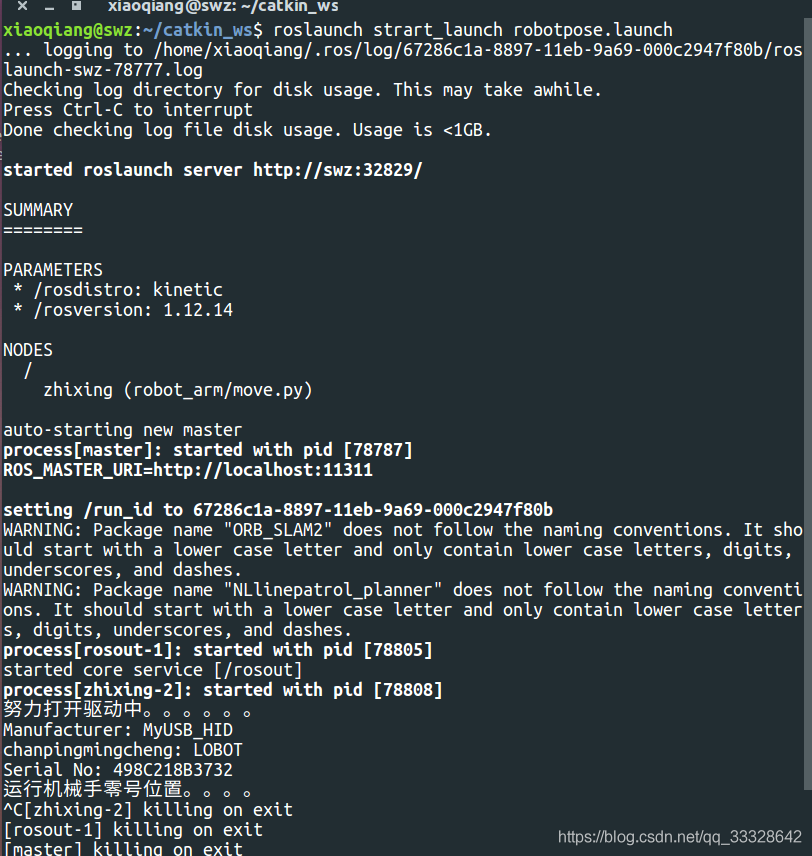
<node pkg="robot_arm" type="move.py" name="zhixing" output="screen" />
</launch>
怎么样,是不是很简单。
然后,我们的只需要cd到catkin_ws中,然后在终端输入:
roslaunch strart_launch robotpose.launch
其中的一个stare_launch是launch功能包名, robotpose.launch是功能包下面的一个launch包里面的launch文件名。PS:你可能有好几个launch文件,因此像启动哪个就输入哪个的名字。
4.2 再写一个只有两行的launch文件
仔细分析move.py文件我们发现,在ROS的发布者文件和订阅者文件里面,move算是一个订阅者文件,因为他内部包含一个callback()函数。
这时,我们需要再写一个发布者文件,让发布者文件发布动作指令,然后订阅者文件move接收到动作指令,再执行动作。
这个其实对于开发机械手臂是非常重要的,一般来讲,只要我们把这一关搞明白,后面基本就是再这上面添加我们需要的命令来逐步丰富控制策略,直到让自己的机械手越来越智能。
首先,在我们的move.py文件中,我们需要补全这个文件。同时,我们需要增加一个动作发布者文件。这个文件用于向move发送动作指令。
一般来讲,动作发布者只需要与订阅者里的话题名和消息类型保持一致就行了。
基本就是者两个文件。
这个阶段,我们只需要模仿别人就可以,先写一些简单的,再逐步完善,一步步来。
4.2.1 修改move.py文件
我们可以参考一下前面的move文件,和topic指令:动作1: rostopic pub robot_arm/cmdstring std_msgs/String '\x55\x55\x05\x06\x00\x01\x00'
这行代码是再终端输入的publisher,现在我们需要自己写个publisher文件,这个文件用来发布后面的'\x55\x55\x05\x06\x00\x01\x00'。
再原始的move文件的callback函数中,有一个对信号进行解码的语句b=b.decode("hex"),再本文中,我们就不需要这一行了,把他注释掉就行了。
修改后的move文件如下:
#!/usr/bin/env python
#coding:utf-8
import hid
import time
import rospy
import os
from std_msgs.msg import String
import re   #正则表达式模块
h=None

# for d in hid.enumerate(1155,22352):
#     keys = d.keys()
#     keys.sort()
#     for key in keys:
#         print "%s : %s" % (key, d[key])
#     print ""

      #这个函数主要是开启机械手的驱动程序,然后让机械手执行第一个默认动作
def openDevice():
    global h
    try:
        print "努力打开驱动中。。。。。。"
        h = hid.device(1155,22352)
        #h = hid.device(0x1941, 0x0021) # Fine Offset USB Weather Station
        print "Manufacturer: %s" % h.get_manufacturer_string()
        print "chanpingmingcheng: %s" % h.get_product_string()
        print "Serial No: %s" % h.get_serial_number_string()

        # try non-blocking mode by uncommenting the next line
        #h.set_nonblocking(1)

        # 尝试输入一些数据到下面的括号里
        h.write([0x55,0x55,0x05,0x06,0x01,0x01,0x00])
        # print "Closing device"
        # h.close()
    except IOError, ex:
        print ex

      #这个是回调函数
def callback(pose):
    global h
    b=pose.data
    rospy.loginfo("b %s", b)
    b=re.sub('\\\\x','',b)  #为了匹配一个反斜杠字面值,模式字符串就需要写成 '\\\\',
                            #因为正则表达式必须写成 \\,而每个反斜杠在普通的Python 字符串字面值内又必须写成 \\。
    #b=b.decode("hex")
    a=map(ord,b)
    #debug only
    #print "recive orders"+str(a)
    if h != None:
        h.write(a)
   #这个是定义订阅者函数
def init():
    global pub_cloud, kinect_tf
    openDevice()  #首先是打开驱动函数,
    rospy.init_node("robot_arm", anonymous=True)#初始化发布者节点,名称为robot_arm
    rospy.Subscriber("robot_arm/cmdstring",String, callback)#定义发布者,话题名为robot_arm/cmdstring
    rospy.spin() #保持节点运行,直到节点关闭。不影响订阅的回调函数,因为回调函数有自己的线程

if __name__ == "__main__":
    init()
    rate = rospy.Rate(1)
    while not rospy.is_shutdown():
        rate.sleep()
    if h!=None:
        h.close()
4.2.2 新写一个动作指令发布文件
话不多说,posepub文件代码如下:
#!/usr/bin/env python
#coding:utf-8
import hid
import time
import rospy
import os
from std_msgs.msg import String
import re

def RobotPose_publisher():
    rospy.init_node('posepub', anonymous=True)# ROS节点初始化,引号内为节点名
    pose_info_pub = rospy.Publisher('robot_arm/cmdstring', String, queue_size=10)
    # 创建一个Publisher,
    #发布名为robot_arm/cmdstring的topic,# 消息类型为String,队列长度10
    rate = rospy.Rate(10)
    while not rospy.is_shutdown():
    	pose_str = "\x55\x55\x05\x06\x03\x01\x00";  # 初始化String类型的消息
        pose_info_pub.publish(pose_str)# 发布消息
        rate.sleep()# 按照循环频率延时
if __name__ == '__main__':
    try:
        RobotPose_publisher()
    except rospy.ROSInterruptException:
        pass
4.2.3 一个新的launch文件
<launch>
    <node pkg="robot_arm" type="move.py" name="subscriber2pose" output="screen" />
    <node pkg="robot_arm" type="posepub.py" name="publisher2pose" output="screen" />
</launch>
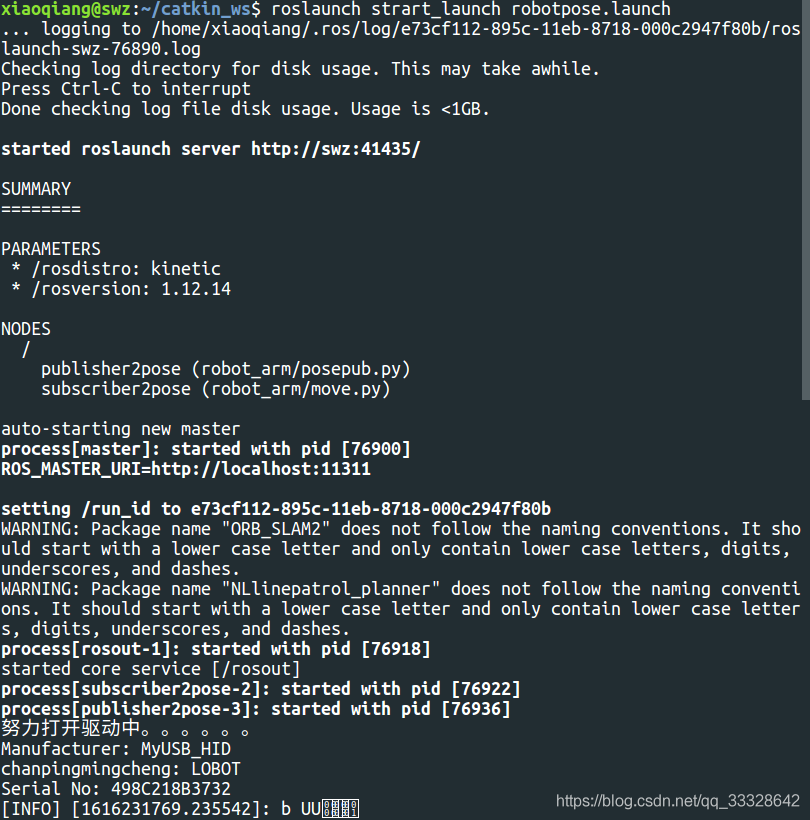

就这样,我们执行这个launch文件后,机械臂会在驱动程序打开的时候执行第一个指令后,再重复执行publisher发布的那个指令,直到停止程序。
到了这个代码之后,大家应该已经能够初步明白ROS的通信模式了,下面,再非视觉私服的情况下,我们可以在publisher文件里尽可能的发挥,然后控制机械臂。
但是,这样毕竟是开环控制,再没有视觉伺服的情况下,能实现的能力有限。
五、总结和展望
这一张,我们大概知道了launch文件的使用以及发布者和订阅者两个文件之间的使用规则。
接下来,我们将介绍小强机械臂的手眼标定方法。因为对机械臂的手眼标定是实现对机械手臂的智能控制的第一步。


评论(0)
您还未登录,请登录后发表或查看评论