

数据集链接:https://url25.ctfile.com/f/34628125-542711816-13fa54
(访问密码:3005)
yolov3 使用的链接:https://github.com/qqwweee/keras-yolo3
环境:linux
tensorflow-gpu 1.7.0
python3.6
数据集:
数据集包含2类:一类是飞机图(aircraft);另外一类是油桶图(oiltank)。这些数据集来自CSDN@AI浩。
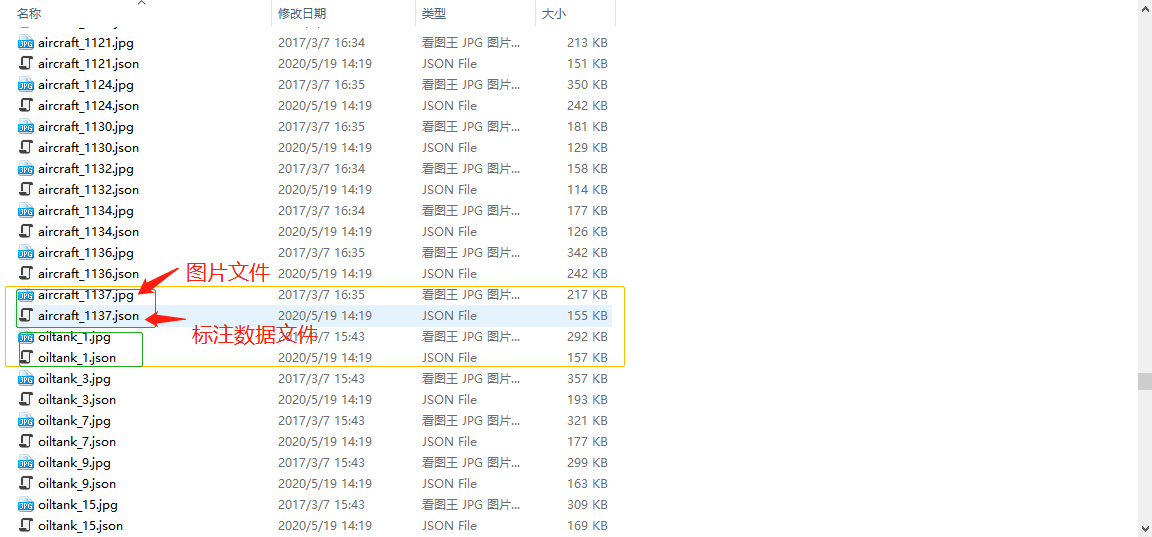
1.查看数据集:每张数据集都包含一张图片以及对应的json标注文件,如下图:
2.解析标注文件:其中需要从json文件获得所有被检物体的标注信息与图片路径
{
	"version": "3.16.4",   #版本
	"flags": {},
	"shapes": [{	# 关键元素 标注的框框相关信息
		"label": "aircraft",   #标注物体的类型
		"line_color": null,
		"fill_color": null,
		"points": [		# 标注框的起始点(左上)与结束点(右下)
			[150.0, 471.0],
			[229.0, 550.0]
		],
		"shape_type": "rectangle",	#标注的框为长方形
		"flags": {}
	}, {
		"label": "aircraft",
		"line_color": null,
		"fill_color": null,
		"points": [
			[565.0, 387.0],
			[639.0, 462.0]
		],
		"shape_type": "rectangle",
		"flags": {}
	}, {
		"label": "aircraft",
		"line_color": null,
		"fill_color": null,
		"points": [
			[657.0, 610.0],
			[721.0, 685.0]
		],
		"shape_type": "rectangle",
		"flags": {}
	}],
	"lineColor": [0, 255, 0, 128],   #框框颜色
	"fillColor": [255, 0, 0, 128],	# 填充颜色
	"imagePath": "aircraft_1124.jpg", #图片文件路径
	"imageData": "*FIo//2Q==",   #图片文件data
	"imageHeight": 915, #图片高度
	"imageWidth": 1044	# 图片宽度
}
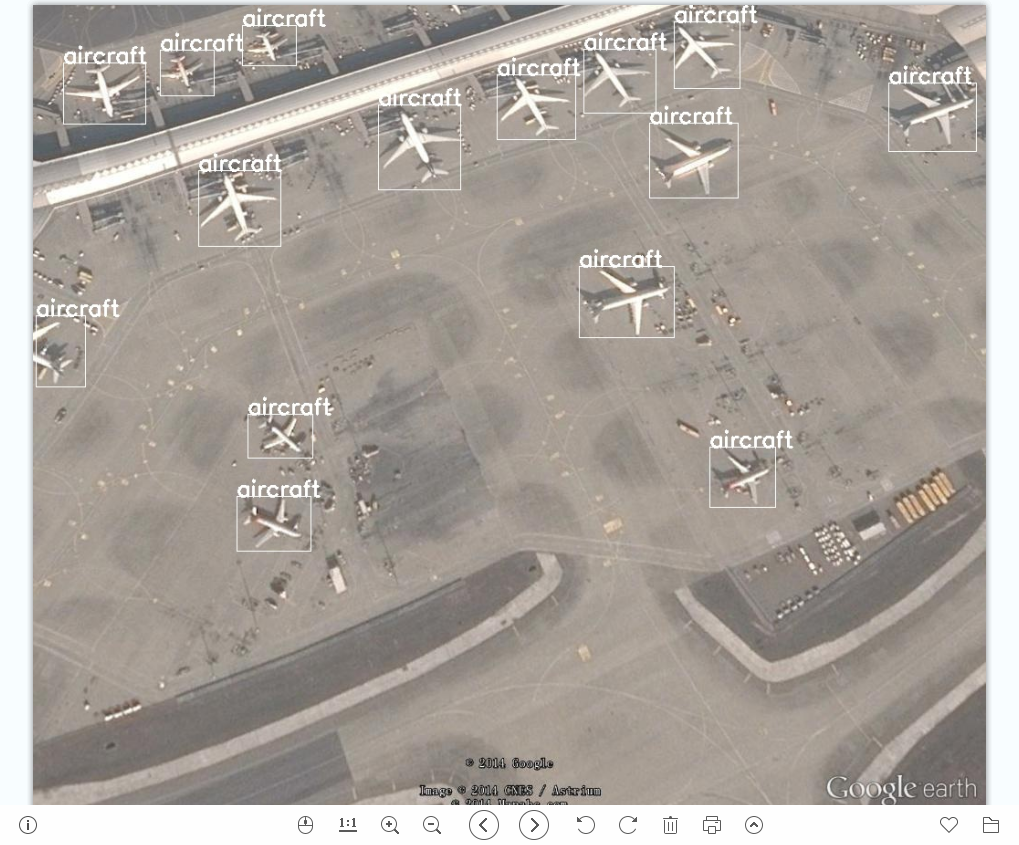
通过下面代码,查看标注图片
import json
import os
import cv2

def drawrectangle(path):
    '''
    输入参数为json文件 json文件与图片文件放置在同一个目录下
    '''
    with open(path, "r", encoding='utf-8') as r:
        # 以json方式读取文件
        json_file = json.load(r)
    # 所有标注
    all_thing = json_file["shapes"]
    # 图片文件名
    image_name = os.path.join(os.path.dirname(os.path.abspath(path)), json_file["imagePath"])
    img = cv2.imread(image_name)
    for i in all_thing:
        cv2.rectangle(img, (int(i["points"][0][0]), int(i["points"][0][1])),
                            (int(i["points"][1][0]), int(i["points"][1][1])), (255, 255, 255))
        cv2.putText(img, i["label"], (int(i["points"][0][0]), int(i["points"][0][1])),
        cv2.FONT_HERSHEY_SIMPLEX, 0.8, (255, 255, 255), 2)
    cv2.imwrite("./1111111111.jpg", img)
图片展示:
3.转化数据集格式
转为txt格式: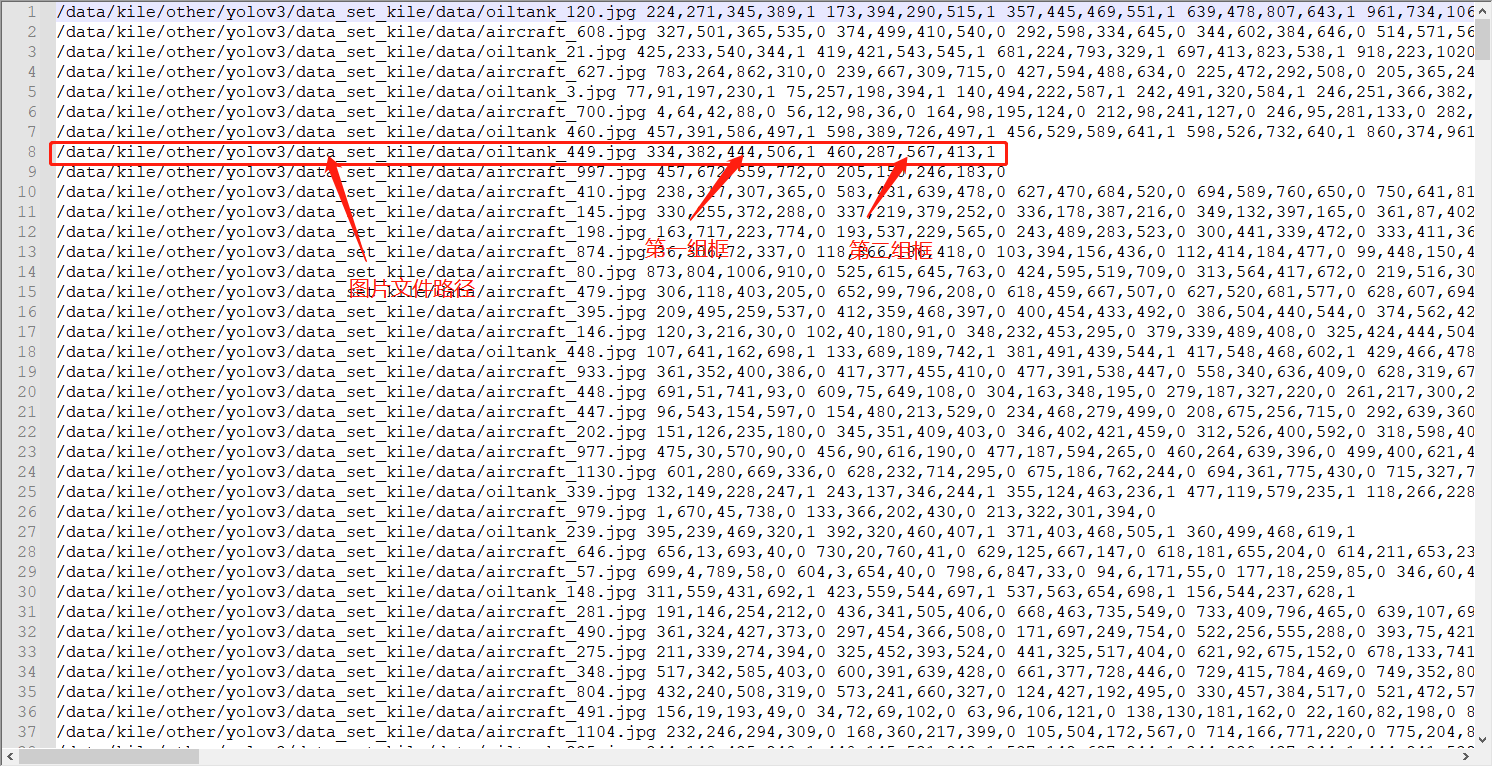
def json2txt(path, txt_file_path):
    '''
    输入参数为json文件 json文件与图片文件放置在同一个目录下
    '''
    with open(path, "r", encoding='utf-8') as r:
        # 以json方式读取文件
        json_file = json.load(r)
    # 所有标注
    all_thing = json_file["shapes"]
    # 图片文件名
    image_path = os.path.join(os.path.dirname(os.path.abspath(path)), json_file["imagePath"])
    with open(txt_file_path, "a", encoding="utf-8") as all_txt:
        all_txt.write(image_path)
        for i in all_thing:
            all_txt.write(" ")
            left_top_points = i["points"][0]
            right_bottom_points = i["points"][1]
            label = 0 if i["label"] == "aircraft" else 1
            all_txt.write(str(int(left_top_points[0])))
            all_txt.write(",")
            all_txt.write(str(int(left_top_points[1])))
            all_txt.write(",")
            all_txt.write(str(int(right_bottom_points[0])))
            all_txt.write(",")
            all_txt.write(str(int(right_bottom_points[1])))
            all_txt.write(",")
            all_txt.write(str(label))
        all_txt.write("\n")

def split_data_set(txt_file_path):
    '''
    将总的txt文件分为train、test set
    '''
    with open(txt_file_path) as txt:
        contents = txt.readlines()
    train_set, test_set = train_test_split(contents,train_size=0.85)
    with open(os.path.join(os.path.dirname(txt_file_path),"train.txt"), "w") as train_t:
        for i in train_set:
            train_t.write(i)
    with open(os.path.join(os.path.dirname(txt_file_path),"test.txt"), "w") as test_t:
        for j in test_set:
            test_t.write(j)

if __name__ == '__main__':
    # txt保存的文件
    txt_save_path = r"/data/kile/other/yolov3/data_set_kile/data_txt"
	# 所有json文件保存的地方
    json_path = r"/data/kile/other/yolov3/data_set_kile/data"
    # 获取所有json文件
    json_files = glob.glob(os.path.join(json_path,"*.json"))
    # 转化为txt的文件
    txt_file_path = os.path.join(txt_save_path, "all_in.txt")
    if os.path.exists(txt_file_path):
        os.remove(txt_file_path)
    for json_file_path in json_files:
        json2txt(json_file_path, txt_file_path)
    # 将txt文件分为train、test数据集
    split_data_set(txt_file_path)
结果如下

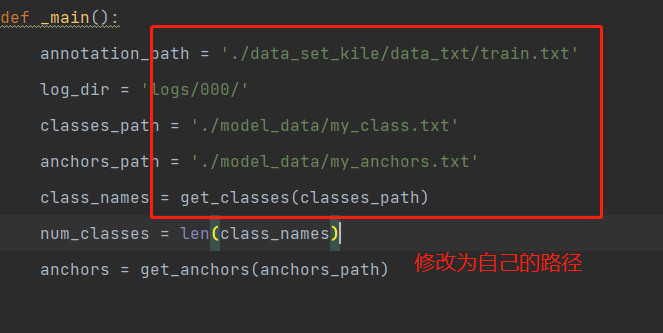
训练:
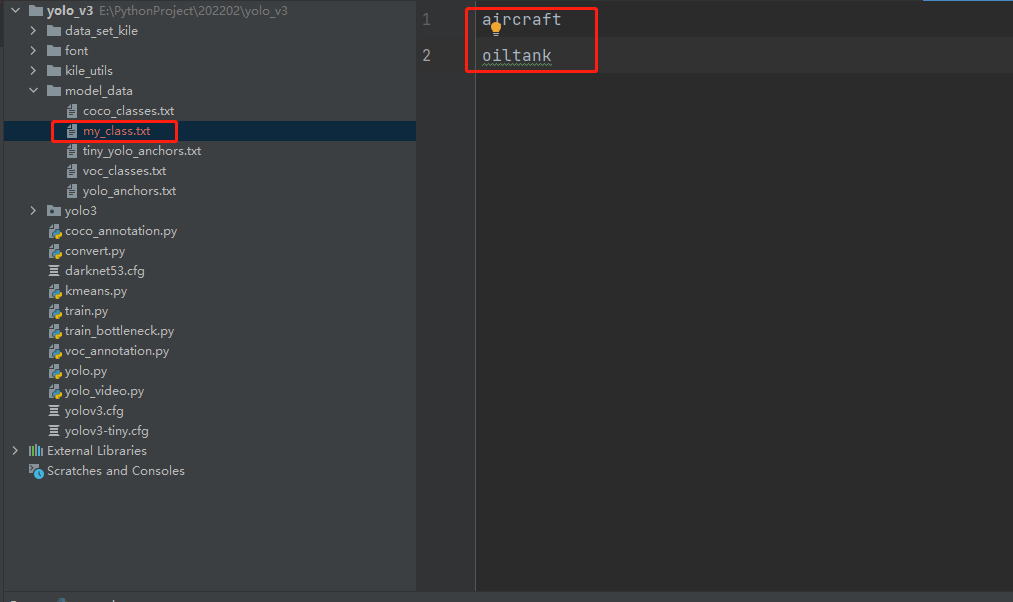
1.修改class文件,原始class文件(物体类别文件)有80种,我们需要修改为我们自己的2种,如下图
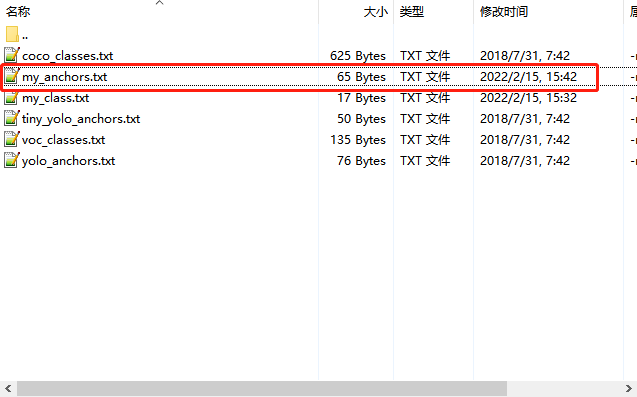
2.对我们的物体进行kmeans聚类
修改代码:可以页面搜索函数
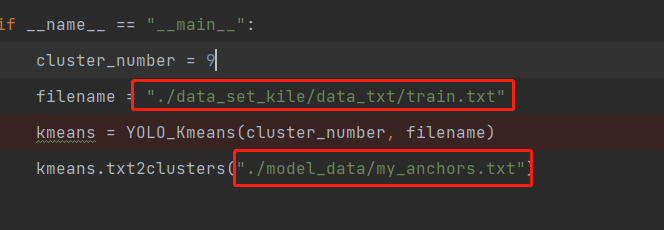


结果如下:

3。将tf模型转化为keras模型
修改convert.py
其中需要的模型我已上传。大家可以下载:https://url25.ctfile.com/f/34628125-544337008-909dc6
(访问密码:3005)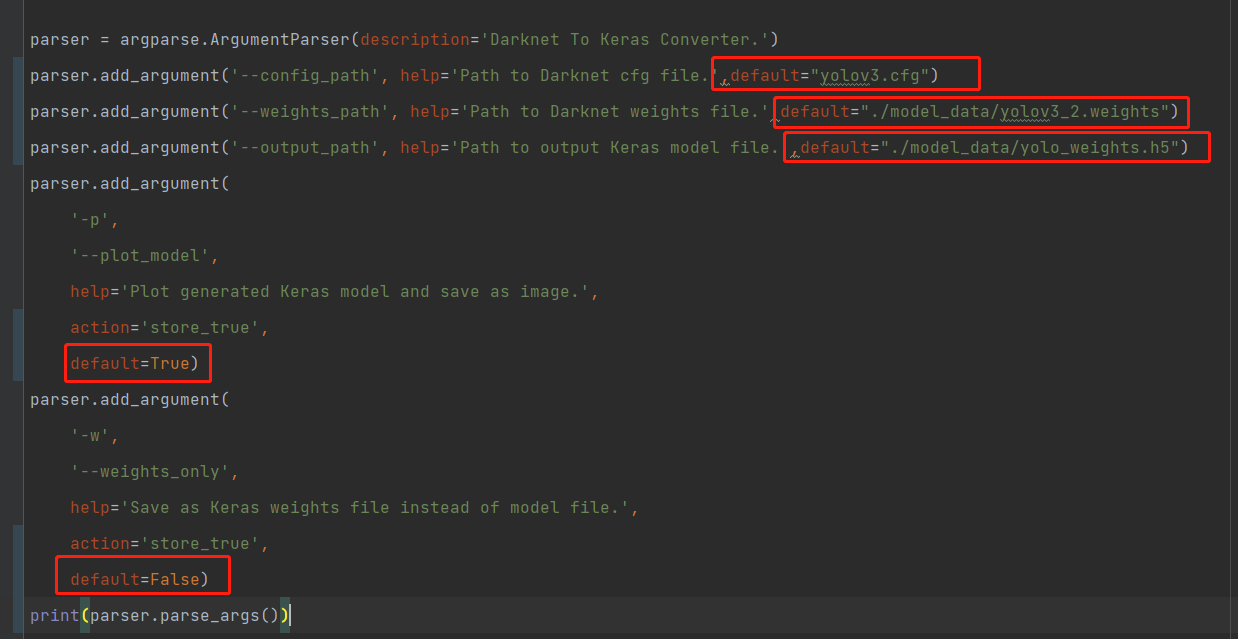
运行convert.py,得到结果
结果模型我以上传,有需要可以下载:
https://url25.ctfile.com/f/34628125-544338339-739498
(访问密码:3005)
修改训练代码:
在train.py之前加入下面代码
# 跳过破损图片
ImageFile.LOAD_TRUNCATED_IMAGES = True

# 设置tensorflow  gpu使用策略
os.environ["CUDA_VISIBLE_DEVICES"] = "0"
config = tf.ConfigProto()
config.gpu_options.per_process_gpu_memory_fraction = 0.8
config.gpu_options.allow_growth = True
_SESSION = tf.Session(config = config)
注意修改自己的batch_size
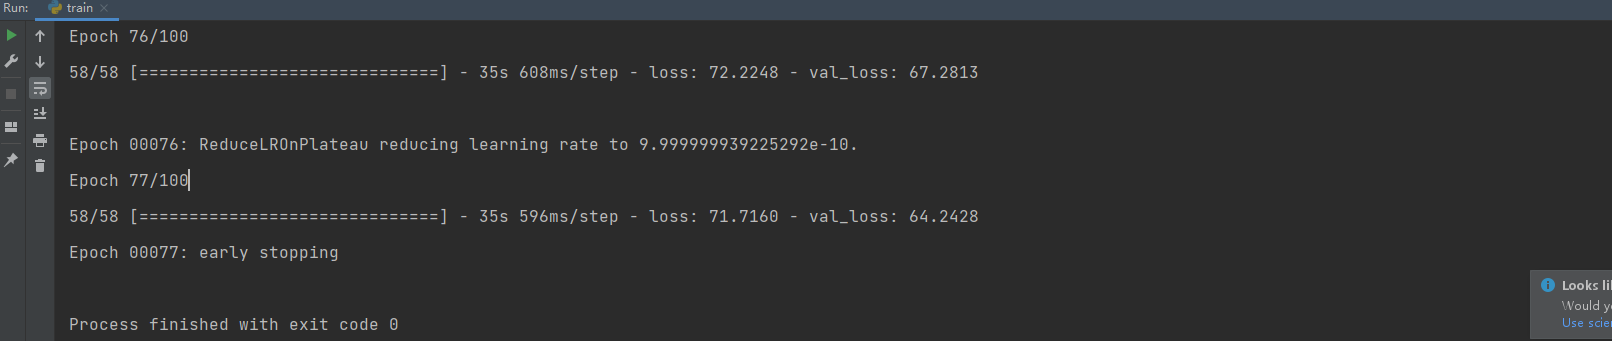
运行train.py,运行结果如下:
预测:原作者是通过开启摄像头检测,这里为了方便,添加了部分函数,用来检测之前的test_set
yolo_video.py 完整代码修改如下:
import glob
import os.path
import sys
import argparse

import numpy as np

from yolo import YOLO, detect_video
from PIL import Image, ImageFont, ImageDraw
from tqdm import tqdm
import tensorflow as tf

os.environ["CUDA_VISIBLE_DEVICES"] = "0"
config = tf.ConfigProto()
config.gpu_options.per_process_gpu_memory_fraction = 0.8
config.gpu_options.allow_growth = True
_SESSION = tf.Session(config=config)


def detect_img(yolo):
    while True:
        img = input('Input image filename:')
        try:
            image = Image.open(img)
        except:
            print('Open Error! Try again!')
            continue
        else:
            r_image = yolo.detect_image(image)
            r_image.show()
    yolo.close_session()


def detect_img_dir(yolo, img_paths, save_path):
    '''
    文件夹批量检测
    '''
    imgs = glob.glob(os.path.join(img_paths, "*"))
    for img in tqdm(imgs):
        if img.split(".")[-1] != "db":
            try:
                image = Image.open(img)
                img1 = yolo.detect_image(image)
                img1.save(os.path.join(save_path, os.path.basename(img)))
            except:
                pass


def drawImage(image, class_list):
    font = ImageFont.truetype(font='font/FiraMono-Medium.otf',
                              size=np.floor(3e-2 * image.size[1] + 0.5).astype('int32'))
    thickness = (image.size[0] + image.size[1]) // 300
    for i in class_list:
        label = i.split(",")[-1]
        box = i.split(",")[:-1]
        left, top, right, bottom = box
        top = int(top)
        left = int(left)
        bottom = int(bottom)
        right = int(right)
        draw = ImageDraw.Draw(image)
        label_size = draw.textsize(label, font)

        top = max(0, np.floor(top + 0.5).astype('int32'))
        left = max(0, np.floor(left + 0.5).astype('int32'))
        bottom = min(image.size[1], np.floor(bottom + 0.5).astype('int32'))
        right = min(image.size[0], np.floor(right + 0.5).astype('int32'))

        if top - label_size[1] >= 0:
            text_origin = np.array([left, top - label_size[1]])
        else:
            text_origin = np.array([left, top + 1])
        for i in range(thickness):
            draw.rectangle(
                [left + i, top + i, right - i, bottom - i],
                outline=(128, 0, 128))
        draw.rectangle(
            [tuple(text_origin), tuple(text_origin + label_size)],
            fill=(128, 0, 128))
        draw.text(text_origin, label, fill=(0, 0, 0), font=font)
        del draw
    return image


def detect_img_txt(yolo, txt_path, save_path):
    '''
    txt批量检测
    '''
    if not os.path.exists(save_path):
        os.makedirs(save_path)
    with open(txt_path, "r") as f:
        contents = f.readlines()
    for img in tqdm(contents):
        image_path = None
        if len(img) > 10:
            image_path = img.split(" ")[0]
            clas_ = img.replace("\n", "").split(" ")[1:]
        if image_path.split(".")[-1] != "db":
            try:
                image = Image.open(image_path)
                img1 = yolo.detect_image(image)
                img1 = drawImage(img1, clas_)
                img1.save(os.path.join(save_path, os.path.basename(image_path)))
            except:
                pass


FLAGS = None

if __name__ == '__main__':
    # class YOLO defines the default value, so suppress any default here
    parser = argparse.ArgumentParser(argument_default=argparse.SUPPRESS)
    '''
    Command line options
    '''
    parser.add_argument(
        '--model_path', type=str,
        default="./logs/000/trained_weights_final.h5",
        help='path to model weight file, default ' + YOLO.get_defaults("model_path")
    )

    parser.add_argument(
        '--anchors_path', type=str,
        default="./model_data/my_anchors.txt",
        help='path to anchor definitions, default ' + YOLO.get_defaults("anchors_path")
    )

    parser.add_argument(
        '--classes_path', type=str,
        default="./model_data/my_class.txt",
        help='path to class definitions, default ' + YOLO.get_defaults("classes_path")
    )

    parser.add_argument(
        '--gpu_num', type=int,
        default=0,
        help='Number of GPU to use, default ' + str(YOLO.get_defaults("gpu_num"))
    )

    parser.add_argument(
        '--image',
        default=True,
        action="store_true",
        help='Image detection mode, will ignore all positional arguments'
    )
    '''
    Command line positional arguments -- for video detection mode
    '''
    parser.add_argument(
        "--input", nargs='?', type=str, required=False, default='./path2your_video',
        help="Video input path"
    )

    parser.add_argument(
        "--output", nargs='?', type=str, default="",
        help="[Optional] Video output path"
    )

    FLAGS = parser.parse_args()

    if FLAGS.image:
        """
        Image detection mode, disregard any remaining command line arguments
        """
        print("Image detection mode")
        if "input" in FLAGS:
            print(" Ignoring remaining command line arguments: " + FLAGS.input + "," + FLAGS.output)
        # detect_img(YOLO(**vars(FLAGS)))

        detect_img_txt(YOLO(**vars(FLAGS)), r"./data_set_kile/data_txt/test.txt", r"./result")
    elif "input" in FLAGS:
        detect_video(YOLO(**vars(FLAGS)), FLAGS.input, FLAGS.output)
    else:
        print("Must specify at least video_input_path.  See usage with --help.")
这是模型运行的部分结果:还需提高
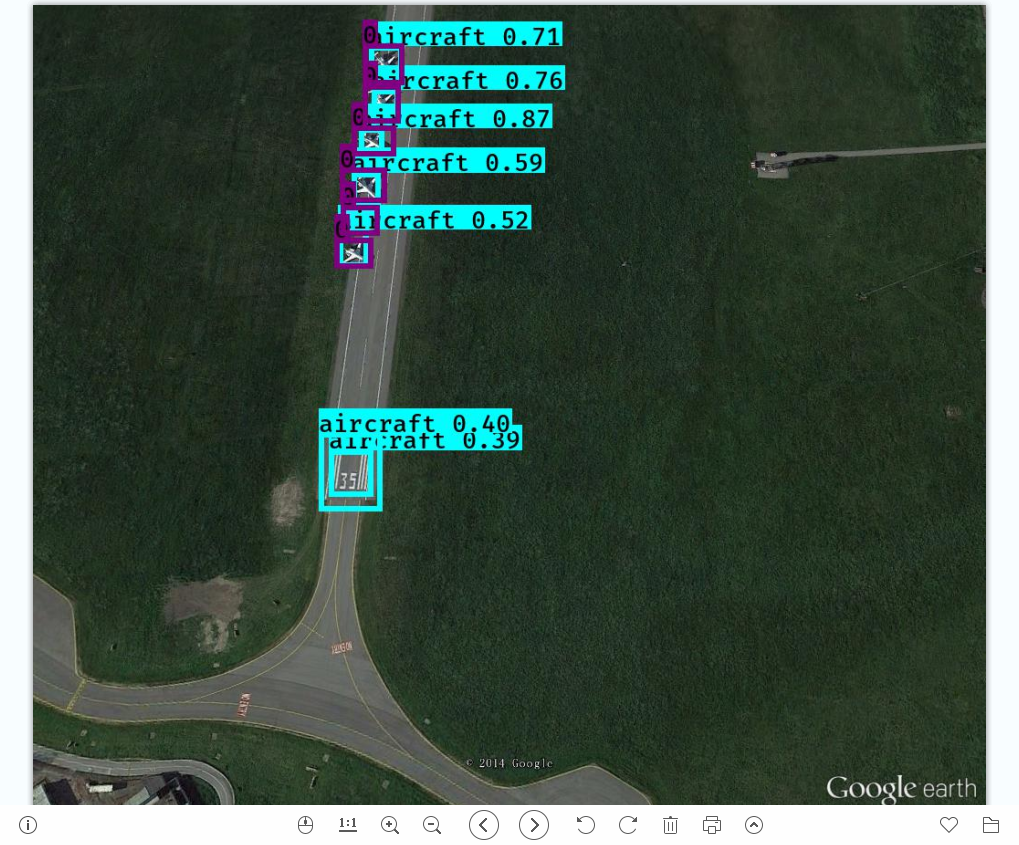
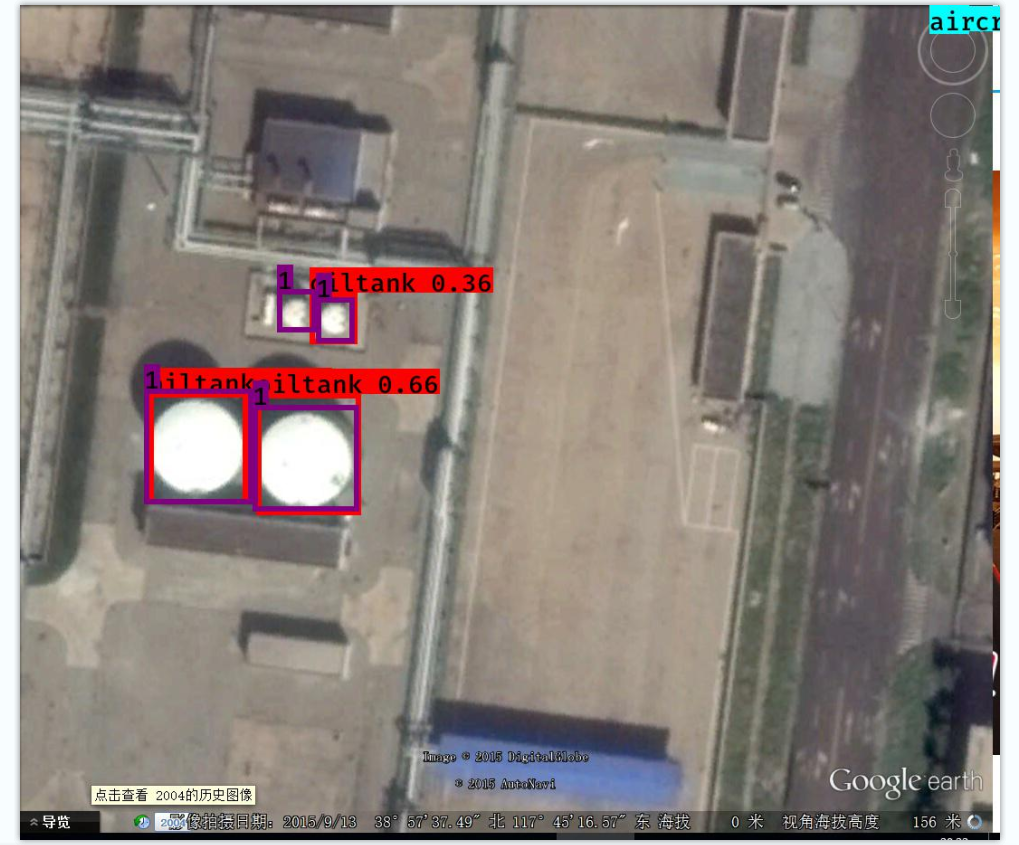
标注为数字的框代表标注数据,另外一个表示预测结果,问题:
1.部分漏检
2.标注框与预测框对比,预测框偏小,即预测物体正确但是有位置偏差,模型训练地还不够优秀
项目文件我也上传了:https://url25.ctfile.com/f/34628125-544338783-34562d
(访问密码:3005)
20220217 更新
之前的结果表现确实有点差,然后刚好手头有台机器,于是更新了策略,重新训练,今天把结果展示一下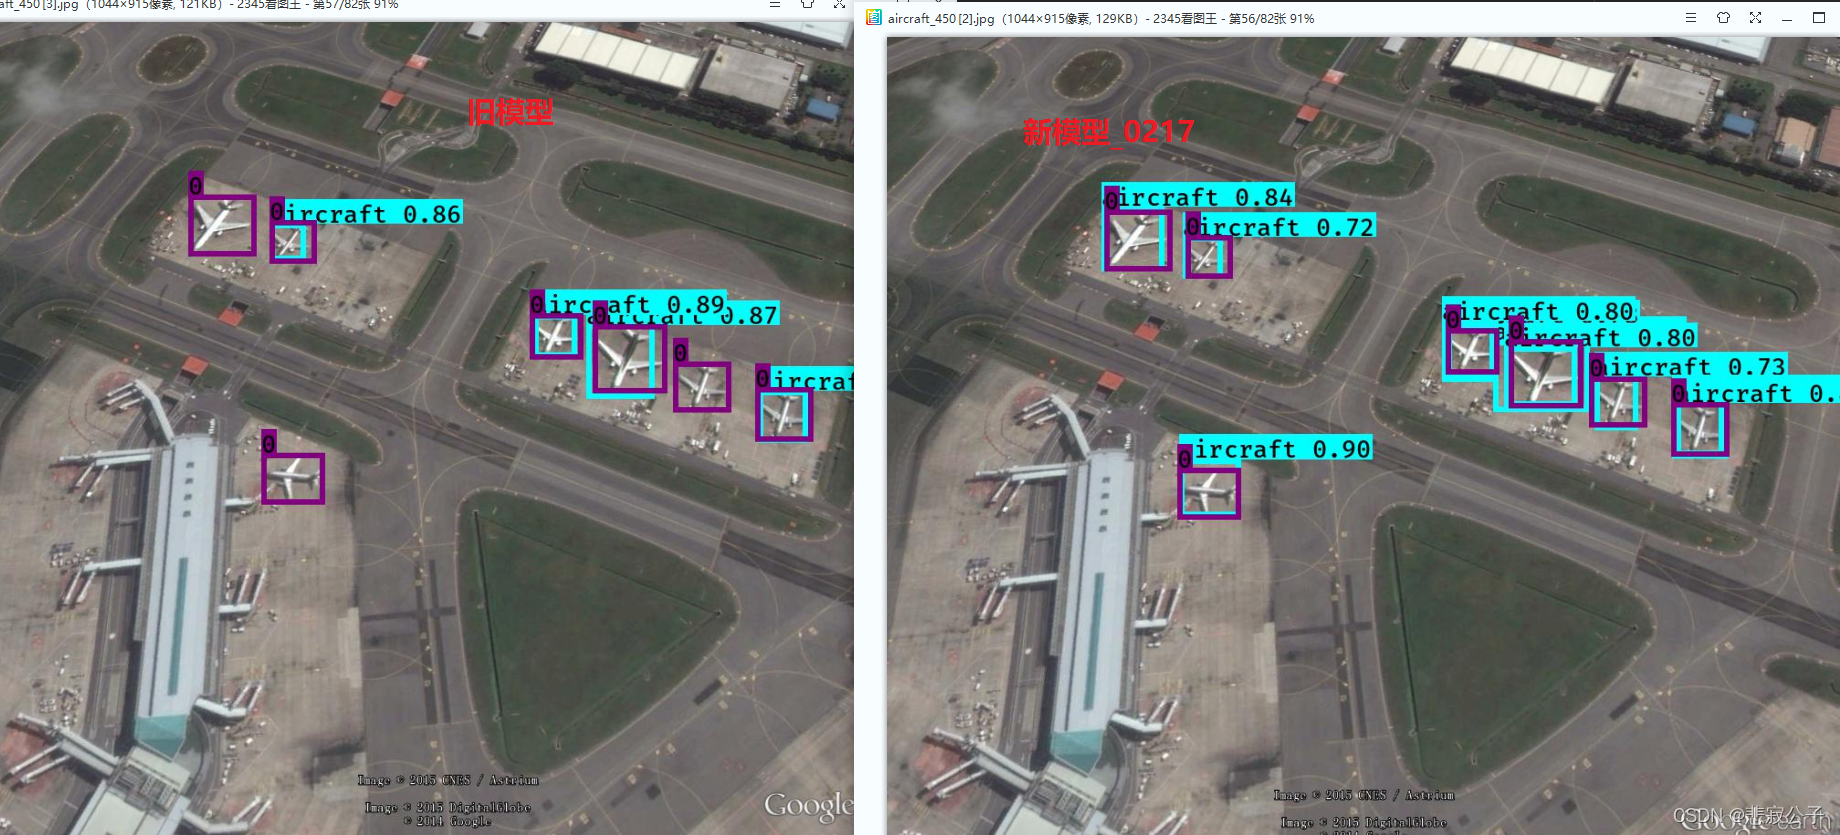

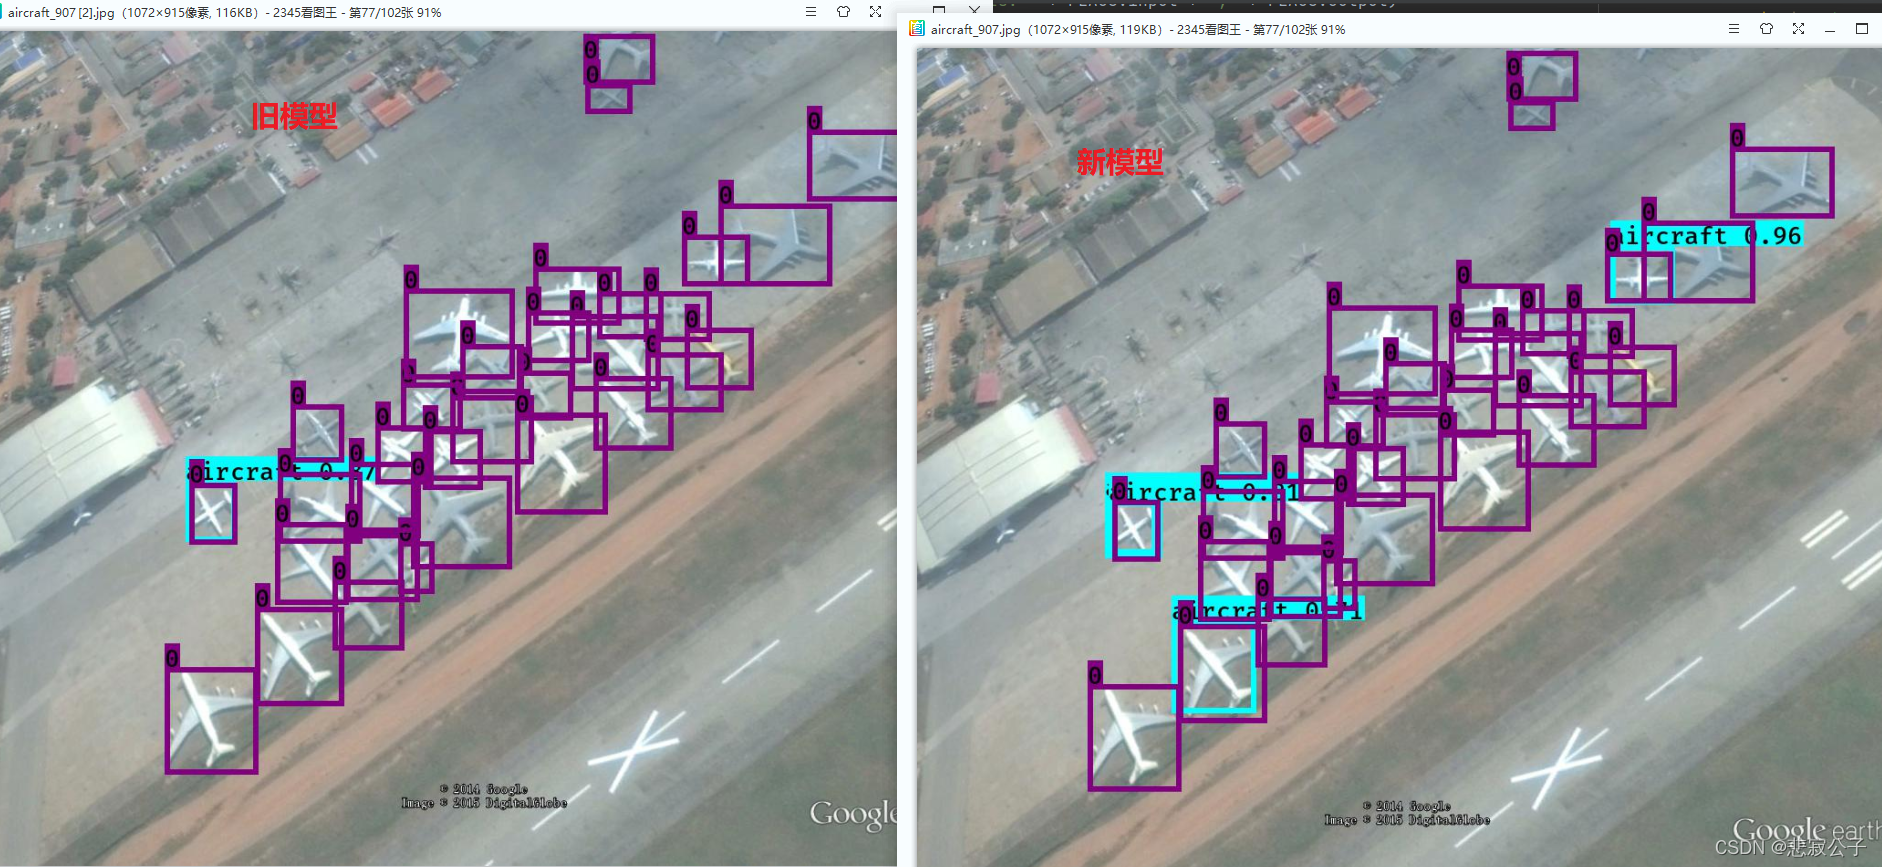
从结果上看,确实有所提高,但是仍然离想要的目标还有一段距离。对于连续密集型的物体,yolov3检测并不是很好,小物体检测也不是很好。等之后有机器了,再更新。。。。


评论(0)
您还未登录,请登录后发表或查看评论