

使用 OpenCV 进行 YOLO 对象检测
本文将教你如何使用YOLOV3对象检测器、OpenCV和Python实现对图像和视频流的检测。用到的文件有yolov3.weights、yolov3.cfg、coco.names,这三个文件的github链接如下:
GitHub - pjreddie/darknet: Convolutional Neural Networks
wget https://pjreddie.com/media/files/yolov3.weights
wget https://github.com/pjreddie/darknet/blob/master/cfg/yolov3.cfg
wget https://github.com/pjreddie/darknet/blob/master/data/coco.names
什么是YOLO物体检测器?
YOLO 是一个单级检测器。
Redmon 等人于 2015 年首次提出,他们的论文 You Only Look Once: Unified, Real-Time Object Detection 详细介绍了一种能够进行超实时物体检测的物体检测器,在 GPU 上获得 45 FPS。
YOLO 经历了多次不同的迭代,包括 YOLO9000: Better, Faster, Stronger(即 YOLOv2),能够检测超过 9,000 个物体检测器。
Redmon 和 Farhadi 通过对对象检测和分类进行联合训练,能够实现如此大量的对象检测。作者使用联合训练同时在 ImageNet 分类数据集和 COCO 检测数据集上训练了 YOLO9000。
在 COCO 的 156 类版本上,YOLO9000 实现了 16% 的平均精度 (mAP),虽然 YOLO 可以检测 9,000 个单独的类,但准确度并不高。
Redmon 和 Farhadi 又发表了一篇新的 YOLO 论文,YOLOv3: An Incremental Improvement (2018)。 YOLOv3 比以前的模型大得多,但在我看来,它是 YOLO 系列对象检测器中最好的(这也是最后一篇,作者抗议将AI用于军事领域,告别了CV)。
我们将在这篇博文中使用 YOLOv3权重,是在 COCO 数据集上训练得到的。
COCO数据集由80个标签组成,包括:person,bicycle,car,motorbike,aeroplane,bus,train,truck,boat,traffic light,fire hydrant,stopsign,parking meter,bench,bird,cat,dog,horse,sheep,cow,elephant,bear,zebra,giraffe,backpack,umbrella,handbag,tie,suitcase,frisbee,skis,snowboard,sports ball,kite,baseball bat,baseball glove,skateboard,surfboard,tennis racket,bottle,wine glass,cup,fork,
knife,spoon,bowl,banana,apple,sandwich,orange,broccoli,carrot,hot dog,pizza,donut,cake,chair,sofa,pottedplant,bed,diningtable,toilet,tvmonitor,laptop,mouse,remote,keyboard,cell phone,microwave,oven,toaster,sink,refrigerator,book,clock,vase,scissors,teddy bear,hair drier,toothbrush。
项目结构
在终端中使用 tree 命令查看项目的结构,如下:
$ tree
.
├── images
│ └── 11.jpg
├── output
│ └── output.avi
├── videos
│ └── overpass.mp4
├── yolo-coco
│ ├── coco.names
│ ├── yolov3.cfg
│ └── yolov3.weights
├── yolo.py
└── yolo_video.py
我们今天的项目由 4 个目录和两个 Python 脚本组成。
目录(按重要性排序)是:
yolo-coco文件夹:YOLOv3 物体检测器模型文件
images文件夹:存放用于评估的图像。
videos文件夹 :存放用于评估的视频
output: 评估后的结果。
yolo.py:评估图像
yolo_video.py :评估视频
检测图像
新建文件yolo_objectdetection.py
# import the necessary packages
import numpy as np
import argparse
import time
import cv2
import os
image_path='11.jpg'
yolo='yolo_coco'
confidence_t=0.5
threshold=0.3
# 加载训练 YOLO 模型的 COCO 类标签
labelsPath = os.path.sep.join([yolo, "coco.names"])
LABELS = open(labelsPath).read().strip().split("\n")
# 初始化一个颜色列表来表示每个类标签
np.random.seed(42)
COLORS = np.random.randint(0, 255, size=(len(LABELS), 3),
dtype="uint8")
# YOLO 对象检测
print("[INFO] loading YOLO from disk...")
config_path = './yolo_coco/yolov3.cfg'
weights_path = './yolo_coco/yolov3.weights'
net = cv2.dnn.readNetFromDarknet(config_path, weights_path)
导入包。
定义全局参数:
image_path:定义图片的路径。
yolo:定义模型存放的路径
confidence_t:过滤弱检测的最小概率。
threshold:非最大值抑制阈值。
接下来,加载了所有的类 LABELS。然后,为每个标签分配随机颜色。
加载权重文件。# 加载我们的输入图像并获取其空间维度
image = cv2.imread(image_path)
(H, W) = image.shape[:2]
# 从输入图像构建一个blob,然后执行一个前向传播
# 通过 YOLO 对象检测器,输出边界框和相关概率
blob = cv2.dnn.blobFromImage(image, 1 / 255.0, (416, 416),
swapRB=True, crop=False)
net.setInput(blob)
start = time.time()
# 获取网络输出层信息(所有输出层的名字),设定并前向传播
outInfo = net.getUnconnectedOutLayersNames()
# 得到各个输出层的、各个检测框等信息,是二维结构。
layerOutputs = net.forward(outInfo)
加载输入图像并提取其尺寸。
从 YOLO 模型取出输出层名称。
构建一个 blob(第 48 和 49 行)。
cv2.dnn.blobFromImage(image[, scalefactor[, size[, mean[, swapRB[, crop[, ddepth]]]]]])
作用:
对图像进行预处理,包括减均值,比例缩放,裁剪,交换通道等,返回一个4通道的blob(blob可以简单理解为一个N维的数组,用于神经网络的输入)
参数:
image:输入图像(1、3或者4通道)
可选参数
scalefactor:图像各通道数值的缩放比例
size:输出图像的空间尺寸,如size=(200,300)表示高h=300,宽w=200
mean:用于各通道减去的值,以降低光照的影响(e.g. image为bgr3通道的图像,mean=[104.0, 177.0, 123.0],表示b通道的值-104,g-177,r-123)
swapRB:交换RB通道,默认为False.(cv2.imread读取的是彩图是bgr通道)
crop:图像裁剪,默认为False.当值为True时,先按比例缩放,然后从中心裁剪成size尺寸
ddepth:输出的图像深度,可选CV_32F 或者 CV_8U.
通过我们的 YOLO 网络执行前向传递
显示 YOLO 的推理时间
接下来我们实现图像的可视化操作:
# 分别初始化检测到的边界框、置信度和类 ID 的列表
boxes = []
confidences = []
classIDs = []
# 循环输出
for output in layerOutputs:
# 遍历每个检测结果
for detection in output:
# 提取物体检测的类ID和置信度(即概率)
scores = detection[5:]
classID = np.argmax(scores)
confidence = scores[classID]
# 过滤精度低的结果
if confidence > confidence_t:
# 延展边界框坐标,计算 YOLO 边界框的中心 (x, y) 坐标,然后是框的宽度和高度
box = detection[0:4] * np.array([W, H, W, H])
(centerX, centerY, width, height) = box.astype("int")
# 使用中心 (x, y) 坐标导出边界框的上角和左角
x = int(centerX - (width / 2))
y = int(centerY - (height / 2))
# 更新边界框坐标、置信度和类 ID 列表
boxes.append([x, y, int(width), int(height)])
confidences.append(float(confidence))
classIDs.append(classID)
# 使用非极大值抑制来抑制弱的、重叠的边界框
idxs = cv2.dnn.NMSBoxes(boxes, confidences, confidence_t,
threshold)
# 确保至少存在一个检测
if len(idxs) > 0:
# 遍历我们保存的索引
for i in idxs.flatten():
# 提取边界框坐标
(x, y) = (boxes[i][0], boxes[i][1])
(w, h) = (boxes[i][2], boxes[i][3])
# 在图像上绘制一个边界框矩形和标签
color = [int(c) for c in COLORS[classIDs[i]]]
cv2.rectangle(image, (x, y), (x + w, y + h), color, 2)
text = "{}: {:.4f}".format(LABELS[classIDs[i]], confidences[i])
cv2.putText(image, text, (x, y - 5), cv2.FONT_HERSHEY_SIMPLEX,
0.5, color, 2)
# show the output image
cv2.imshow("Image", image)
cv2.waitKey(0)
初始化列表:
box :我们围绕对象的边界框。
置信度:YOLO 分配给对象的置信度值。 较低的置信度值表明对象可能不是网络认为的那样。 从上面的命令行参数中记住,我们将过滤掉不满足 0.5 阈值的对象。
classIDs :检测到的对象的类标签。
循环遍历每个 layerOutputs。
循环输出中的每个检测项。
提取 classID 和置信度。
过滤掉弱检测项。
到这里已经得到了高精度的检测项,然后:
延展边界框坐标,以便可以在原始图像上正确显示它们。
提取边界框的坐标和尺寸。 YOLO 以以下形式返回边界框坐标: (centerX, centerY, width, and height) 。
使用此信息计算出边界框的左上角 (x, y) 坐标。
更新 box 、 confidences 和 classIDs 列表。
然后使用NMS过滤冗余和无关的边界框。
接下主要将结果绘制到图片上。
运行结果: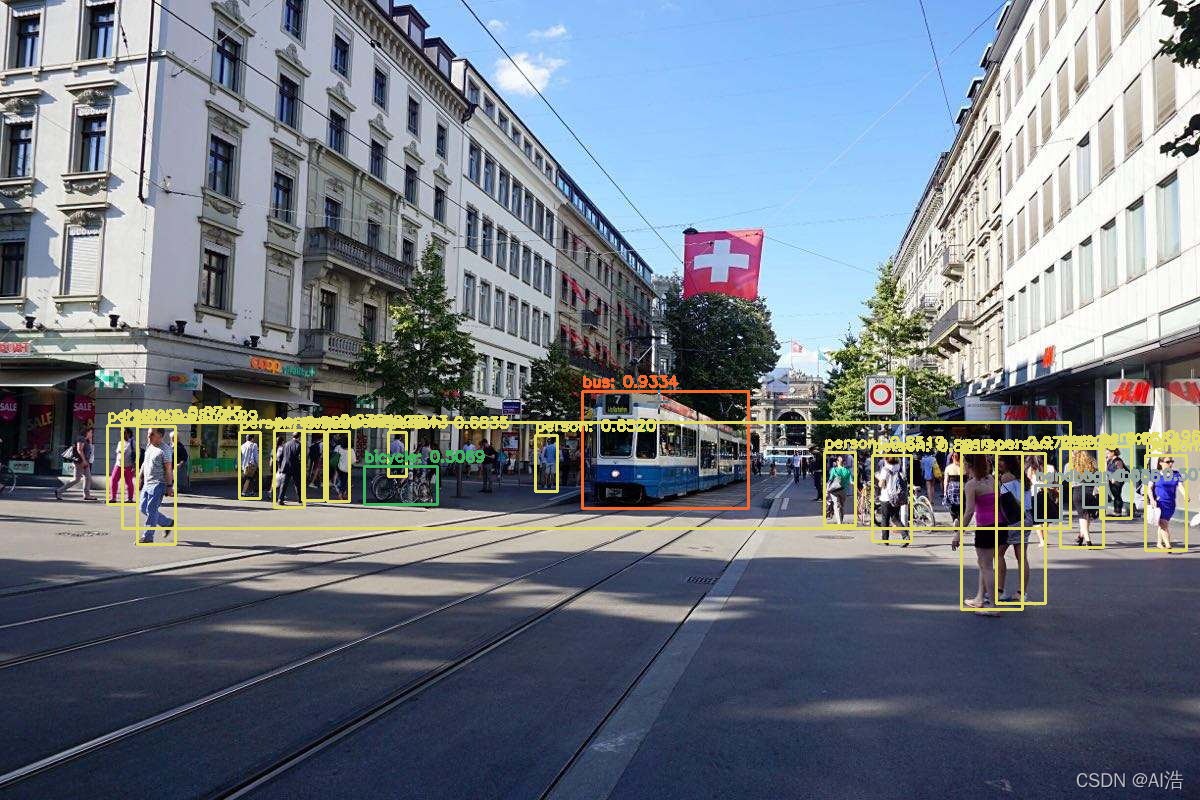
检测视频
现在我们已经学习了如何将 YOLO 对象检测器应用于单个图像,接下来尝试检测视频或者摄像头中的物体。
新建 yolo_video.py 文件并插入以下代码:
import numpy as np
import imutils
import time
import cv2
import os
yolo = 'yolo_coco'
confidence_t = 0.5
threshold = 0.3
output = 'output.avi'
导入需要的包
定义全局参数:
- yolo:定义模型存放的路径
- confidence_t:过滤弱检测的最小概率。
- threshold:非最大值抑制阈值。
- output:输出的视频结果
# 加载YOLO 模型训练的 COCO 类标签
labelsPath = os.path.sep.join([yolo, "coco.names"])
LABELS = open(labelsPath).read().strip().split("\n")
# 初始化颜色列表
np.random.seed(42)
COLORS = np.random.randint(0, 255, size=(len(LABELS), 3), dtype="uint8")
# 配置 YOLO 权重和模型配置的路径
weightsPath = os.path.sep.join([yolo, "yolov3.weights"])
configPath = os.path.sep.join([yolo, "yolov3.cfg"])
# 加载在 COCO 数据集(80 个类)上训练的 YOLO 对象检测,并获取YOLO输出层的名称
net = cv2.dnn.readNetFromDarknet(configPath, weightsPath)
# 获取网络输出层信息(所有输出层的名字),设定并前向传播
outInfo = net.getUnconnectedOutLayersNames()
# 初始化视频流、指向输出视频文件的指针和帧尺寸
vs = cv2.VideoCapture(0)
writer = None
(W, H) = (None, None)
# 获取文件的总帧数。
try:
prop = cv2.cv.CV_CAP_PROP_FRAME_COUNT if imutils.is_cv2() \
else cv2.CAP_PROP_FRAME_COUNT
total = int(vs.get(prop))
print("[INFO] {} total frames in video".format(total))
except:
print("[INFO] could not determine # of frames in video")
print("[INFO] no approx. completion time can be provided")
total = -1
这段代码的步骤:
读取类别。
给每个类别初始化颜色。
设置YOLO权重文件的路径。
加载YOLO权重文件。
获取输出层信息。
初始化VideoCapture对象。
初始化视频编写器和帧尺寸。
获取总帧数,以便估计处理整个视频需要多长时间。
# loop over frames from the video file stream
while True:
# 从文件中读取下一帧
(grabbed, frame) = vs.read()
# 如果帧没有被抓取,那么已经到了流的末尾
if not grabbed:
break
# 如果框架尺寸为空,则给他们赋值
if W is None or H is None:
(H, W) = frame.shape[:2]
# 从输入帧构造一个 blob,然后执行 YOLO 对象检测器的前向传递,得到边界框和相关概率
blob = cv2.dnn.blobFromImage(frame, 1 / 255.0, (416, 416),
swapRB=True, crop=False)
net.setInput(blob)
start = time.time()
layerOutputs = net.forward(outInfo)
end = time.time()
# 分别初始化检测到的边界框、置信度和类 ID 的列表
boxes = []
confidences = []
classIDs = []
# 循环输出
for output in layerOutputs:
# 遍历每个检测结果
for detection in output:
# 提取物体检测的类ID和置信度(即概率)
scores = detection[5:]
classID = np.argmax(scores)
confidence = scores[classID]
# 过滤精度低的结果
if confidence > confidence_t:
# 缩放边界框坐标,计算 YOLO 边界框的中心 (x, y) 坐标,然后是框的宽度和高度
box = detection[0:4] * np.array([W, H, W, H])
(centerX, centerY, width, height) = box.astype("int")
# 使用中心 (x, y) 坐标导出边界框的上角和左角
x = int(centerX - (width / 2))
y = int(centerY - (height / 2))
# 更新边界框坐标、置信度和类 ID 列表
boxes.append([x, y, int(width), int(height)])
confidences.append(float(confidence))
classIDs.append(classID)
# 使用非极大值抑制来抑制弱的、重叠的边界框
idxs = cv2.dnn.NMSBoxes(boxes, confidences, confidence_t,
threshold)
# 确保至少存在一个检测
if len(idxs) > 0:
# 遍历保存的索引
for i in idxs.flatten():
# 在图像上绘制一个边界框矩形和标签
(x, y) = (boxes[i][0], boxes[i][1])
(w, h) = (boxes[i][2], boxes[i][3])
# 确保至少存在一个检测
color = [int(c) for c in COLORS[classIDs[i]]]
cv2.rectangle(frame, (x, y), (x + w, y + h), color, 2)
text = "{}: {:.4f}".format(LABELS[classIDs[i]],
confidences[i])
cv2.putText(frame, text, (x, y - 5),
cv2.FONT_HERSHEY_SIMPLEX, 0.5, color, 2)
cv2.imshow("Frame", frame)
key = cv2.waitKey(1) & 0xFF
# check if the video writer is None
if writer is None:
# initialize our video writer
fourcc = cv2.VideoWriter_fourcc(*'XVID')
writer = cv2.VideoWriter('output.avi', fourcc, 30, (int(frame.shape[1]), int(frame.shape[0])))
# some information on processing single frame
if total > 0:
elap = (end - start)
print("[INFO] single frame took {:.4f} seconds".format(elap))
print("[INFO] estimated total time to finish: {:.4f}".format(
elap * total))
# write the output frame to disk
writer.write(frame)
# release the file pointers
print("[INFO] cleaning up...")
writer.release()
vs.release()
定义了一个 while 循环,然后抓取第一帧。
检查它是否是视频的最后一帧。 如果是,我们需要中断 while 循环。
如果框架尺寸为None,则给他们赋值。
构建一个 blob 并将其通过网络,获得预测。
初始化列表:
box :我们围绕对象的边界框。
置信度:YOLO 分配给对象的置信度值。 较低的置信度值表明对象可能不是网络认为的那样。 从上面的命令行参数中记住,我们将过滤掉不满足 0.5 阈值的对象。
classIDs :检测到的对象的类标签。
循环遍历每个 layerOutputs。
循环输出中的每个检测项。
提取 classID 和置信度。
过滤掉弱检测项。
到这里已经得到了高精度的检测项,然后:
延展边界框坐标,以便可以在原始图像上正确显示它们。
提取边界框的坐标和尺寸。 YOLO 以以下形式返回边界框坐标: (centerX, centerY, width, and height) 。
使用此信息计算出边界框的左上角 (x, y) 坐标。
更新 box 、 confidences 和 classIDs 列表。
然后使用NMS过滤冗余和无关的边界框。
接下主要将结果绘制到帧上。
运行结果:
完整代码:
https://download.csdn.net/download/hhhhhhhhhhwwwwwwwwww/74968249
转载自:https://wanghao.blog.csdn.net/article/details/122156895


评论(0)
您还未登录,请登录后发表或查看评论