

简介
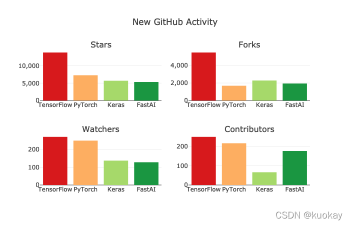
目前的深度学习框架很多,如Tensorflow、Pytorch、Keras、FastAI、CNTK等等,这些框架各有优缺点,尤其是Tensorflow和Pytorch,使用都非常广泛,那么应该如何进行选择呢?这应该是每一位即将开始学习深度学习的童鞋比较困惑的问题。下面先看看github上各种框架的一个使用统计
选择pytorch的几大理由
动态计算图
- 用法跟python更接近,比tensorflow更容易上手
有助于理解深度学习的核心
- pytorch需要定义网络层、参数更新等步骤,可以帮助我们深刻理解深度学习
动态图机制
- 动态图机制在调试方面非常方便
易于上手
- 快速上手,学会后很容易切换到其它框架
安装python环境
conda create -n pytorch1.6 python=3.7
conda activate pytorch1.6
安装nvidia驱动
到nvidia官网 https://www.nvidia.cn/Download/index.aspx?lang=cn 下载驱动文件
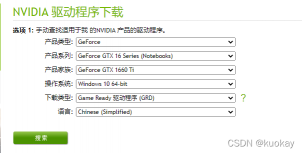
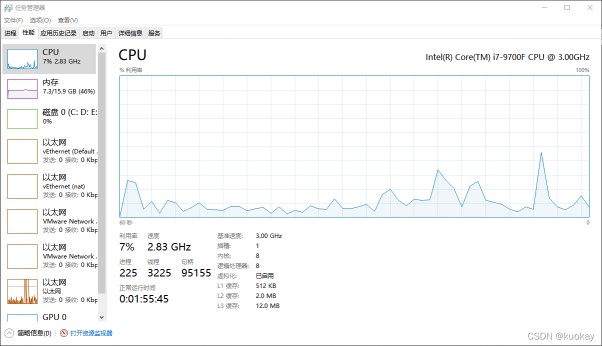
安装文件下载完成后,进行傻瓜式安装,最后来确认下是不是安装成功。方法是,打开 任务管理器 --> 性能 --> GPU 0
安装pytorch
来到官网 https://pytorch.org/get-started/locally/,选择PyTorch Build为稳定版1.6.0、操作系统选择windows、Package使用pip、Language选择Python、CUDA选择10.1,这些都是需要根据自己的实际情况进行选择。可以看到,前面步骤中我们并没有单独安装CUDA,因为pytorch的安装过程中顺便把CUDA也安装好了,这点非常棒。
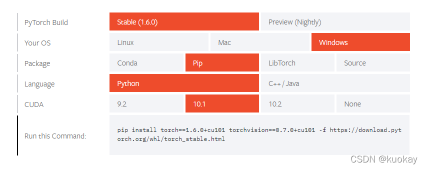
pip install torch1.6.0+cu101 torchvision0.7.0+cu101 -f https://download.pytorch.org/whl/torch_stable.html
如果没有GPU环境,安装命令是
pip install torch1.6.0+cpu torchvision0.7.0+cpu -f https://download.pytorch.org/whl/torch_stable.html
验证pytorch环境
(pytorch1.6) PS C:\Windows\system32> python
Python 3.7.9 (default, Aug 31 2020, 17:10:11) [MSC v.1916 64 bit (AMD64)] :: Anaconda, Inc. on win32
Type "help", "copyright", "credits" or "license" for more information.
>>> import torch
>>> torch.__version__
'1.6.0+cu101'
>>> torch.cuda.is_available()
True
>>>
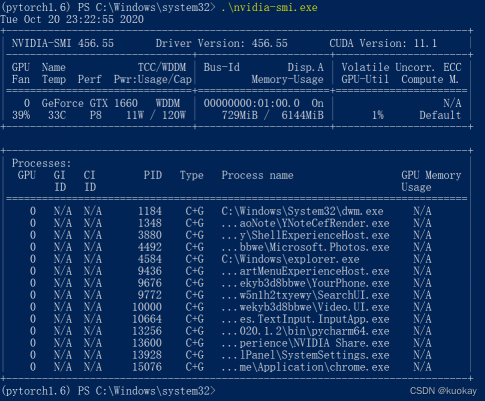
另外,可以通过nvidia-smi命令来查看当前进程使用GPU资源的情况
源码编译
环境
- ubuntu 18.04 64bit
- NVidia GTX 1070Ti
- anaconda with python 3.7
- CUDA 10.1
- cuDNN 7.6
- pytorch 1.8
编译步骤
安装基础依赖
conda install numpy ninja pyyaml mkl mkl-include setuptools cmake cffi typing_extensions future six requests dataclasses
由于要使用gpu,所以还需要安装LAPACK支持,根据CUDA版本安装对应的软件包
# Add LAPACK support for the GPU if needed
conda install -c pytorch magma-cuda101  # or [ magma-cuda101 | magma-cuda100 | magma-cuda92 ] depending on your cuda version
接下来就可以开始克隆代码了
git clone --recursive https://github.com/pytorch/pytorch
cd pytorch
# if you are updating an existing checkout
git submodule sync
git submodule update --init --recursive
准备工作完成后,就可以开始编译了
export CMAKE_PREFIX_PATH=${CONDA_PREFIX:-"$(dirname $(which conda))/../"}
python setup.py install
CMAKE_PREFIX_PATH其实就是anaconda的安装目录,如我这里的/home/xugaoxiang/anaconda3

编译的时候较长,耐心等待就好
测试
重新开一个terminal进行测试
(base) xugaoxiang@1070Ti:~$ ipython
Python 3.7.6 (default, Jan  8 2020, 19:59:22)
Type 'copyright', 'credits' or 'license' for more information
IPython 7.19.0 -- An enhanced Interactive Python. Type '?' for help.

In [1]: import torch

In [2]: torch.__version__
Out[2]: '1.8.0a0+46d846f'

In [3]: torch.cuda.is_available()
Out[3]: True
说明pytorch已经安装到了anaconda的环境中,而且是gpu的版本,搞定!


评论(0)
您还未登录,请登录后发表或查看评论