

目录
一、数据集的处理(txt格式和xml格式相互转换)
说明
txttoxml.py
二、正式训练预处理
第一步:将图片进行裁剪(不占用过多内存),统一修改后缀为.jpg(方便后续处理)
第二步:创建如下四个文件,将图片放入images,将标签放入annotation
第三步:将图片和xml文件重命名(不是特别重要,只是为了更加好看)
第四步:标签分类
第五步:将xml格式标签转换为txt格式标签(如果已经是txt格式标签,这一步省略)
xmltotxt.py
第六步:创建配置文件
第七步:修改models下的配置文件,选择相应的使用的模型,我用的是S大小的权重模型,所以修改yolov5s.yaml文件,修改类别,其它不用修改。
第八步:开始训练
训练说明
第九步:结果测试
三、pip失败处理(pip install numpy -i http://mirrors.aliyun.com/pypi/simple/)
说明:后面的yolov5-3.1使用的是yolov5-6.1的环境,直接可以运行,向下兼容。
一、数据集的处理(txt格式和xml格式相互转换)
这里数据集的收集和标注具体过程省略,我直接用的labelImg软件进行标注。
说明
labelImg标注软件一个是voc格式一个是yolo格式,最终生成xml文件或者txt文件。这里建议统一用voc格式去标,到时候要转换为yolo格式也方便,因为xml里面存储的信息更加详细,其次是yolo格式只有标号代表类别,标号有专门的classes文件。
不过这里如果你想要让多个人去标注,就得统一好class顺序 ,如果出现问题就可能类别重复,也挺麻烦的。所以用voc格式统一标注。
很不幸,这次我就遇到了没统一class顺序,几个人标注好了发现不能直接使用,所以我就采用先把txt转换为xml格式。
以下是参考脚本
txttoxml.py
# -*- coding: utf-8 -*-
"""
Created on Fri Mar 29 19:30:50 2019

@author: XIE-XUE-LI
"""

import os
import cv2
import os.path as osp

# 基本只需要修改这几个参数就行
src_img_dir = "G:\\1Marked\\Scared\\Scared"             #原图.jpg文件的路径
src_txt_dir = "G:\\1Marked\\Scared\\Scaredlabels"              #labels中.txt文件的路径
src_xml_dir = "G:\\1Marked\\Scared\\Scaredxml"          #生成的xml文件需要保存的路径
VISDrone_CLASSES = ['Scared']                            #标签的内容(我这里基本一类一个文件夹,,所以这里的class只有一类,你们可以更具自己的顺序添加)
folder = 'Scared'                                        #文件夹命名

# 判断当前路径下是否存在Annotations这个文件夹,若不存在,自动创建一个
if not os.path.exists(src_xml_dir):
    os.mkdir(src_xml_dir)

img_name = []
for id in os.listdir(src_img_dir):
    img_name.append(id[:-4])

for img in img_name:
    im = cv2.imread(osp.join(src_img_dir,img+'.jpg'))
    im = cv2.cvtColor(im, cv2.COLOR_BGR2RGB)
    height, width, channels = im.shape

    xml_file = open((src_xml_dir + '\\' + img + '.xml'), 'w')
    xml_file.write('<annotation>\n')
    xml_file.write('    <folder>' + folder + '</folder>\n')
    xml_file.write('    <filename>' + str(img) + '.jpg' + '</filename>\n')
    xml_file.write('    <size>\n')
    xml_file.write('        <width>' + str(width) + '</width>\n')
    xml_file.write('        <height>' + str(height) + '</height>\n')
    xml_file.write('        <depth>3</depth>\n')
    xml_file.write('    </size>\n')
    with open(src_txt_dir + '\\' + img + '.txt') as f:
        lines = f.readlines()
        for line in lines:
            box = line.split(' ')

            x = int(float(box[1]) * width)
            y = int(float(box[2]) * height)
            w = int(float(box[3]) * width)
            h = int(float(box[4]) * height)

            xmin = x+1-w/2
            ymin = y+1-h/2
            xmax = x+1+w/2
            ymax = y+1+h/2

            xml_file.write('    <object>\n')
            name = VISDrone_CLASSES[0]
            xml_file.write('        <name>' + str(name) + '</name>\n')
            xml_file.write('        <pose>Unspecified</pose>\n')
            xml_file.write('        <truncated>0</truncated>\n')

            difficult = 0

            xml_file.write('        <difficult>' + str(difficult) + '</difficult>\n')
            xml_file.write('        <bndbox>\n')
            xml_file.write('            <xmin>' + str(xmin) + '</xmin>\n')
            xml_file.write('            <ymin>' + str(ymin) + '</ymin>\n')
            xml_file.write('            <xmax>' + str(xmax) + '</xmax>\n')
            xml_file.write('            <ymax>' + str(ymax) + '</ymax>\n')
            xml_file.write('        </bndbox>\n')
            xml_file.write('    </object>\n')
    xml_file.write('</annotation>')
这里转换完毕,接下来直接开始按照步骤进行操作!
二、正式训练预处理
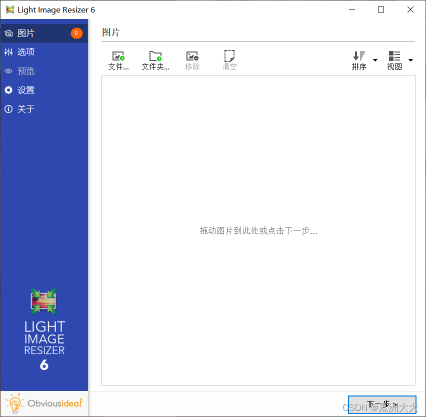
第一步:将图片进行裁剪(不占用过多内存),统一修改后缀为.jpg(方便后续处理)
这里我直接使用了这款软件,蛮好用的。
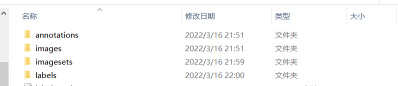
第二步:创建如下四个文件,将图片放入images,将标签放入annotation
第三步:将图片和xml文件重命名(不是特别重要,只是为了更加好看)
只需要修改路径和你的目标命名,脚本如下:
import numpy as np
import glob
import os
import xml.etree.ElementTree as ET
import xml.dom.minidom

'''
第一步,将xml文件和图片重新命名
'''
# 获取文件夹中bmp图片的数量
def getDirImageNum(path):
    bmpDirImagesNum = 0
    for bmpfile in os.listdir(path):
        if os.path.splitext(bmpfile)[1] == '.jpg':
            bmpDirImagesNum += 1
    return bmpDirImagesNum


# 获取文件夹中xml文件的数量
def getDirXmlNum(path):
    xmlDirXmlNum = 0
    for xmlfile in os.listdir(path):
        if os.path.splitext(xmlfile)[1] == '.xml':
            xmlDirXmlNum += 1
    return xmlDirXmlNum


inputpath1 = "E:\\Graduation_Project\\code\\yolov5\\yolov5-3.1\\7_emotion\\images1\\"
inputpath2 = "E:\\Graduation_Project\\code\\yolov5\\yolov5-3.1\\7_emotion\\annotations1\\"

outpath1 = "E:\\Graduation_Project\\code\\yolov5\\yolov5-3.1\\7_emotion\\images\\"
outpath2 = "E:\\Graduation_Project\\code\\yolov5\\yolov5-3.1\\7_emotion\\annotations\\"

file_name = os.listdir(inputpath2)


#只需要修改这个名字
name = '7_emotion'
error = []
for item in file_name:
    print(item)
    o_imap = inputpath1 + item.split('.')[0] + ".jpg"
    o_xmlp = inputpath2 + item.split('.')[0] + ".xml"
    i = getDirImageNum(outpath1)  # 表示bmp文件的命名是从当前输出文件夹中的bmp文件数目开始的
    if os.path.exists(o_imap) and os.path.exists(o_xmlp):
        i = i + 1
        new_name = name + format(str(i), '0>4s') + '.jpg'
        dst1 = os.path.join(os.path.abspath(outpath1), new_name)
        os.rename(o_imap, dst1)
        dst2 = os.path.join(os.path.abspath(outpath2), name + format(str(i), '0>4s') + '.xml')  # 为000000.xml形式,想要的格式
        try:
            dom = xml.dom.minidom.parse(o_xmlp)
            root = dom.documentElement
            # 获取标签对path之间的值并赋予新值j
            # 文件夹赋值
#            root.getElementsByTagName('folder')[0].firstChild.data = "VOC2007"

            # 获取标签对filename之间的值并赋予新值j
            root.getElementsByTagName('filename')[0].firstChild.data = new_name

            # 将修改后的xml文件保存,xml文件修改前后的路径
            # 打开并写入
            with open(o_xmlp, 'w') as fh:
                dom.writexml(fh)
            os.rename(o_xmlp, dst2)
            print('converting %s to %s ...' % (o_xmlp, dst2))
        except:
            error.append(new_name)
            continue
# 如果有出错的文件,error++
print(len(error))
第四步:标签分类
包括训练集,验证集和测试集,我这里没有设置测试集,trainval_percent和train_percent 两个代表占比,trainval_percent为train+val占全部图片的比例,若不需要test集则改为1。train_percent 代表拿来训练。
修改的话只需要修改图片和标签路径
第五步:将xml格式标签转换为txt格式标签(如果已经是txt格式标签,这一步省略)
xmltotxt.py
这里需要修改class
# -*- coding: utf-8 -*-
import xml.etree.ElementTree as ET
from tqdm import tqdm
import os
from os import getcwd

sets = ['train', 'test','val']
#这里使用要改
classes = ['Angry', 'Disgusted', 'Happy','Neutral','Sad',
           'Scared','Surprised']


def convert(size, box):
    dw = 1. / (size[0])
    dh = 1. / (size[1])
    x = (box[0] + box[1]) / 2.0 - 1
    y = (box[2] + box[3]) / 2.0 - 1
    w = box[1] - box[0]
    h = box[3] - box[2]
    x = x * dw
    w = w * dw
    y = y * dh
    h = h * dh
    x = round(x,6)
    w = round(w,6)
    y = round(y,6)
    h = round(h,6)
    return x, y, w, h

#后面只用修改各个文件夹的位置
def convert_annotation(image_id):
     #try:
        in_file = open('8_emotion/annotations/%s.xml' % (image_id), encoding='utf-8')
        out_file = open('8_emotion/labels/%s.txt' % (image_id), 'w', encoding='utf-8')
        tree = ET.parse(in_file)
        root = tree.getroot()
        size = root.find('size')
        w = int(size.find('width').text)
        h = int(size.find('height').text)
        for obj in root.iter('object'):
            difficult = obj.find('difficult').text
            cls = obj.find('name').text
            if cls not in classes or int(difficult) == 1:
                continue
            cls_id = classes.index(cls)
            xmlbox = obj.find('bndbox')
            b = (float(xmlbox.find('xmin').text), float(xmlbox.find('xmax').text), float(xmlbox.find('ymin').text),
                 float(xmlbox.find('ymax').text))
            b1, b2, b3, b4 = b
            # 标注越界修正
            if b2 > w:
                b2 = w
            if b4 > h:
                b4 = h
            b = (b1, b2, b3, b4)
            bb = convert((w, h), b)
            out_file.write(str(cls_id) + " " +
                           " ".join([str(a) for a in bb]) + '\n')
     #except Exception as e:
         #print(e, image_id)


wd = getcwd()
for image_set in sets:
    if not os.path.exists('8_emotion/labels/'):
        os.makedirs('8_emotion/labels/')
    image_ids = open('8_emotion/imagesets/%s.txt' %
                     (image_set)).read().strip().split()
    list_file = open('8_emotion/%s.txt' % (image_set), 'w')
    for image_id in tqdm(image_ids):
        list_file.write('8_emotion/images/%s.jpg\n' % (image_id))
        convert_annotation(image_id)
    list_file.close()
第六步:创建配置文件
在工程的data目录下创建mydata.yaml文件,修改三个地址(上面已经自动生成文件),修改类别数目和具体类别名字,顺序和上面转换时 一致。
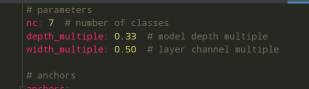
第七步:修改models下的配置文件,选择相应的使用的模型,我用的是S大小的权重模型,所以修改yolov5s.yaml文件,修改类别,其它不用修改。
第八步:开始训练
需要设置这几个变量:
(1)–weights 就是权重文件的位置(官网可下载);
(2)–data 就是上面自己创建的mydata.yaml文件;
(3)–epochs 就是训练次数(三五千张图片,经过测试80-120左右基本就可以了)
(4)batch-size 和自己电脑配置有关,16大了就8,8大了就4,最小为1;
其它就暂时不用管!

然后直接值命令行,输入:
python train.py
开始运行:
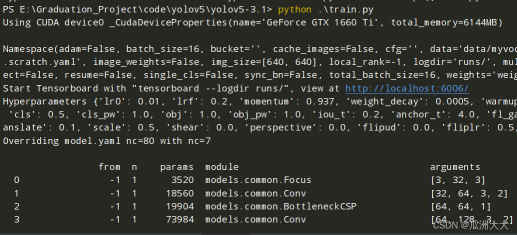
YOLOV5-3.1版本,可以看到一轮差不多就需要一分半;

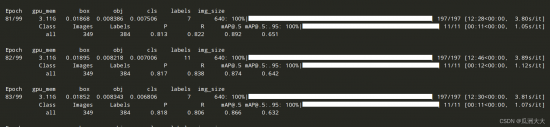
训练说明
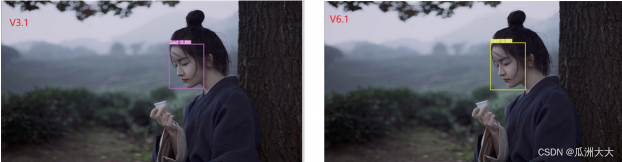
可以看到,YOLOV5-3.1同样的数据集比YOLOV5-6.1快上很多,前者一轮1分30秒左右,后者一轮13分钟左右,没有具体去研究过原因,估计是网络更加复杂吧。
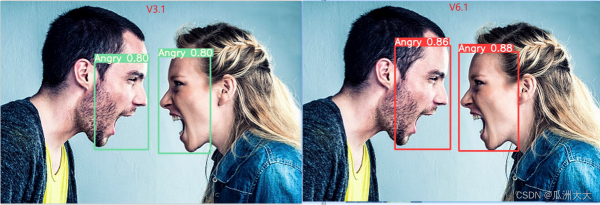
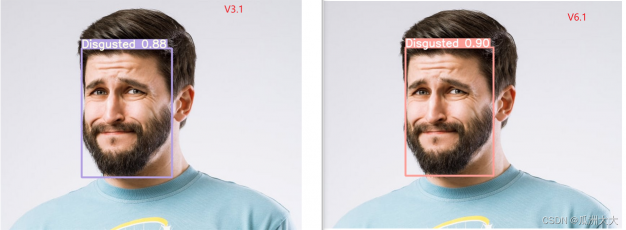
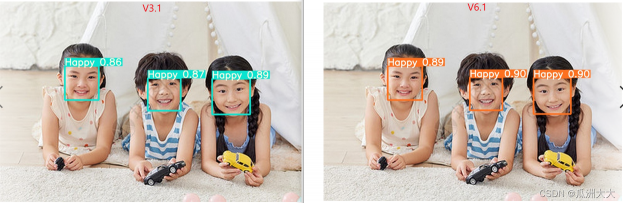
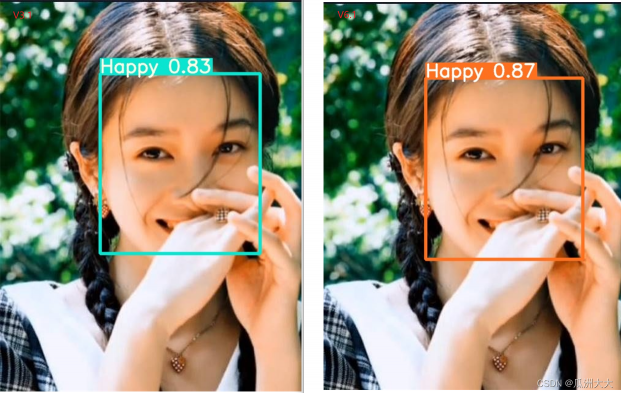
其次,对于图片的单独识别,我分别做了测试,准确率基本100%(选了三十多张简单测试,但是准确率确实不错),但是实时识别的效果6.1确实比3.1好一些,不过差不太多!
第九步:结果测试
实时测试命令如下,只需要修改–weights 模型训练出来的位置,就可以实时识别!(实时会有一定误识别不过效果也还不错)
python .\detect.py --weights runs\exp1\weights\best.pt --source 0
其它测试命令
 # 检测摄像头
 python detect.py  --weights runs/train/exp/weights/best.pt --source 0  # webcam
 # 检测图片文件
  python detect.py  --weights runs/train/exp/weights/best.pt --source file.jpg  # image
 # 检测视频文件
   python detect.py --weights runs/train/exp/weights/best.pt --source file.mp4  # video
 # 检测一个目录下的文件
  python detect.py --weights runs/train/exp/weights/best.pt path/  # directory
 # 检测网络视频
  python detect.py --weights runs/train/exp/weights/best.pt 'https://youtu.be/NUsoVlDFqZg'  # YouTube video
 # 检测流媒体
  python detect.py --weights runs/train/exp_yolov5s/weights/best.pt 'rtsp://example.com/media.mp4'  # RTSP, RTMP, HTTP stream

三、pip失败处理(pip install numpy -i http://mirrors.aliyun.com/pypi/simple/)
参考链接:
ERROR: No matching distribution found for numpy
报错如下:

说是位于这个镜像上的库不受信任或不安全的主机,将被忽略,所以我们需要让它受信任,所以将代码改为:
pip install numpy -i http://mirrors.aliyun.com/pypi/simple/ --trusted-host mirrors.aliyun.com,
成功。


评论(1)
您还未登录,请登录后发表或查看评论