

Fastapi LLM支持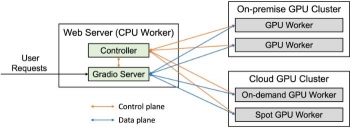
安装
方法一:pip
pip3 install "fschat[model_worker,webui]"
方法二:源文件
git clone https://github.com/lm-sys/FastChat.git
cd FastChat
Mac 上运行:
brew install rust cmake
从源文件安装
pi```shell
p3 install —upgrade pip # enable PEP 660 support
pip3 install -e “.[model_worker,webui]”
加载大模型推理
```shell
python3 -m fastchat.serve.cli --model-path lmsys/vicuna-7b-v1.3

关键参数汇总: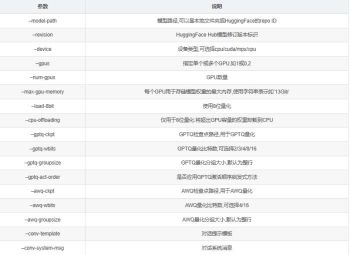

2.Web
要使用 Web UI 提供服务,您需要三个主要组件:
1、与用户交互的 Web 服务器
2、托管一个或多个模型的模型工作人员
3、协调网络服务器和模型工作人员的控制器。
启动控制器
python3 -m fastchat.serve.controller
python3 -m fastchat.serve.controller

启动模型工作
python3 -m fastchat.serve.model_worker --model-path lmsys/vicuna-7b-v1.3
等到进程完成加载模型,您会看到“Uvicorn running on …”。模型工作者将自己注册到控制器。
测试模型是否注册到控制器,成功会有一个简短的输出
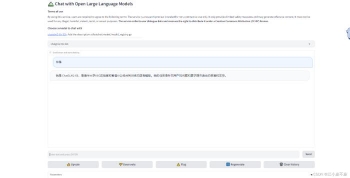
启动 Gradio Web 服务器
python3 -m fastchat.serve.gradio_web_server
这是用户将与之交互的用户界面。

打开 http://0.0.0.0:7860 ,可以看到交互界面
注册多个模型
您可以将多个模型工作人员注册到单个控制器,该控制器可用于为具有更高吞吐量的单个模型提供服务或同时为多个模型提供服务。执行此操作时,请为不同的模型工作人员分配不同的 GPU 和端口。
# worker 0
CUDA_VISIBLE_DEVICES=0 python3 -m fastchat.serve.model_worker --model-path lmsys/vicuna-7b-v1.3 --controller http://localhost:21001 --port 31000 --worker http://localhost:31000
# worker 1
CUDA_VISIBLE_DEVICES=1 python3 -m fastchat.serve.model_worker --model-path lmsys/fastchat-t5-3b-v1.0 --controller http://localhost:21001 --port 31001 --worker http://localhost:31001
您还可以启动多选项卡 gradio 服务器,其中包括 Chatbot Arena 选项卡。
python3 -m fastchat.serve.gradio_web_server_multi
3.兼容 OpenAI 的 RESTful API
RESTful API 服务器
1、启动控制器
python3 -m fastchat.serve.controller
2、启动模型加载
python3 -m fastchat.serve.model_worker --model-path /mnt/code/LLM_Service/model/Baichuan-13b-Chat --num-gpus 2
3、启动 RESTful API 服务器
python3 -m fastchat.serve.openai_api_server --host localhost --port 8000
安装openai-python:
pip install --upgrade openai
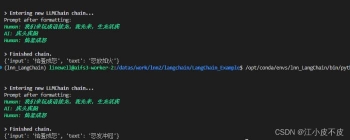
通过ChatOpenAI接口调用模型:
from langchain.chat_models import ChatOpenAI
from langchain import LLMChain
from langchain.prompts.chat import (
    ChatPromptTemplate,
    HumanMessagePromptTemplate,
)

api_base_url = "http://192.168.175.6:8000/v1"
api_key= "EMPTY"
LLM_MODEL = "Baichuan-13b-Chat"
model = ChatOpenAI(
    streaming=True,
    verbose=True,
    # callbacks=[callback],
    openai_api_key=api_key,
    openai_api_base=api_base_url,
    model_name=LLM_MODEL
)


human_prompt = "{input}"
human_message_template = HumanMessagePromptTemplate.from_template(human_prompt)

chat_prompt = ChatPromptTemplate.from_messages(
    [("human", "我们来玩成语接龙,我先来,生龙活虎"),
     ("ai", "虎头虎脑"),
     ("human", "{input}")])


chain = LLMChain(prompt=chat_prompt, llm=model, verbose=True)
print(chain({"input": "恼羞成怒"}))
python3 -m fastchat.serve.multi_model_worker \
    --model-path lmsys/vicuna-7b-v1.3 \
    --model-names vicuna-7b-v1.3 \
    --model-path lmsys/longchat-7b-16k \
    --model-names longchat-7b-16k
本地GPU微调
安装依赖
pip3 install -e ".[train]"
微调
您可以使用以下命令使用 4 x A100 (40GB) 训练 Vicuna-7B。—model_name_or_path使用 LLaMA 权重的实际路径和—data_path数据的实际路径进行更新。
torchrun --nproc_per_node=4 --master_port=20001 fastchat/train/train_mem.py \
    --model_name_or_path ~/model_weights/llama-7b  \
    --data_path data/dummy_conversation.json \
    --bf16 True \
    --output_dir output_vicuna \
    --num_train_epochs 3 \
    --per_device_train_batch_size 2 \
    --per_device_eval_batch_size 2 \
    --gradient_accumulation_steps 16 \
    --evaluation_strategy "no" \
    --save_strategy "steps" \
    --save_steps 1200 \
    --save_total_limit 10 \
    --learning_rate 2e-5 \
    --weight_decay 0. \
    --warmup_ratio 0.03 \
    --lr_scheduler_type "cosine" \
    --logging_steps 1 \
    --fsdp "full_shard auto_wrap" \
    --fsdp_transformer_layer_cls_to_wrap 'LlamaDecoderLayer' \
    --tf32 True \
    --model_max_length 2048 \
    --gradient_checkpointing True \
    --lazy_preprocess True


评论(0)
您还未登录,请登录后发表或查看评论