

本文参考如下文章:
2. Win10 Bash搭建ESP8266编译环境(RTOS SDK)
Note:工具链是直接下载的,无需编译
最近重装win系统,然后按照我以前写的博文重新搭建ESP8266编译环境 https://blog.csdn.net/toopoo/article/details/80528536
但是发现如果直接运行Eclipse.exe而不是从安信可IDE.exe启动,那么会导致错误,clean的时候出现"FIND: 参数格式不正确"的错误提示,从bash直接运行也一样,(用安信可一体环境v0.5是没问题的)。
$ make clean
make -C user clean;  make -C driver clean;  make -C Gizwits clean;  make -C Utils clean;
make[1]: Entering directory '/e/Documents/Eclipseworkspace/Filter_SoC_ESP8266_20181220/app/user'
rm -f -r .output/eagle/debug
find ../ -name .output | xargs rm -fr
FIND: 参数格式不正确
rm -f -r ../bin/upgrade
make[1]: Leaving directory '/e/Documents/Eclipseworkspace/Filter_SoC_ESP8266_20181220/app/user'
make[1]: Entering directory '/e/Documents/Eclipseworkspace/Filter_SoC_ESP8266_20181220/app/driver'
rm -f -r .output/eagle/debug
find ../ -name .output | xargs rm -fr
FIND: 参数格式不正确
rm -f -r ../bin/upgrade
make[1]: Leaving directory '/e/Documents/Eclipseworkspace/Filter_SoC_ESP8266_20181220/app/driver'
make[1]: Entering directory '/e/Documents/Eclipseworkspace/Filter_SoC_ESP8266_20181220/app/Gizwits'
rm -f -r .output/eagle/debug
find ../ -name .output | xargs rm -fr
FIND: 参数格式不正确
rm -f -r ../bin/upgrade
make[1]: Leaving directory '/e/Documents/Eclipseworkspace/Filter_SoC_ESP8266_20181220/app/Gizwits'
make[1]: Entering directory '/e/Documents/Eclipseworkspace/Filter_SoC_ESP8266_20181220/app/Utils'
rm -f -r .output/eagle/debug
find ../ -name .output | xargs rm -fr
FIND: 参数格式不正确
rm -f -r ../bin/upgrade
make[1]: Leaving directory '/e/Documents/Eclipseworkspace/Filter_SoC_ESP8266_20181220/app/Utils'
rm -f -r .output/eagle/debug
find ../ -name .output | xargs rm -fr
FIND: 参数格式不正确
rm -f -r ../bin/upgrade
此时编译也会失败:
$ ./gen_misc.sh
gen_misc.sh version 20150511

boot mode: new
app:1
spi speed: 40 MHz
spi mode: QIO
spi_size_map:6
make[1]: Entering directory '/e/Documents/Eclipseworkspace/Filter_SoC_ESP8266_20181220/app/user'
DEPEND: xtensa-lx106-elf-gcc -M -Os -g -Wpointer-arith -Wundef -Wl,-EL -fno-inline-functions -nostdlib -mlongcalls -mtext-section-literals -ffunction-sections -fdata-sections -DICACHE_FLASH -I include -I ./ -I ../../include/ets -I ../include -I ../../include -I ../../include/eagle -I ../..//app/gagent/inc -I ../..//app/Gizwits -I ../..//app/Utils pwm.c
/bin/sh: line 1: /e/ESP8266/xtensa-lx106-elf/bin/xtensa-lx106-elf-gcc: cannot execute binary file: Exec format error
DEPEND: xtensa-lx106-elf-gcc -M -Os -g -Wpointer-arith -Wundef -Wl,-EL -fno-inline-functions -nostdlib -mlongcalls -mtext-section-literals -ffunction-sections -fdata-sections -DICACHE_FLASH -I include -I ./ -I ../../include/ets -I ../include -I ../../include -I ../../include/eagle -I ../..//app/gagent/inc -I ../..//app/Gizwits -I ../..//app/Utils user_main.c
/bin/sh: line 1: /e/ESP8266/xtensa-lx106-elf/bin/xtensa-lx106-elf-gcc: cannot execute binary file: Exec format error
DEPEND: xtensa-lx106-elf-gcc -M -Os -g -Wpointer-arith -Wundef -Wl,-EL -fno-inline-functions -nostdlib -mlongcalls -mtext-section-literals -ffunction-sections -fdata-sections -DICACHE_FLASH -I include -I ./ -I ../../include/ets -I ../include -I ../../include -I ../../include/eagle -I ../..//app/gagent/inc -I ../..//app/Gizwits -I ../..//app/Utils user_json.c
/bin/sh: line 1: /e/ESP8266/xtensa-lx106-elf/bin/xtensa-lx106-elf-gcc: cannot execute binary file: Exec format error
xtensa-lx106-elf-gcc -Os -g -Wpointer-arith -Wundef -Wl,-EL -fno-inline-functions -nostdlib -mlongcalls -mtext-section-literals -ffunction-sections -fdata-sections   -DICACHE_FLASH   -I include -I ./ -I ../../include/ets -I ../include  -I ../../include -I ../../include/eagle -I ../..//app/gagent/inc -I ../..//app/Gizwits -I ../..//app/Utils  -o .output/eagle/debug/obj/user_json.o -c user_json.c
/e/ESP8266/xtensa-lx106-elf/bin/xtensa-lx106-elf-gcc: /e/ESP8266/xtensa-lx106-elf/bin/xtensa-lx106-elf-gcc: cannot execute binary file
make[1]: *** [../../Makefile:322: .output/eagle/debug/obj/user_json.o] Error 126
make[1]: Leaving directory '/e/Documents/Eclipseworkspace/Filter_SoC_ESP8266_20181220/app/user'
make: *** [../Makefile:307: .subdirs] Error 2
说到底就是个Eclipse配置的问题,因为原先是可以的。
顺便试了一下Visual Studio Code, 使用VSC terminal 的bash编译是相同的错误,所以决定重新整理一下,实现Visual Studio Code + win10 64bit bash 的ESP8266 linux编译环境。
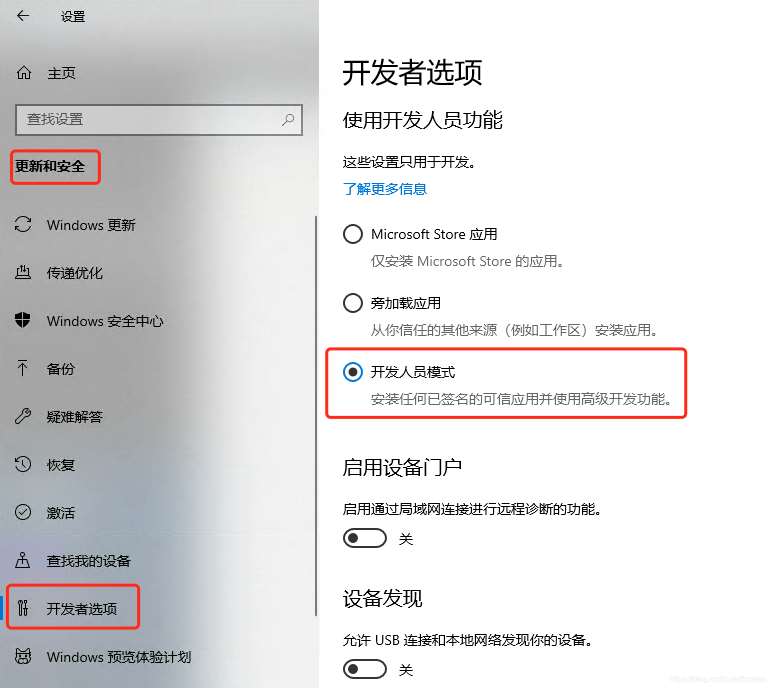
首先打开Windows10开发者模式:设置-更新和安全-开发者选项,选中“开发人员模式”,等待相关文件安装完成。
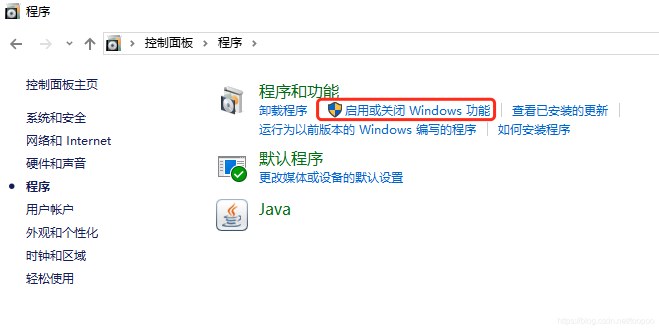
然后进入 控制面板-程序和功能-启用或关闭Windows功能
选中“适用于Linux的Windows子系统”
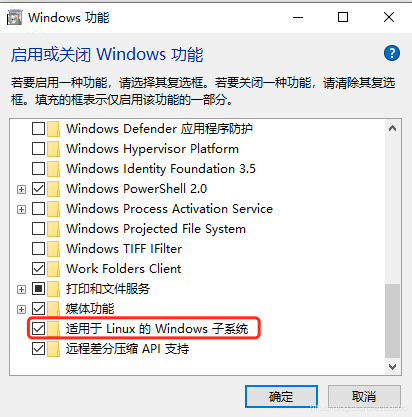
点击“确定”以后等待安装完成,进入cmd命令行,然后输入 bash ,仍然得到如下提示:
E:\Documents\Eclipseworkspace>bash
适用于 Linux 的 Windows 子系统没有已安装的分发版。
可以通过访问 Microsoft Store 来安装分发版:
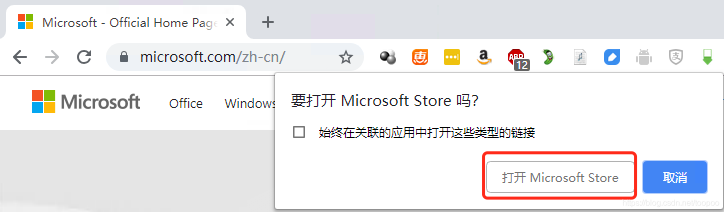
https://aka.ms/wslstore访问提示的网址 https://aka.ms/wslstore,根据提示从Microsoft Store打开链接:
然后可以看到若干Linux版本:Ubuntu, openSUSE Leap 42, SUSE Linux Enterprise Server 12, Debian GNU/Linux, Kali Linux
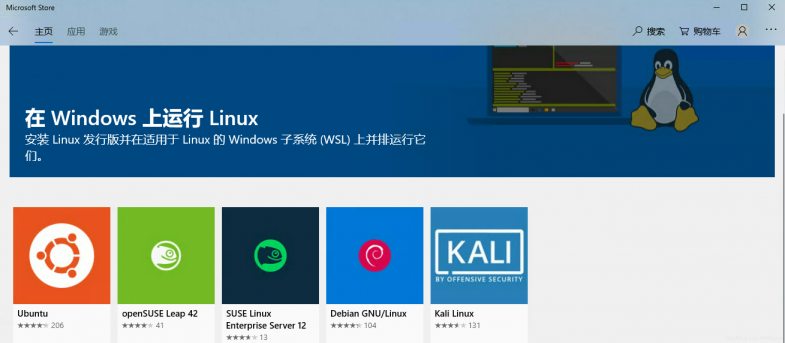
选择Ubuntu进行安装
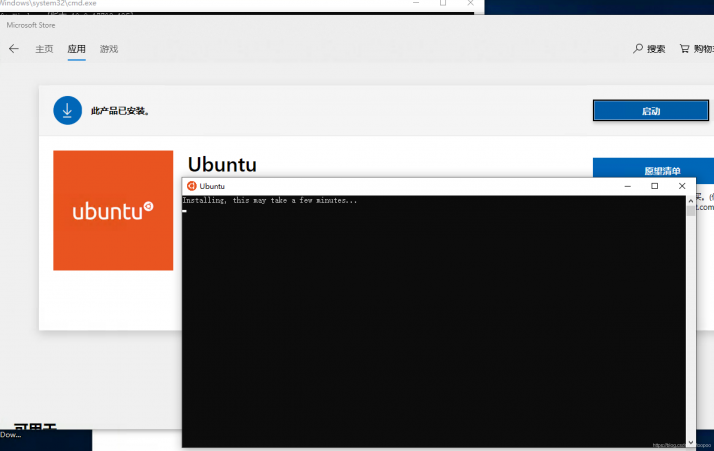
按照提示创建账号和密码,账号不一定需要和windows账号相同
Installing, this may take a few minutes...
AAPlease create a default UNIX user account. The username does not need to match your Windows username.
For more information visit: https://aka.ms/wslusers
Enter new UNIX username: simonliu
Enter new UNIX password:
Retype new UNIX password:
passwd: password updated successfully
Installation successful!
To run a command as administrator (user "root"), use "sudo <command>".
See "man sudo_root" for details.
看一下版本,是Ubuntu 18.04.1
simonliu@DESKTOP-JF56RKP:~$ cat /etc/issue
Ubuntu 18.04.1 LTS \n \l
查看版本,x86_64表示这是64位系统:
$ uname -m
x86_64
先更新一下源
sudo apt update然后安装相关依赖(64bit),其中nano 和 emacs属于编辑器,可选。
sudo apt install git wget nano emacs sed autoconf make automake gperf bison flex texinfo gawk libtool libncurses5-dev expat python python-serial build-essential pacman创建一个新目录并修改权限,用于存放预编译好的工具链
sudo mkdir /opt/espressif
sudo chmod 777 /opt/espressif
64bit系统工具链下载(如果速度很慢,也可以用迅雷等工具下载,大小28.86M,然后复制到/opt/expressif)
cd /opt/espressif
wget http://arduino.esp8266.com/linux64-xtensa-lx106-elf-gb404fb9.tar.gz
解压
tar zxvf linux64-xtensa-lx106-elf-gb404fb9.tar.gz下载库补丁至/opt/espressif/xtensa-lx106-elf/xtensa-lx106-elf/lib,先切换目录,注意是xtensa-lx106-elf下面的xtensa-lx106-elf同名子目录:
cd /opt/espressif/xtensa-lx106-elf/xtensa-lx106-elfwget -O lib/libc.a https://github.com/esp8266/esp8266-wiki/raw/master/libs/libc.a
wget -O lib/libhal.a https://github.com/esp8266/esp8266-wiki/raw/master/libs/libhal.a
wget -O include.tgz https://github.com/esp8266/esp8266-wiki/raw/master/include.tgz
tar zxvf include.tgz编辑~/.bashrc 添加路径
nano ~/.bashrc最后一行添加如下内容:
PATH="/opt/espressif/xtensa-lx106-elf/bin:$PATH"然后source ~/.bashrc 使其立刻生效,然后输入echo $PATH确认 /opt/espressif/xtensa-lx106-elf/bin 在路径中:
$source ~/.bashrc
$echo $PATH
输入xtensa-lx106-elf-gcc -v 确认看到如下信息即可:
$ xtensa-lx106-elf-gcc -v
Using built-in specs.
COLLECT_GCC=xtensa-lx106-elf-gcc
COLLECT_LTO_WRAPPER=/opt/espressif/xtensa-lx106-elf/bin/../libexec/gcc/xtensa-lx106-elf/4.8.2/lto-wrapper
Target: xtensa-lx106-elf
Configured with: /home/igrokhotkov/xtensa/crosstool-NG/.build/src/gcc-4.8.2/configure --build=x86_64-build_unknown-linux-gnu --host=x86_64-build_unknown-linux-gnu --target=xtensa-lx106-elf --prefix=/home/igrokhotkov/xtensa/crosstool-NG/builds/xtensa-lx106-elf --with-local-prefix=/home/igrokhotkov/xtensa/crosstool-NG/builds/xtensa-lx106-elf/xtensa-lx106-elf/sysroot --disable-libmudflap --with-sysroot=/home/igrokhotkov/xtensa/crosstool-NG/builds/xtensa-lx106-elf/xtensa-lx106-elf/sysroot --with-newlib --enable-threads=no --disable-shared --with-pkgversion='crosstool-NG 1.20.0' --disable-__cxa_atexit --with-gmp=/home/igrokhotkov/xtensa/crosstool-NG/.build/xtensa-lx106-elf/buildtools --with-mpfr=/home/igrokhotkov/xtensa/crosstool-NG/.build/xtensa-lx106-elf/buildtools --with-mpc=/home/igrokhotkov/xtensa/crosstool-NG/.build/xtensa-lx106-elf/buildtools --with-isl=/home/igrokhotkov/xtensa/crosstool-NG/.build/xtensa-lx106-elf/buildtools --with-cloog=/home/igrokhotkov/xtensa/crosstool-NG/.build/xtensa-lx106-elf/buildtools --with-libelf=/home/igrokhotkov/xtensa/crosstool-NG/.build/xtensa-lx106-elf/buildtools --enable-lto --enable-target-optspace --disable-libgomp --disable-libmudflap --disable-nls --disable-multilib --enable-languages=c,c++
Thread model: single
gcc version 4.8.2 (crosstool-NG 1.20.0)
至于non_os的SDK的使用我就不写了,这里以机智云的SOC代码为例说明, 在Visual Studio Code中点击 Add workspace folder

选择项目ESP项目存放的文件夹,本例中为:
E:\Documents\Eclipseworkspace\
首先,机智云的SoC代码需要修改项目文件夹下根目录的makefile内容的如下几行为:bo
BOOT?=new
APP?=1
SPI_SPEED?=40
SPI_MODE?=QIO
SPI_SIZE_MAP?=6
然后点击菜单 "Terminal-New Terminal"

然后在Terminal中输入bash:
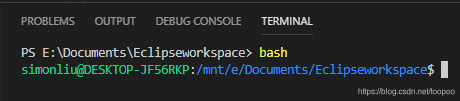
当前目录切换到路径下的具体项目(本例为Filter_SoC_ESP8266_20181220)下的app子文件夹:
cd /mnt/e/Documents/Eclipseworkspace/Filter_SoC_ESP8266_20181220/app然后make clean,再也不出现前面的find参数错误了
simonliu@DESKTOP-JF56RKP:/mnt/e/Documents/Eclipseworkspace/Filter_SoC_ESP8266_20181220/app$ make clean
make -C user clean;  make -C driver clean;  make -C Gizwits clean;  make -C Utils clean;
make[1]: Entering directory '/mnt/e/Documents/Eclipseworkspace/Filter_SoC_ESP8266_20181220/app/user'
rm -f -r .output/eagle/debug
find ../ -name .output | xargs rm -fr
rm -f -r ../bin/upgrade
make[1]: Leaving directory '/mnt/e/Documents/Eclipseworkspace/Filter_SoC_ESP8266_20181220/app/user'
make[1]: Entering directory '/mnt/e/Documents/Eclipseworkspace/Filter_SoC_ESP8266_20181220/app/driver'
rm -f -r .output/eagle/debug
find ../ -name .output | xargs rm -fr
rm -f -r ../bin/upgrade
make[1]: Leaving directory '/mnt/e/Documents/Eclipseworkspace/Filter_SoC_ESP8266_20181220/app/driver'
make[1]: Entering directory '/mnt/e/Documents/Eclipseworkspace/Filter_SoC_ESP8266_20181220/app/Gizwits'
rm -f -r .output/eagle/debug
find ../ -name .output | xargs rm -fr
rm -f -r ../bin/upgrade
make[1]: Leaving directory '/mnt/e/Documents/Eclipseworkspace/Filter_SoC_ESP8266_20181220/app/Gizwits'
make[1]: Entering directory '/mnt/e/Documents/Eclipseworkspace/Filter_SoC_ESP8266_20181220/app/Utils'
rm -f -r .output/eagle/debug
find ../ -name .output | xargs rm -fr
rm -f -r ../bin/upgrade
make[1]: Leaving directory '/mnt/e/Documents/Eclipseworkspace/Filter_SoC_ESP8266_20181220/app/Utils'
rm -f -r .output/eagle/debug
find ../ -name .output | xargs rm -fr
rm -f -r ../bin/upgrade
然后输入 sh gen_misc.sh即可编译成功:
simonliu@DESKTOP-JF56RKP:/mnt/e/Documents/Eclipseworkspace/Filter_SoC_ESP8266_20181220/app$ make clean
make -C user clean;  make -C driver clean;  make -C Gizwits clean;  make -C Utils clean;
make[1]: Entering directory '/mnt/e/Documents/Eclipseworkspace/Filter_SoC_ESP8266_20181220/app/user'
rm -f -r .output/eagle/debug
find ../ -name .output | xargs rm -fr
rm -f -r ../bin/upgrade
make[1]: Leaving directory '/mnt/e/Documents/Eclipseworkspace/Filter_SoC_ESP8266_20181220/app/user'
make[1]: Entering directory '/mnt/e/Documents/Eclipseworkspace/Filter_SoC_ESP8266_20181220/app/driver'
rm -f -r .output/eagle/debug
find ../ -name .output | xargs rm -fr
rm -f -r ../bin/upgrade
make[1]: Leaving directory '/mnt/e/Documents/Eclipseworkspace/Filter_SoC_ESP8266_20181220/app/driver'
make[1]: Entering directory '/mnt/e/Documents/Eclipseworkspace/Filter_SoC_ESP8266_20181220/app/Gizwits'
rm -f -r .output/eagle/debug
find ../ -name .output | xargs rm -fr
rm -f -r ../bin/upgrade
make[1]: Leaving directory '/mnt/e/Documents/Eclipseworkspace/Filter_SoC_ESP8266_20181220/app/Gizwits'
make[1]: Entering directory '/mnt/e/Documents/Eclipseworkspace/Filter_SoC_ESP8266_20181220/app/Utils'
rm -f -r .output/eagle/debug
find ../ -name .output | xargs rm -fr
rm -f -r ../bin/upgrade
make[1]: Leaving directory '/mnt/e/Documents/Eclipseworkspace/Filter_SoC_ESP8266_20181220/app/Utils'
rm -f -r .output/eagle/debug
find ../ -name .output | xargs rm -fr
rm -f -r ../bin/upgrade
simonliu@DESKTOP-JF56RKP:/mnt/e/Documents/Eclipseworkspace/Filter_SoC_ESP8266_20181220/app$ sh gen_misc.sh
gen_misc.sh version 20150511

boot mode: new
app:1
spi speed: 40 MHz
spi mode: QIO
spi_size_map:6
make[1]: Entering directory '/mnt/e/Documents/Eclipseworkspace/Filter_SoC_ESP8266_20181220/app/user'
DEPEND: xtensa-lx106-elf-gcc -M -Os -g -Wpointer-arith -Wundef -Wl,-EL -fno-inline-functions -nostdlib -mlongcalls -mtext-section-literals -ffunction-sections -fdata-sections -DICACHE_FLASH -I include -I ./ -I ../../include/ets -I ../include -I
......(此处省略....)
'/mnt/e/Documents/Eclipseworkspace/Filter_SoC_ESP8266_20181220/app/Utils'
xtensa-lx106-elf-gcc  -L../lib -nostdlib -T../ld/eagle.app.v6.new.2048.ld -Wl,--no-check-sections -u call_user_start -Wl,-static -Wl,--start-group -lc -lgcc -lhal -lphy -lpp -lnet80211 -llwip -lwpa -lmain -ljson -lupgrade -lssl -lpwm -lcrypto -lsmartconfig -lairkiss -lgagent user/.output/eagle/debug/lib/libuser.a driver/.output/eagle/debug/lib/libdriver.a Gizwits/.output/eagle/debug/lib/libGizwits.a Utils/.output/eagle/debug/lib/libUtils.a -Wl,--end-group -o .output/eagle/debug/image/eagle.app.v6.out
mkdir -p ../bin/upgrade

!!!
-1674082697
1674082696
Support boot_v1.4 and +
Generate user1.4096.new.6.bin successully in folder bin/upgrade.
boot.bin------------>0x00000
user1.4096.new.6.bin--->0x01000
!!!
这样编译快多了,在我的NAS J3160平台上,使用安信可Eclipse一体化平台,clean需要30秒+,编译需要3分钟+,但是win10 Ubuntu bash下,make clean只需要2秒,编译只需要26秒!速度快多了~~
")


评论(0)
您还未登录,请登录后发表或查看评论