

0. 简介
Apollo Cyber RT 是专为自动驾驶场景设计的开源、高性能运行时框架。 基于中心化计算模型,主要价值是提升自动驾驶系统的高并发、低延迟、高吞吐。
Apollo 并不是一开始就使用 CyberRT,在 v3.0 之前用的都是基于 ROS 框架进行开发。但在之前的版本中发现了很多问题,随着 Apollo 的发展,对最高水平的稳健性和性能的需求, Apollo Cyber RT 应运而生,它满足了一个面向商业化的自动驾驶解决方案的基础需求。
1. CyberRT结构
CyberRT 是一堆庞大复杂的代码,我们从cyber.h入手,可以看到这里面只有一个 CreateNode 方法,返回的是 Node 的引用。根据头文件引用及对代码的敏感性,刨去一些 log、time 之类的辅助类代码,我相信 CyberRT 中这些概念很重要:
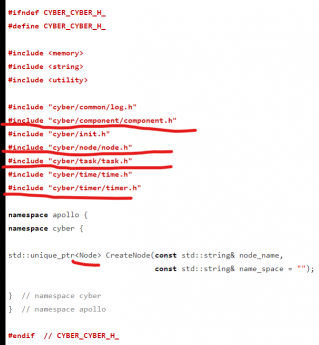
- component
- node
- task
- timer
所以,研究 CyberRT 得到 CyberRT 全貌,我们可以从这些概念相应的代码入手。这里就不详述了,frank909大佬的文章讲的非常详细了,

总而言之,核心类是 Component 和 TimerComponent;支撑 component 的是 Node、Scheduler、Timer、DataVisitor;其他的 Reader、Writer、ChannelImple、TimerTask 等等是具体的细节相关类。

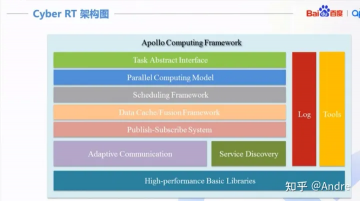
2. CyberRT架构
Cyber RT的框架如下图所示:
- 基础库:Cyber RT为了高性能和减少依赖,实现了自己的基础库。(Lock-free的对象池,队列)
- 通信层:Publish/Subscribe机制,Service/Client机制,服务自发现,自适应的通信机制(共享内存、Socket、进程内存)
- 数据缓存/融合层:数据缓存与融合。多路传感器之间数据需要融合,而且算法可能需要缓存一定的数据。比如典型的仿真应用,不同算法模块之间需要有一个数据桥梁,数据层起到了这个模块间通信的桥梁的作用
- 计算层:计算模型,任务以及任务调度
- 接口: Cyber RT为开发者提供了component类,开发者的算法业务模块只需要继承该类,实现其中的proc接口即可。该接口类似于ROS的callback,消息通过参数的方式传递。此外Cyber RT也提供了并行计算的相关接口以及用于开发调试、录制回放的工具。
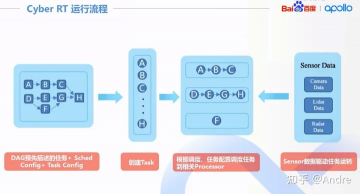
3. CyberRT的运行流程
- 算法模块:算法模块通过有向无环图(DAG, Directed Acyclic Graph)配置任务间的逻辑关系。每个算法都可以进行优先级、运行时间、使用资源等方面的配置。
- 创建任务:Cyber RT可以结合DAG创建任务,任务的实现方式不是thread,而是协程(coroutine)。
- 调度器:调度器根据调度、任务配置将任务放入相关Processor的队列中。
- 数据输入: Senor输入数据驱动系统的运转。
4. CyberRT模块使用
先介绍下两个容易混淆的概念,module(模块)和component(组件),在Cyber RT中,一个module可以由多个component组成。
首先我们来看一下基于cyber/examples/common_component_example中的例子,目录下的README.md介绍了如何编译运行该例子。common_component_example是一个简单的module,仅包含一个component CommonComponentSample, 定义在common_component_example.cc中。初始化的时候Init函数会被框架调用,Proc是消息回调函数,客户端发送的消息到达的时候会被框架自动调用。
在common_component_example.cc中并没有main函数。没错,它并不是一个完整的可执行程序,编译出来的成果物是动态库libcommon_component_example.so。 通过下面的命令可以启动该动态库:
mainbooard -d cyber/examples/common_component_example/common.dag
Dag文件是module的配置文件,由protocolbuffers文件cyber/proto/dag_conf.proto定义,每个module都要有一个配套的dag文件,启动本module时使用。
- module_library指明了要加载的动态库。
- 这个module只有一个component,该component对应的class_name是CommonComponentSample,和common_component_example.h中的定义要一致。
# Define all coms in DAG streaming.
    module_config {
    module_library : "/apollo/bazel-bin/cyber/examples/common_component_example/libcommon_component_example.so"
    components {
        class_name : "CommonComponentSample"
        config {
            name : "common"
            readers {
                channel: "/apollo/prediction"
            }
            readers {
                channel: "/apollo/test"
            }
        }
      }
    }
5. CyberRT编译
common_component_example.h中调用CYBER_REGISTER_COMPONENT(CommonComponentSample)注册component。
将宏CYBER_REGISTER_COMPONENT逐步展开后的代码如下,其中:
- 模板参数
Derived的值为CommonComponentSample,即本component对应的类名 - 模板参数
Base的值为apollo::cyber::ComponentBase,是CommonComponentSample的间接基类 UniqueID是一个唯一的整数,由编译期宏COUNTER实现
#define CLASS_LOADER_REGISTER_CLASS_INTERNAL(Derived, Base, UniqueID)     \
  namespace {                                                             \
  struct ProxyType##UniqueID {                                            \
    ProxyType##UniqueID() {                                               \
      apollo::cyber::class_loader::utility::RegisterClass<Derived, Base>( \
          #Derived, #Base);                                               \
    }                                                                     \
  };                                                                      \
  static ProxyType##UniqueID g_register_class_##UniqueID;                 \
  }
上面的宏定义了一个名为ProxyType##UniqueID的结构体,UniqueID保证了该结构体是全局唯一的,然后用这个结构体定义了一个静态全局变量(静态全局变量的妙用我们稍后再做介绍)。
6. CyberRT运行
运行期主要负责加载动态库libcommon_component_example.so,然后创建类CommonComponentSample的实例对象并初始化。
可执行程序mainboard通过dag文件加载对应的component,入口为cyber/mainboard/mainboard.cc中的main函数。类ModuleController负责加载动态库并初始化各component的实例。
函数ModuleController::LoadModule(const std::string& path)先将protocolbuffers文件common.dag序列化为DagConfig对象,然后调用ModuleController::LoadModule(const DagConfig& dag_config).
component的工作流程大致如下:
- 通过继承
cyber::Component,用户自定义一个模块,并且实现Init()和Proc()函数。编译生成.so文件。 - 通过classloader加载component模块到内存,创建component对象,调用
Initialize()初始化。(Initialize中会调用Init) - 创建协程任务,并且注册
Process()回调,当数据到来的时候,唤醒对象的协程任务执行Process()处理数据。(Process会调用Proc)
该函数主要部分解释如下:
bool ModuleController::LoadModule(const DagConfig& dag_config) {
  const std::string work_root = common::WorkRoot();

  for (auto module_config : dag_config.module_config()) {
    ...
    // 1. 加载动态库libcommon_component_example.so
    class_loader_manager_.LoadLibrary(load_path);

    // 2. 根据配置信息初始化各个component实例
    for (auto& component : module_config.components()) {
      const std::string& class_name = component.class_name();
      std::shared_ptr<ComponentBase> base =
          class_loader_manager_.CreateClassObj<ComponentBase>(class_name);
      if (base == nullptr || !base->Initialize(component.config())) {
        return false;
      }
      component_list_.emplace_back(std::move(base));
    }
    ...
  }

  return true;
}
整个操作流程可以看:Apollo Cyber RT学习日记。如果想要编译自己的protobuf库:第二章:Cyber RT通信机制解析与实践
7.参考连接
https://blog.csdn.net/briblue/article/details/123432580
https://zhuanlan.zhihu.com/p/397607823
https://blog.51cto.com/lovebetterworld/5451112
https://www.cxyzjd.com/article/qq_40254086/104356515#231DAG367

评论(0)
您还未登录,请登录后发表或查看评论